3. Basic Operation
3.1 The CVS User Interface
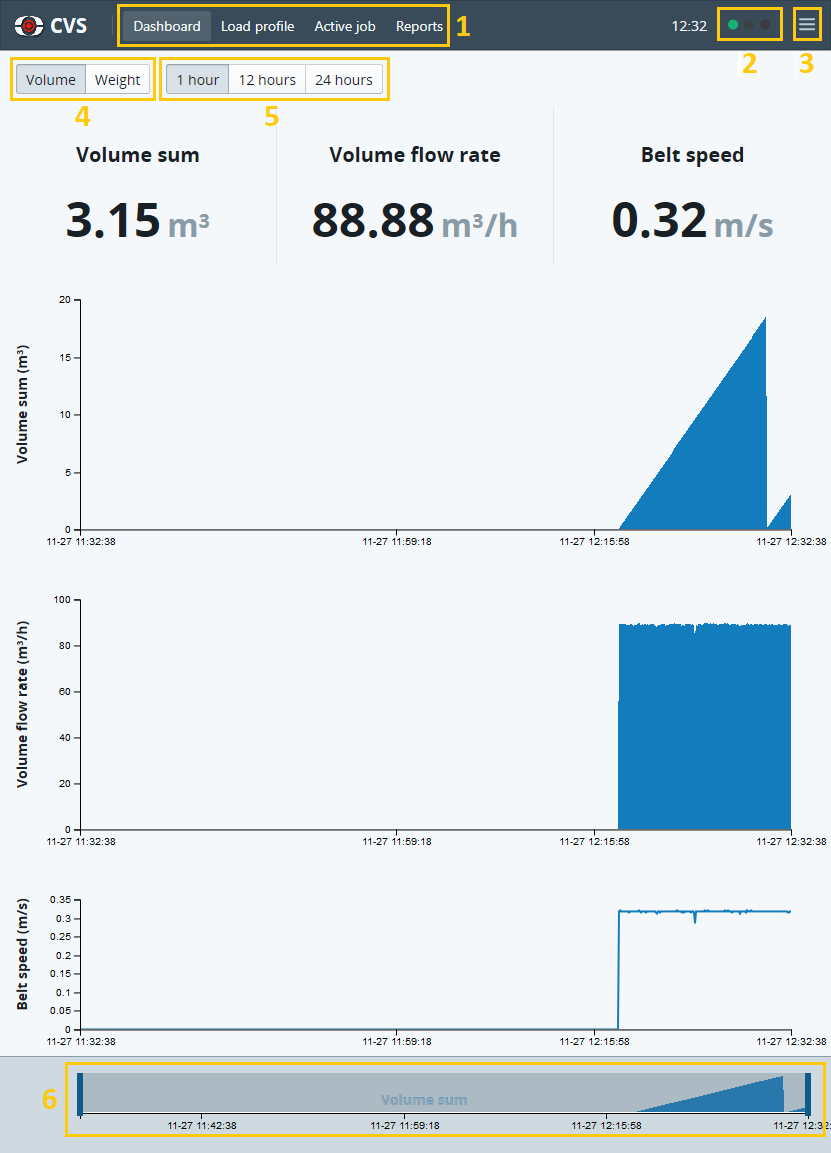
The CVS user interface is designed for use with any modern web-browser on desktop, tablet or mobile device. Menu buttons [1] in the header bar provide access to the primary user interface pages and additional functionality is available from the drop-down menu [3]. In mobile mode the menu buttons are incorporated into the drop-down menu.
3.1.1 Login levels
Select Login or Logout from the drop-down menu. Available logins are:
- user – allows full operation of the CVS, including jobs, materials and customer management and setting the zero profile but does not allow system configuration changes.
- admin – allows full operation of the CVS and access to system configuration settings.
The default password for both login levels is “loadscan”. Passwords can be changed from the Users section of System configuration (available on the drop-down menu when logged in as admin) and optionally the CVS can be set to log in automatically by setting the Default user level.
3.1.2 Dashboard
The Dashboard (see image above — 3.1 The CVS User Interface) is the default page. It provides an overview of current primary measurements and plots of recent measurement history over selectable 1, 12 or 24-hour periods [5]. The default period is 1-hour. A slider bar at the bottom of the page [6] allows plots to be zoomed and panned within the selected period and additional information can be viewed by tapping/hovering over the plots.
3.1.3 Load Profile
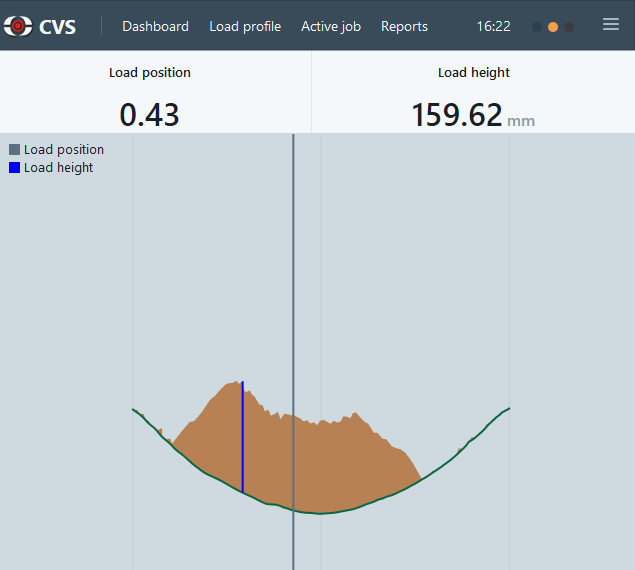 The Load profile page provides a real-time graphical representation of the load cross-section on the belt and load profile measurements, including load height and load position. These are live measurements for monitoring purposes only and are not recorded.
3.1.4 Status indicators
Green, amber and red status lights on the header bar [2] indicate the system status. Click on the status lights for more detailed information and any active warning or error messages. The following are reported:
- Idle: measurement mode is operational, but no job is active (unassigned measurement only).
- Job active: a job is running.
- Job target reached: target volume/weight for active job has been reached and job is still running.
- Black belt: belt is running (belt speed greater than zero) but there is no material on the belt.
- Belt stopped: belt speed is zero.
- Learn mode: system is in zero profile learn mode (measurement stopped).
- Warning: non-fatal error condition requiring operator intervention is active.
- Error: a fatal error condition requiring operator intervention is active (measurement stopped).
3.1.5 Switching between volume and weight modes
When the system is in volume mode, current and historical measurement data is displayed in the configured volume units. When the system is in weight mode, current and historical measurement data is displayed in the configured mass units. Volume and Weight buttons [4] appear on the Dashboard, Active job and Jobs pages to toggle between display modes. Material density values need to be specified for weight measurement mode (see 3.5 Measurement Calibration).
3.2 Setting the Zero Profile
The Zero Profile is the cross-section profile of the empty belt. This must be learned by the CVS before measurement can occur and must be updated whenever the belt profile changes or shifts significantly.
Follow the steps below to update the zero profile:
- Login to the CVS as admin.
- Make sure the belt is running (at typical speed) and completely empty and clean.
- Open the Belt profile page. This page displays a view of the current zero profile and the live measured scan profile.
- Push the Configure zero profile button. The zero profile will change from green to red and start updating with the live profile.
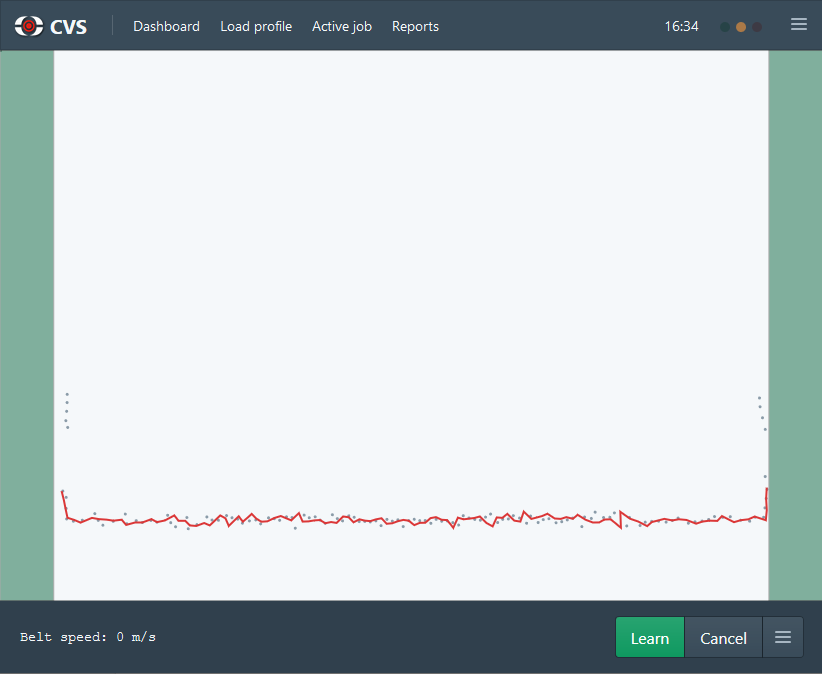
- Move the left and right slider bars so that only the desired measurement range is visible between them. This range should extend from the left edge of the belt to the right edge of the belt or to the extremes of possible load on the belt.
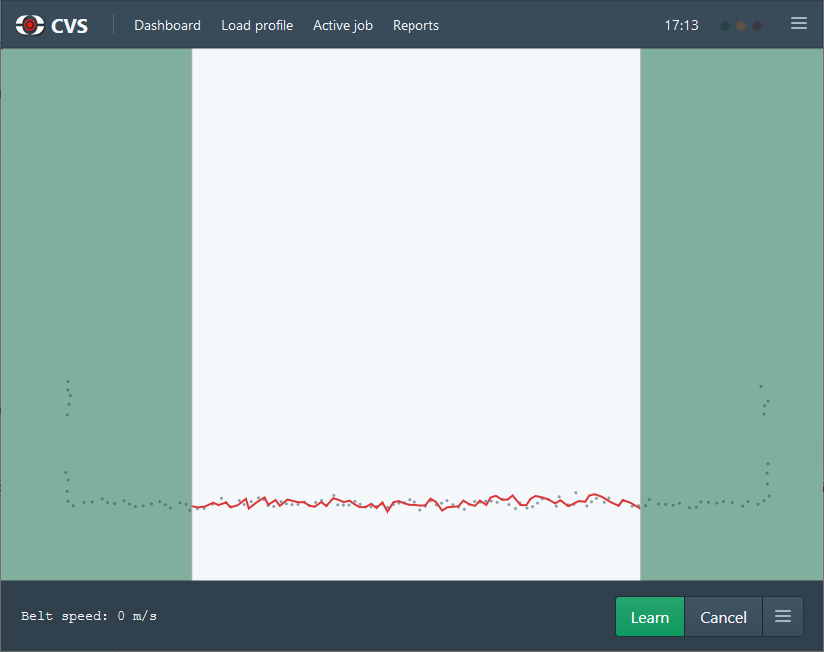
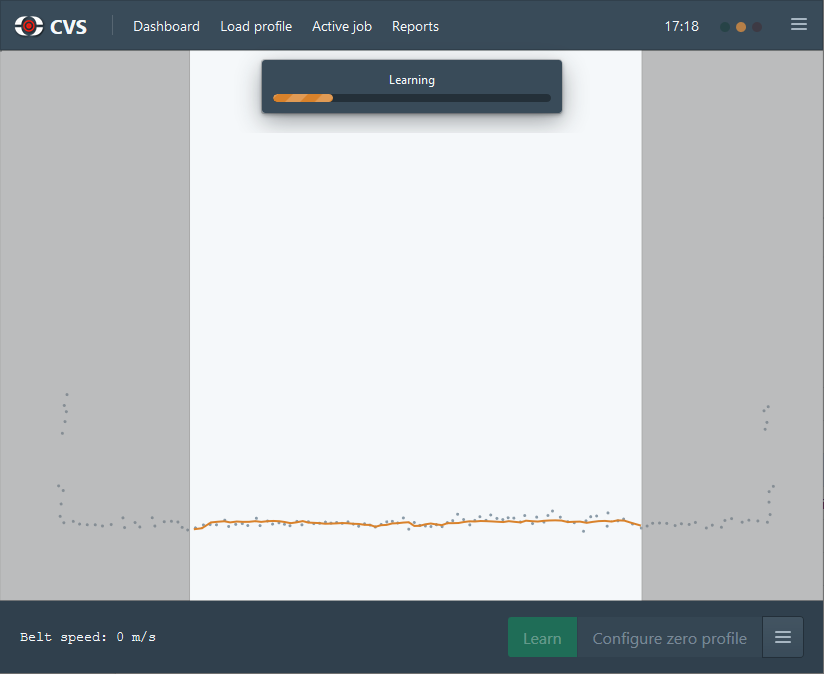
- Push the Learn button. The zero profile will change from red to orange and start learning the new zero profile. This will take about 30 seconds.
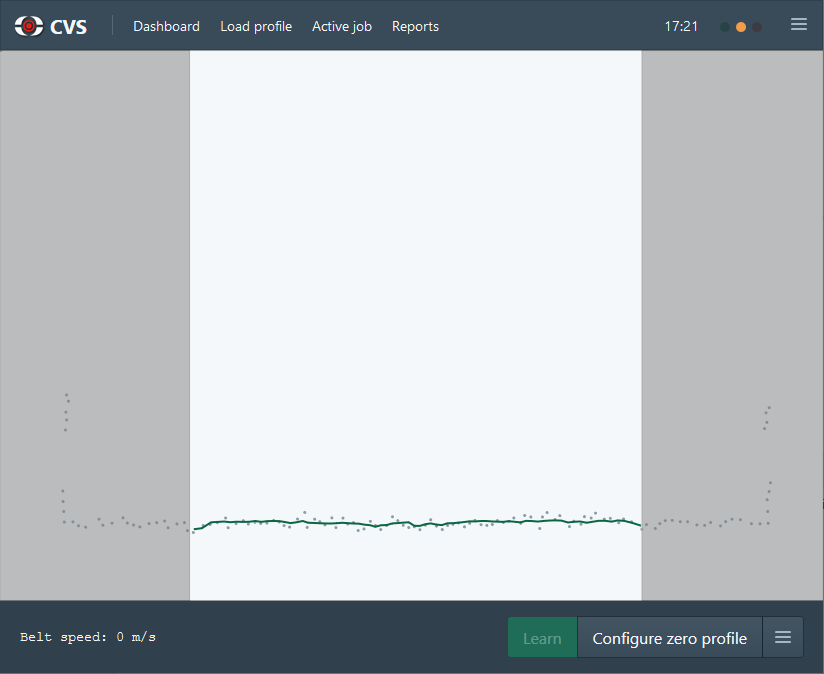
- The new zero profile will display in green and idle measurement mode will re-start automatically.
3.3 Measuring with Jobs
A job can be created for each batch of product run over the belt and a material and customer associated with the job.
3.3.1 Create a new job
Follow the steps below to create a new job.
- Open the Active Job page.
- Push the [+] button next to the job selector to open the Create New Job dialog.
- Enter a unique name for the job in the Name field.
- Optionally enter a description for the job in the Description field.
- If you do not want to use the default material, then change the Material selection.
- Optionally select a Customer for the job.
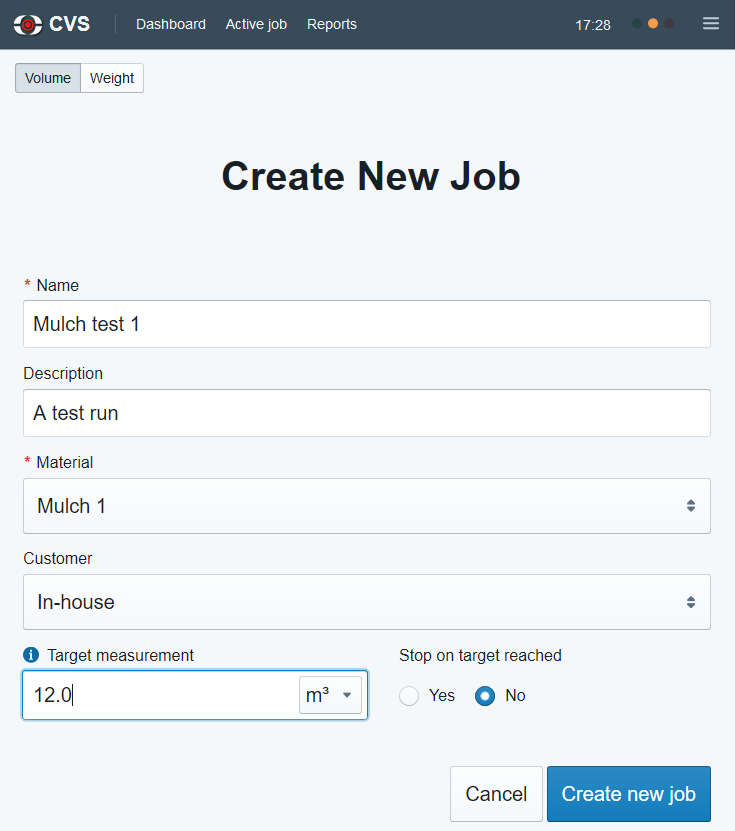
- Optionally select a target volume or weight for the job in the Target measurement field. Select the desired units for this value. If you want the job to stop automatically when the target is reached, set Stop on target reached to Yes.
- Push the Create new job button to create the job.
Notes
- Materials can be managed from the Materials page and the default material set in the General section of System configuration (admin login required).
- Customers can be managed from the Customers page (admin login required).
- If a job is set to stop on target reached, this will automatically stop the job running on the CVS but will not stop material running over the conveyor belt. If you want to start and stop the belt automatically when jobs are run or turn on a ‘target reached’ indicator/alarm, this can be achieved by assigning system status signals to digital switching outputs that are wired to control external signals (optional CVS-I/O box required) or Modbus TCP outputs that are polled by external control systems. See 2.4.2 Assign status signals to outputs for available system status signals and configuration details.
3.3.2 Run a job
Follow the steps below to run a job.
- Open the Active Job page.
- Select the job to run in the job selector. Only jobs that have not yet run and jobs that have been reset or resumed are displayed on the list. Once selected, the job details will be loaded.
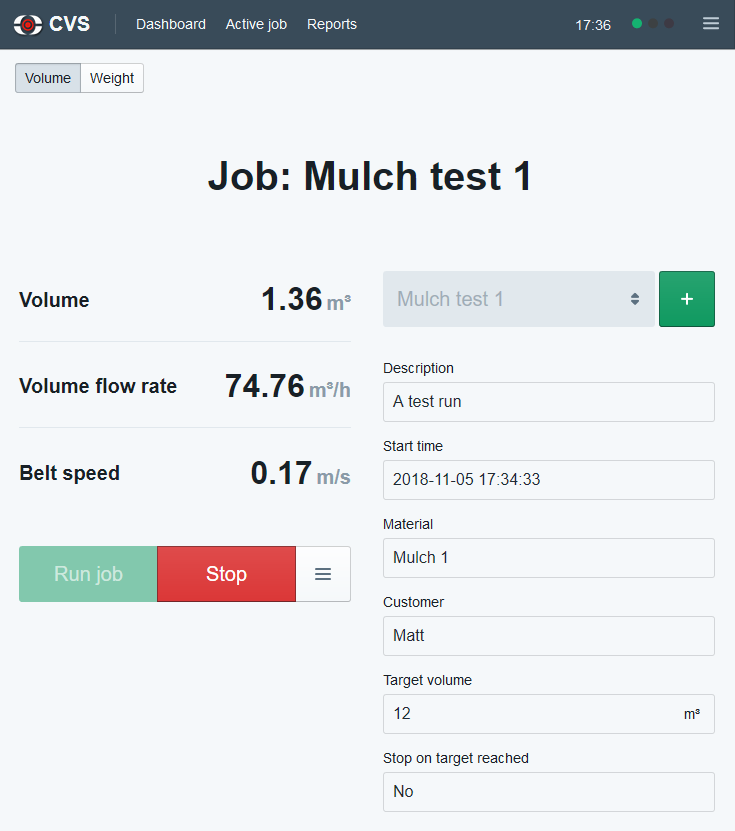
- Push the Run job button to start the job.
- If Stop on target reached has been set, then the job will stop automatically when the target measurement is reached. Otherwise, push the Stop button when the job is complete. When a job is stopped, a summary report is displayed, and the CVS returns to idle measurement state.
3.3.3 Resume a job
A job that was previously run can be resumed and run again, and new measurement added to the previous total. When a resumed job is run again, the measurement totals on the Dashboard and Active job pages start at zero again. When the job is stopped, the total is added to the previously recorded total. The new total appears on the job summary report and any historical job reports. A job can be resumed from the Jobs page. Once a job has been resumed, it will re-appear on the job selection list on the Active Job page.
3.3.4 Reset a job
Reset allows the job to run again and resets the total to zero. A job can be reset from the Jobs page. Once a job has been reset, it appears on the job selection list on the Active Job page.
3.3.5 Manage jobs
To view job details and perform job management such as creating multiple new jobs or editing a job, open the Jobs page. It is possible to re-name a job, edit the description and change the material and customer, even if the job has already been run.
Note that changing the material will affect reported measurements for the job.
3.4 Measuring without Jobs
The CVS records measurement data in idle state even if no job is active. If the same material is always run over the belt and it is not necessary to record specific customers, job details or target measurements, then the CVS can be used without jobs for simple production monitoring.
3.4.1 Reset volume/weight total
When measuring in idle state, the cumulative total volume/weight increases until idle state is exited, or the total is manually reset. To manually reset the total to zero, push the Reset button on the Dashboard. This button is only available when idle measurement state is active.
3.4.2 Unassigned jobs
Every time the CVS enters idle state the volume/weight total is reset to zero, a new ‘unassigned job’ with an automatically generated name is created and any measurement data is logged against this job. The default material is used for unassigned jobs and no customer is assigned. An unassigned job continues until idle measurement state is exited, such as when a user-defined job is started, or the CVS is powered-down.
Notes
- Idle state measurement logged against unassigned jobs always shows on measurement history plots and downloaded period data, but unassigned jobs are not included in job charts or tables by default (see 3.6 Reporting).
- Materials can be managed from the Materials page and the default material set in the General section of System configuration (admin login required).
3.4.3 Claim an unassigned job
An unassigned job can be claimed as a standard job so that it appears on job reports, can be resumed, reset and so on. Follow the steps below to claim an unassigned job.
- Open the Jobs page.
- Push the Show unassigned button to show unassigned jobs in the jobs table
- Identify the unassigned job by the job start time.
- Select the unassigned job to open the job editing page.
- Enter a suitable Name for the job and set the Description, Material and Customer as desired. Note that changing the material will affect reported measurements for the job.
- Click the Update job button to save the changes. This job will now be reported as a standard job.
3.5 Measurement Calibration
The CVS measures the volume created by the visible surface of the loose bulk material as it sits on the belt. The level of compression of the material under its own weight (compaction of lower layers) may differ significantly on the belt and in the output stockpile, bin, or destination environment. This may result in a reproduceable difference between the volume measured on the belt and volume of the same material in a bin or stockpile. This also affects the material density used for reporting weight measurement.
To correct this systematic measurement error, each material has a specified volume correction factor and the measured volume reported by the CVS is a ‘corrected volume’, where:
Corrected volume = raw volume x volume correction factor
Each material also has a specified density value. This value is the mass-to-volume ratio of the material, where volume is the corrected volume. The measured weight reported by the CVS is:
Weight = corrected volume x density
3.5.1 Perform test measurements
It is suggested to perform several test measurements for each material, to determine the necessary calibration factors. A large rectangular bin or truck body with even sides should be used to create a test sample of known volume and weight. Follow the steps below to perform a test measurement.
- Accurately measure the internal dimensions of the bin to get average values for length (L), width (W) and depth (D).
- Calculate the volume capacity of the bin as V1 = L x W x D
- If you wish to use the CVS in weight measurement mode, then measure and record the empty weight of the bin as W1.
- Create a job for the test measurement and select the correct material. Ensure that the volume correction factor and density for the material are at default values of 1.
- Run the job and begin feeding the conveyor output into the test bin.
- When the bin is close to full, level the load across the top of the bin so that the bin in filled to level across the entire top surface. Do not stand on or compress the material.
- Stop the job and record the raw measured volume as V2.
- If required, measure and record the loaded weight of the bin as W2.
- Compute the volume correction factor and density for the material as below:
Volume correction factor = V1/V2
Density = (W2-W1)/V1
Notes
- At least three test measurements should be performed for each product to get suitable averages.
- Material calibration factors can be edited by selecting the material on the Materials page. Density must be computed and entered in the specified units (based on the configured weight and volume units).
- The same material may have different properties depending on time of year/moisture content. In this case it is suggested to create multiple versions of the same material. For example, ‘summer’ and ‘winter’ or ‘wet’ and ‘dry’ variants with different calibration factors.
- Editing calibration factors will not affect reported measurements for completed jobs.
3.6 Reporting
The CVS can display job summary information and plot measured parameters for a selected time period. Job details and logged measurement data for the period can also be downloaded in CSV file format for export to other applications such as Microsoft® Excel.
3.6.1 Generate a period report
Follow the steps below to generate a period report.
- Open the Reports page.
- Select one or more Report metrics to include in the output.
- Select Job types to include. Unassigned jobs recorded in idle measurement mode are always included in history plot data and downloaded period data but not in job charts or tables by default.
- Enter Start time and End time for the desired report period.
- Push the Generate Report button.
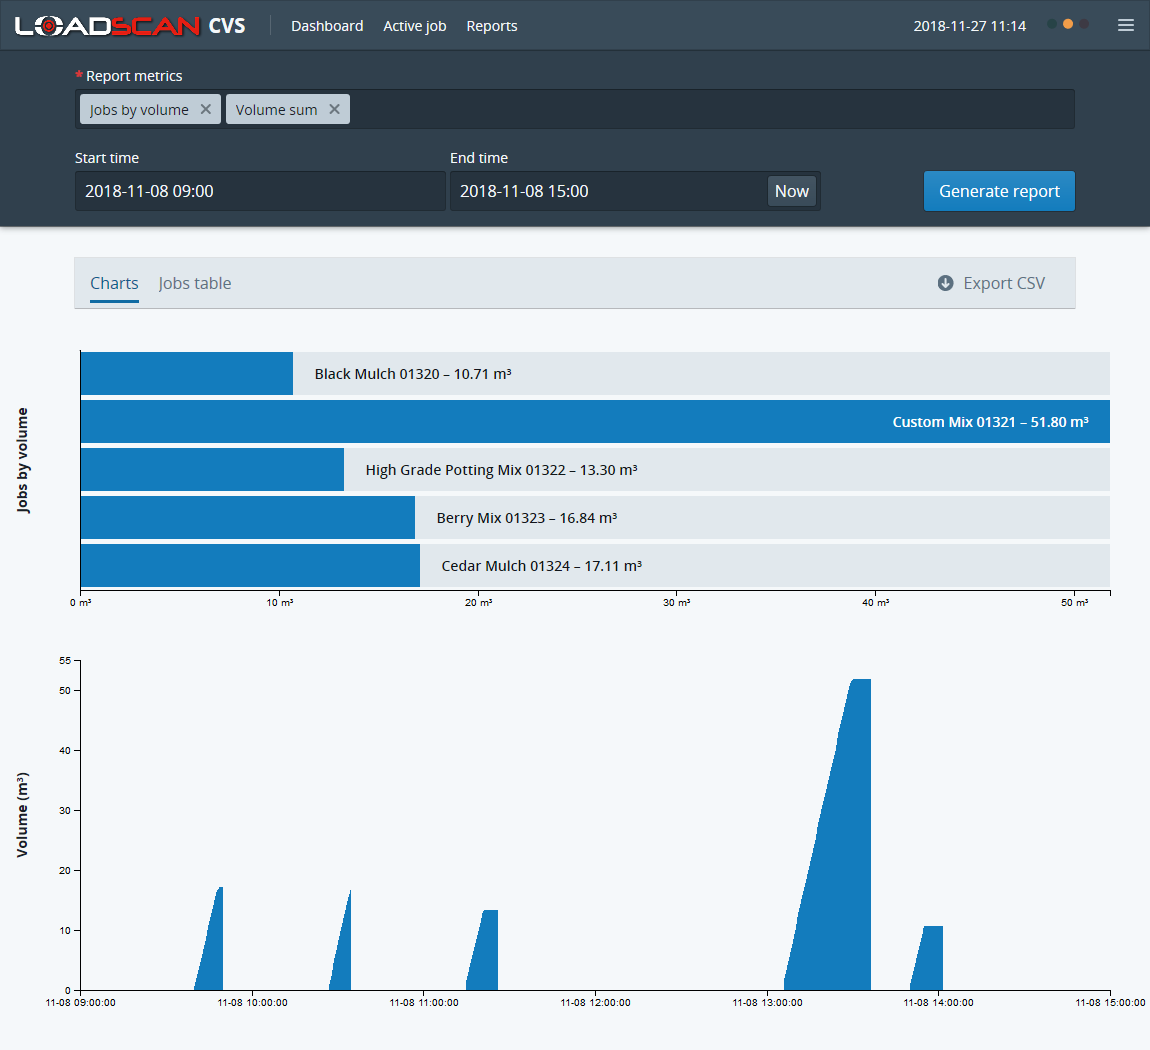
The selected metrics will display as charts in the Charts tab. Additional information can be viewed by tapping/hovering over the charts. If jobs report(s) have been included, then job details will be available in table form in a Jobs table tab. The raw logged job information and measurement data for the period can be downloaded in CSV text-file format by clicking on the Export CSV download icon.
Notes
- All jobs that were run fully or partly within the selected time period will be included in job reports.
- Report plots are based on logged measurement data. Periodic measurement records are logged once per minute when the belt is running, and the volume/weight total is not zero. Additional records are logged for specific events. Profile measurements (load height and load position) are not logged and do not appear in reports. Downloaded CVS files include all logged measurement records.
- Logged data is retained on the system for a period of at least two years.
In this Article
3. Basic Operation
3.1 The CVS User Interface
The CVS user interface is designed for use with any modern web-browser on desktop, tablet or mobile device. Menu buttons [1] in the header bar provide access to the primary user interface pages and additional functionality is available from the drop-down menu [3]. In mobile mode the menu buttons are incorporated into the drop-down menu.

3.1.1 Login levels
Select Login or Logout from the drop-down menu. Available logins are:
- user – allows full operation of the CVS, including jobs, materials and customer management and setting the zero profile but does not allow system configuration changes.
- admin – allows full operation of the CVS and access to system configuration settings.
The default password for both login levels is “loadscan”. Passwords can be changed from the Users section of System configuration (available on the drop-down menu when logged in as admin) and optionally the CVS can be set to log in automatically by setting the Default user level.
3.1.2 Dashboard
The Dashboard (see image above — 3.1 The CVS User Interface) is the default page. It provides an overview of current primary measurements and plots of recent measurement history over selectable 1, 12 or 24-hour periods [5]. The default period is 1-hour. A slider bar at the bottom of the page [6] allows plots to be zoomed and panned within the selected period and additional information can be viewed by tapping/hovering over the plots.
3.1.3 Load Profile
 The Load profile page provides a real-time graphical representation of the load cross-section on the belt and load profile measurements, including load height and load position. These are live measurements for monitoring purposes only and are not recorded.
3.1.4 Status indicators
Green, amber and red status lights on the header bar [2] indicate the system status. Click on the status lights for more detailed information and any active warning or error messages. The following are reported:
- Idle: measurement mode is operational, but no job is active (unassigned measurement only).
- Job active: a job is running.
- Job target reached: target volume/weight for active job has been reached and job is still running.
- Black belt: belt is running (belt speed greater than zero) but there is no material on the belt.
- Belt stopped: belt speed is zero.
- Learn mode: system is in zero profile learn mode (measurement stopped).
- Warning: non-fatal error condition requiring operator intervention is active.
- Error: a fatal error condition requiring operator intervention is active (measurement stopped).
3.1.5 Switching between volume and weight modes
When the system is in volume mode, current and historical measurement data is displayed in the configured volume units. When the system is in weight mode, current and historical measurement data is displayed in the configured mass units. Volume and Weight buttons [4] appear on the Dashboard, Active job and Jobs pages to toggle between display modes. Material density values need to be specified for weight measurement mode (see 3.5 Measurement Calibration).
3.2 Setting the Zero Profile
The Zero Profile is the cross-section profile of the empty belt. This must be learned by the CVS before measurement can occur and must be updated whenever the belt profile changes or shifts significantly.
Follow the steps below to update the zero profile:
- Login to the CVS as admin.
- Make sure the belt is running (at typical speed) and completely empty and clean.
- Open the Belt profile page. This page displays a view of the current zero profile and the live measured scan profile.
- Push the Configure zero profile button. The zero profile will change from green to red and start updating with the live profile.

- Move the left and right slider bars so that only the desired measurement range is visible between them. This range should extend from the left edge of the belt to the right edge of the belt or to the extremes of possible load on the belt.

- Push the Learn button. The zero profile will change from red to orange and start learning the new zero profile. This will take about 30 seconds.

- The new zero profile will display in green and idle measurement mode will re-start automatically.

3.3 Measuring with Jobs
A job can be created for each batch of product run over the belt and a material and customer associated with the job.
3.3.1 Create a new job
Follow the steps below to create a new job.
- Open the Active Job page.
- Push the [+] button next to the job selector to open the Create New Job dialog.
- Enter a unique name for the job in the Name field.
- Optionally enter a description for the job in the Description field.
- If you do not want to use the default material, then change the Material selection.
- Optionally select a Customer for the job.
- Optionally select a target volume or weight for the job in the Target measurement field. Select the desired units for this value. If you want the job to stop automatically when the target is reached, set Stop on target reached to Yes.
- Push the Create new job button to create the job.

Notes
- Materials can be managed from the Materials page and the default material set in the General section of System configuration (admin login required).
- Customers can be managed from the Customers page (admin login required).
- If a job is set to stop on target reached, this will automatically stop the job running on the CVS but will not stop material running over the conveyor belt. If you want to start and stop the belt automatically when jobs are run or turn on a ‘target reached’ indicator/alarm, this can be achieved by assigning system status signals to digital switching outputs that are wired to control external signals (optional CVS-I/O box required) or Modbus TCP outputs that are polled by external control systems. See 2.4.2 Assign status signals to outputs for available system status signals and configuration details.
3.3.2 Run a job
Follow the steps below to run a job.
- Open the Active Job page.
- Select the job to run in the job selector. Only jobs that have not yet run and jobs that have been reset or resumed are displayed on the list. Once selected, the job details will be loaded.
- Push the Run job button to start the job.
- If Stop on target reached has been set, then the job will stop automatically when the target measurement is reached. Otherwise, push the Stop button when the job is complete. When a job is stopped, a summary report is displayed, and the CVS returns to idle measurement state.

3.3.3 Resume a job
A job that was previously run can be resumed and run again, and new measurement added to the previous total. When a resumed job is run again, the measurement totals on the Dashboard and Active job pages start at zero again. When the job is stopped, the total is added to the previously recorded total. The new total appears on the job summary report and any historical job reports. A job can be resumed from the Jobs page. Once a job has been resumed, it will re-appear on the job selection list on the Active Job page.
3.3.4 Reset a job
Reset allows the job to run again and resets the total to zero. A job can be reset from the Jobs page. Once a job has been reset, it appears on the job selection list on the Active Job page.
3.3.5 Manage jobs
To view job details and perform job management such as creating multiple new jobs or editing a job, open the Jobs page. It is possible to re-name a job, edit the description and change the material and customer, even if the job has already been run.
Note that changing the material will affect reported measurements for the job.
3.4 Measuring without Jobs
The CVS records measurement data in idle state even if no job is active. If the same material is always run over the belt and it is not necessary to record specific customers, job details or target measurements, then the CVS can be used without jobs for simple production monitoring.
3.4.1 Reset volume/weight total
When measuring in idle state, the cumulative total volume/weight increases until idle state is exited, or the total is manually reset. To manually reset the total to zero, push the Reset button on the Dashboard. This button is only available when idle measurement state is active.
3.4.2 Unassigned jobs
Every time the CVS enters idle state the volume/weight total is reset to zero, a new ‘unassigned job’ with an automatically generated name is created and any measurement data is logged against this job. The default material is used for unassigned jobs and no customer is assigned. An unassigned job continues until idle measurement state is exited, such as when a user-defined job is started, or the CVS is powered-down.
Notes
- Idle state measurement logged against unassigned jobs always shows on measurement history plots and downloaded period data, but unassigned jobs are not included in job charts or tables by default (see 3.6 Reporting).
- Materials can be managed from the Materials page and the default material set in the General section of System configuration (admin login required).
3.4.3 Claim an unassigned job
An unassigned job can be claimed as a standard job so that it appears on job reports, can be resumed, reset and so on. Follow the steps below to claim an unassigned job.
- Open the Jobs page.
- Push the Show unassigned button to show unassigned jobs in the jobs table
- Identify the unassigned job by the job start time.
- Select the unassigned job to open the job editing page.
- Enter a suitable Name for the job and set the Description, Material and Customer as desired. Note that changing the material will affect reported measurements for the job.
- Click the Update job button to save the changes. This job will now be reported as a standard job.
3.5 Measurement Calibration
The CVS measures the volume created by the visible surface of the loose bulk material as it sits on the belt. The level of compression of the material under its own weight (compaction of lower layers) may differ significantly on the belt and in the output stockpile, bin, or destination environment. This may result in a reproduceable difference between the volume measured on the belt and volume of the same material in a bin or stockpile. This also affects the material density used for reporting weight measurement.
To correct this systematic measurement error, each material has a specified volume correction factor and the measured volume reported by the CVS is a ‘corrected volume’, where:
Corrected volume = raw volume x volume correction factor
Each material also has a specified density value. This value is the mass-to-volume ratio of the material, where volume is the corrected volume. The measured weight reported by the CVS is:
Weight = corrected volume x density
3.5.1 Perform test measurements
It is suggested to perform several test measurements for each material, to determine the necessary calibration factors. A large rectangular bin or truck body with even sides should be used to create a test sample of known volume and weight. Follow the steps below to perform a test measurement.
- Accurately measure the internal dimensions of the bin to get average values for length (L), width (W) and depth (D).
- Calculate the volume capacity of the bin as V1 = L x W x D
- If you wish to use the CVS in weight measurement mode, then measure and record the empty weight of the bin as W1.
- Create a job for the test measurement and select the correct material. Ensure that the volume correction factor and density for the material are at default values of 1.
- Run the job and begin feeding the conveyor output into the test bin.
- When the bin is close to full, level the load across the top of the bin so that the bin in filled to level across the entire top surface. Do not stand on or compress the material.
- Stop the job and record the raw measured volume as V2.
- If required, measure and record the loaded weight of the bin as W2.
- Compute the volume correction factor and density for the material as below:
Volume correction factor = V1/V2
Density = (W2-W1)/V1
Notes
- At least three test measurements should be performed for each product to get suitable averages.
- Material calibration factors can be edited by selecting the material on the Materials page. Density must be computed and entered in the specified units (based on the configured weight and volume units).
- The same material may have different properties depending on time of year/moisture content. In this case it is suggested to create multiple versions of the same material. For example, ‘summer’ and ‘winter’ or ‘wet’ and ‘dry’ variants with different calibration factors.
- Editing calibration factors will not affect reported measurements for completed jobs.
3.6 Reporting
The CVS can display job summary information and plot measured parameters for a selected time period. Job details and logged measurement data for the period can also be downloaded in CSV file format for export to other applications such as Microsoft® Excel.
3.6.1 Generate a period report
Follow the steps below to generate a period report.
- Open the Reports page.
- Select one or more Report metrics to include in the output.
- Select Job types to include. Unassigned jobs recorded in idle measurement mode are always included in history plot data and downloaded period data but not in job charts or tables by default.
- Enter Start time and End time for the desired report period.
- Push the Generate Report button.
The selected metrics will display as charts in the Charts tab. Additional information can be viewed by tapping/hovering over the charts. If jobs report(s) have been included, then job details will be available in table form in a Jobs table tab. The raw logged job information and measurement data for the period can be downloaded in CSV text-file format by clicking on the Export CSV download icon.

Notes
- All jobs that were run fully or partly within the selected time period will be included in job reports.
- Report plots are based on logged measurement data. Periodic measurement records are logged once per minute when the belt is running, and the volume/weight total is not zero. Additional records are logged for specific events. Profile measurements (load height and load position) are not logged and do not appear in reports. Downloaded CVS files include all logged measurement records.
- Logged data is retained on the system for a period of at least two years.
