This section describes basic operation of the LVS after installation and commissioning.
Starting up and shutting down
Use the power isolator switch on the front of the power box to power on the LVS.
After initialisation sequence the operator console and message board will display ‘READY TO SCAN’ if no problems are detected.
To shut the system down, wait until the system is idle before turning off power with the power isolator switch.
If checks fail, a ‘SYSTEM SETUP REQUIRED’ message will be generated and the scan head alignment procedure must be carried out. (See Appendix 2 – Scan head installation and alignment.)
The main screen
The operator console Main screen (figure 2) displays:
- load details for the most recent measurement
- status messages
- buttons for accessing other screens.
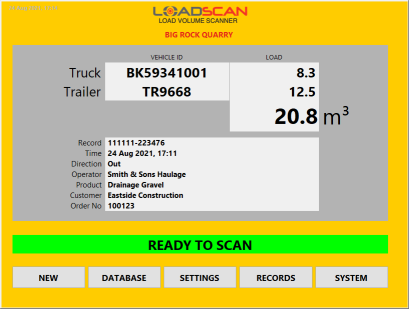
Figure 2 – operator console Main screen
All other screens can be password protected. The default for all passwords is ‘TALLY’. See Password settings to change password options.
A ‘READY TO SCAN’ message indicates the system is operational and ready to start a scan.
Ensure this message is displayed and the scan area is clear of obstacles after power-up and initialisation.
If the message reads ‘SYSTEM SETUP REQUIRED’ and the scan area is clear, the system has detected that the scan head alignment is out and must be re-aligned. (See Appendix 2 – Scan head installation and alignment.)
Status messages change to show the current system status.
On-screen prompts request manual input of vehicle/bin IDs or other information as required.
Status messages are also reported on the message board. For a list of status messages, see Appendix 3 – Status messages and error codes.
General scan procedure
The general procedure for scanning any vehicle combination is:
- Wait for ‘READY TO SCAN’ message on message board.
- Approach scanner slowly and stop vehicle clear of scan head.
Covers must be fully stowed during scanning
- Wait for ‘PROCEED’ message on message board.
- Proceed at a SLOW, STEADY speed (walking pace) through the scan area.
- Stop clear of scan head when message changes to ‘WAIT FOR RESULT’.
- Enter details at operator console if prompted on message board/console screen.Scanning starts and stops automatically when the target vehicle crosses the scan area.
If the vehicle is empty and has not already been scanned into the vehicle database, the vehicle details need to be entered at the operator console before scanning. (See Scan a new vehicle into the database.)
If the vehicle is loaded, scan as above and then enter bin IDs and load details as requested to complete the measurement. (See Scan a load.)
Scan a new vehicle into the database
Normally a truck/trailer is scanned empty and recorded as a reference scan in the vehicle database before being scanned with a load.
On subsequent visits, the loaded vehicle is scanned and load volume computed by comparing the new scan with the reference scan.
To create a new reference scan:
- Ensure the vehicle is unloaded.
All truck and trailer bins must be completely empty and covers fully stowed.
- Push the NEW button on the Main screen or on the Database screen (not available if system is not ready to scan) to open the New Vehicle dialog (figure 3).
- Select the Type of vehicle to scan:
- 1 BIN – TRUCK/DUMPER/SEMI-TRAILER: scan target has only one load carrying bin (e.g., rigid body truck, semi-trailer or tractor-trailer).
- 2 BINS – TRUCK AND TRAILER (TANDEM/DOUBLE): scan target has two load carrying bins (e.g., truck and trailer/double/tandem combination).
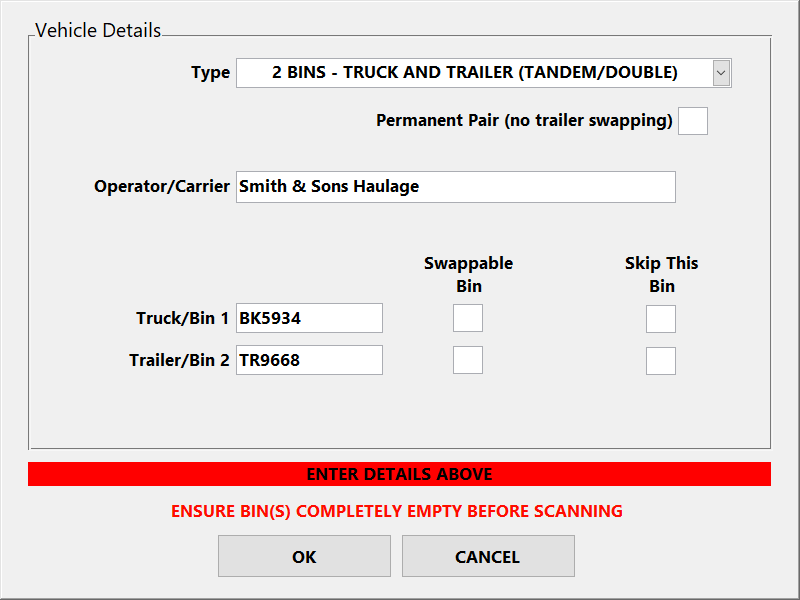
Figure 3 – operator console New Vehicle dialog
- Enter the name of the vehicle operator (owner/company) in the Operator/Carrier
- For each bin, enter the vehicle license plate number or unique identifier corresponding to that bin.
- For semi-trailers where the trailer has a different identifier than the tractor unit and can be swapped with a different one, use the trailer identifier.
- Select the Swappable Bin option if a bin is removable from the truck/trailer body carrying it and can be swapped with other bins or swapped between first and second positions on a 2-bin combination vehicle. In this case, enter a unique ID that identifies the bin not the carrying vehicle. Swappable bins appear on both the truck (bin 1) and trailer (bin 2) selection lists in manual ID prompts after scanning.
- Select the Skip This Bin option if the corresponding bin does not need to be entered into the vehicle database – for example, when the bin is already in the database and does not need to be updated or is currently loaded or covered.
- If the 2-bin type has been selected, the Permanent Pair option is available. (See Link truck and trailer as a permanent pair for details.)
- If ID tags are being used, fit these before scanning the vehicle. (See Automatic vehicle identification)
- Push the OK button and follow the General scan procedure above.
When the scan completes successfully, the dialog closes and the message board briefly displays SCAN OK.
If the new vehicle scan was initiated from the Main screen, the system returns to the Main screen with READY TO SCAN status.
Vehicle records can be reviewed in the Database screen. (See Vehicle database management.)
Reference scans expire after 6-12 months (depending on regional/legal settings) and must be updated. (See Updating reference scans.)
If any structural changes are made, or a cover/tarpaulin is added/removed, the reference scan for the affected bin must be updated immediately.
Scan a load
Scan
- Scan the loaded vehicle (as per the General scan procedure above).
Identify vehicle
- When the scan is complete, identify the vehicle. Each bin (truck, trailer) is identified separately. If registered ID tags are fitted to the vehicle, identification is automatic. (See Automatic vehicle identification below.)If no tags are fitted or a tag cannot be read, enter manually. The operator console prompts for manual ID entry (figure 4).Vehicles (bins) in the database can be selected from the displayed list. Keying the first letter(s) of the ID auto-scrolls the list to the closest match for quick selection.
- Select the bin ID and press the Enter key [ ] to confirm. If a trailer (second bin) is present, its ID will be requested with a second prompt. The LVS searches for the identified vehicles(s) in the database. If found, the load volume is computed.
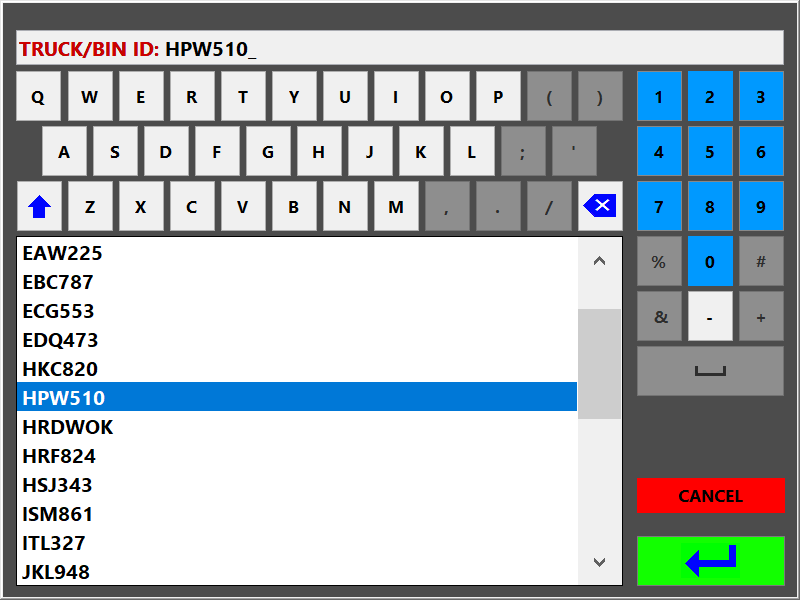
Figure 4 – operator console ID prompt
- If the vehicle is not found, the operator console prompts with 2-SCAN and RE-ENTER options:
— In the case of mis-keyed entry, select RE-ENTER.
— If the vehicle is not in the database, select 2-SCAN to complete the measurement in 2-Scan mode. This requires a second scan of the empty bin(s) after the vehicle has been unloaded. (See 2-Scan measurements below.)
Enter load details
- If additional prompts for load details have been configured, the operator console also prompts for information about the measured load (figure 5).
User-defined load details such as product type, customer or order number can be collected at this stage. (See Configuring load detail prompts.)
After a load has been scanned and all prompts completed, a load report displays on the operator console screen and on the message board.
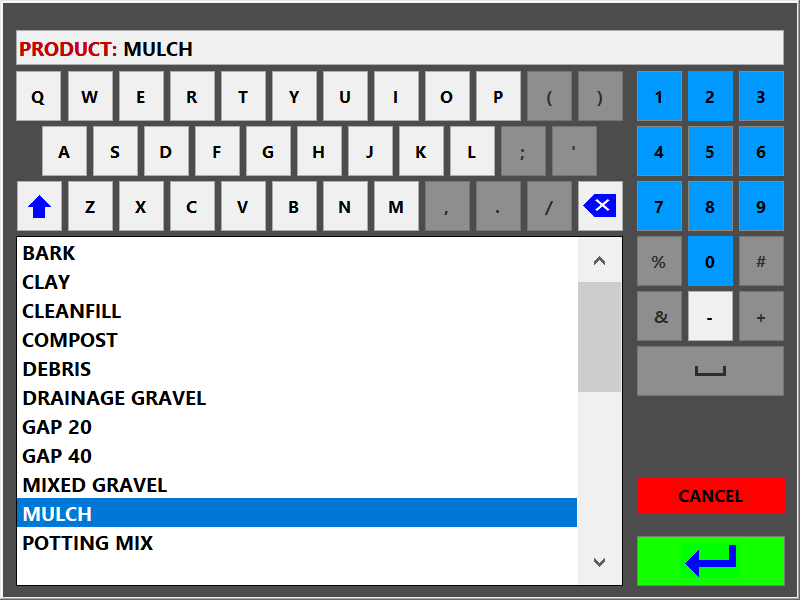
Figure 5 – operator console load detail prompt
The load details are also logged to file and a ticket may be printed, depending on configuration. (See User configuration options.)
Scanning options for a 2-bin vehicle
For a loaded 2-bin combination vehicle where only one of the two bins is in the database or one of the bins is covered and should not be measured:
- If both bins must be measured, do a 2-Scan measurement. (See 2-Scan measurements below.)
- If one bin can be skipped (no measurement required) then do a ‘truck only’ or ‘trailer only’ measurement by cancelling the ID prompt for the bin to be skipped. In this case, load details (on the load report, printed ticket and so on) are blank for the cancelled bin.
2-Scan measurements
It is possible to measure a load on a vehicle that has not previously been scanned empty.
In this case, the truck or truck and trailer combination is scanned one time loaded and then again when empty. The load is computed as the difference between the two scans.
The advantage of 2-Scan measurement is that there is no need to first create a reference scan. The disadvantage is that two scans are required for every measurement.
This mode should normally only be used for the first load on a truck that is new to the site. The vehicle should be entered into the database as a reference scan immediately after completion of the 2-Scan measurement.
However, it may sometimes be desirable to perform 2-Scan measurements for all loads:
- Trucks arrive on site loaded and each truck visits the site a very limited number of times. In such case it may not be worthwhile performing controlled empty scans.
- It is desirable to measure the carry-back (load material stuck in bin after off-loading) for every load and report the net volume as the measured load volume (the difference between the carry-back volume and the fully loaded gross volume).
2-Scan first scan procedure
- For the first scan (1 of 2), scan of the vehicle as per General scan procedure above.
- Enter an ID to identify the vehicle when the ID Prompt displays.For a 2-bin truck and trailer combination, only one ID needs to be entered.The operator console will prompt with a message stating that the ID cannot be found in the database, with 2-SCAN and RE-ENTER options (figure 6).
- Select 2-SCAN to start a new 2-Scan measurement.

Figure 6 – operator console 2-Scan mode prompt
2-Scan second scan procedure
- For the second scan (2 of 2), scan the vehicle.
- Select the previously entered ID from the ID prompt list.
The load computation and processing will then proceed as normal.
Load details can be requested on either the first or the second scan in 2-Scan mode and 2-Scan measurements can be disabled. (See 2-Scan measurement settings.)
The first scan of a 2-Scan measurement is only valid for 6 hours. After this, it is not possible to complete the 2-Scan measurement.
Within 10 minutes after the second scan, it is possible to repeat the second scan if a re-measurement is desired. In this case the new measurement will be marked as a REPEAT SCAN.
Create a reference scan after a 2-Scan measurement
The second scan of a 2-Scan measurement can optionally be converted into a reference scan in the vehicle database to avoid performing a separate empty scan.
This is only possible within 10 minutes of completing the second scan and before any other scans are performed.
To record the second scan as a reference scan:
- Confirm all bins are completely empty.
- Follow the steps of Scan a new vehicle into the database above.
- When prompted whether to create the database record from the previous scan or a new scan, select PREVIOUS.
- After entering the required vehicle details, click the OK button – the reference scan will be recorded in the database.
Automatic vehicle identification
Vehicles can optionally be fitted with ID tags for automatic identification.
An RFID tag reader in the scan head detects the tags during scanning.
For 2-bin combinations, separate ID tags are required for truck (bin 1) and trailer (bin 2), unless the trailer has been linked to the truck as a permanent pair. (See Link truck and trailer as a permanent pair.)
To register an ID tag to a vehicle that has not yet been scanned into the database, mount the tag on the vehicle, as described below, before doing the empty reference scan.
Mount the tag:
- as close as possible to horizontal (flat, face up)
- as close as possible to the centre of the vehicle (width-ways)
- with a clear line of site to the scan head when the vehicle passes beneath it
- with the clearance zone as shown in figure 7 on all sides of the tag.
On top of the external sun-visor at front of cab is generally a good position for a truck.
For a trailer, fit the tag in a central position at front, away from possible damage area.
Tags have two mounting holes that suit M4 screws or similar mechanical fasteners. Heavy-duty industrial double-sided adhesive tape can also be used for mounting.
Do not store unused tags within reading range of the tag reader.
To manually register, replace or clear an ID tag for a vehicle already in the database, see Manual ID tag registration.
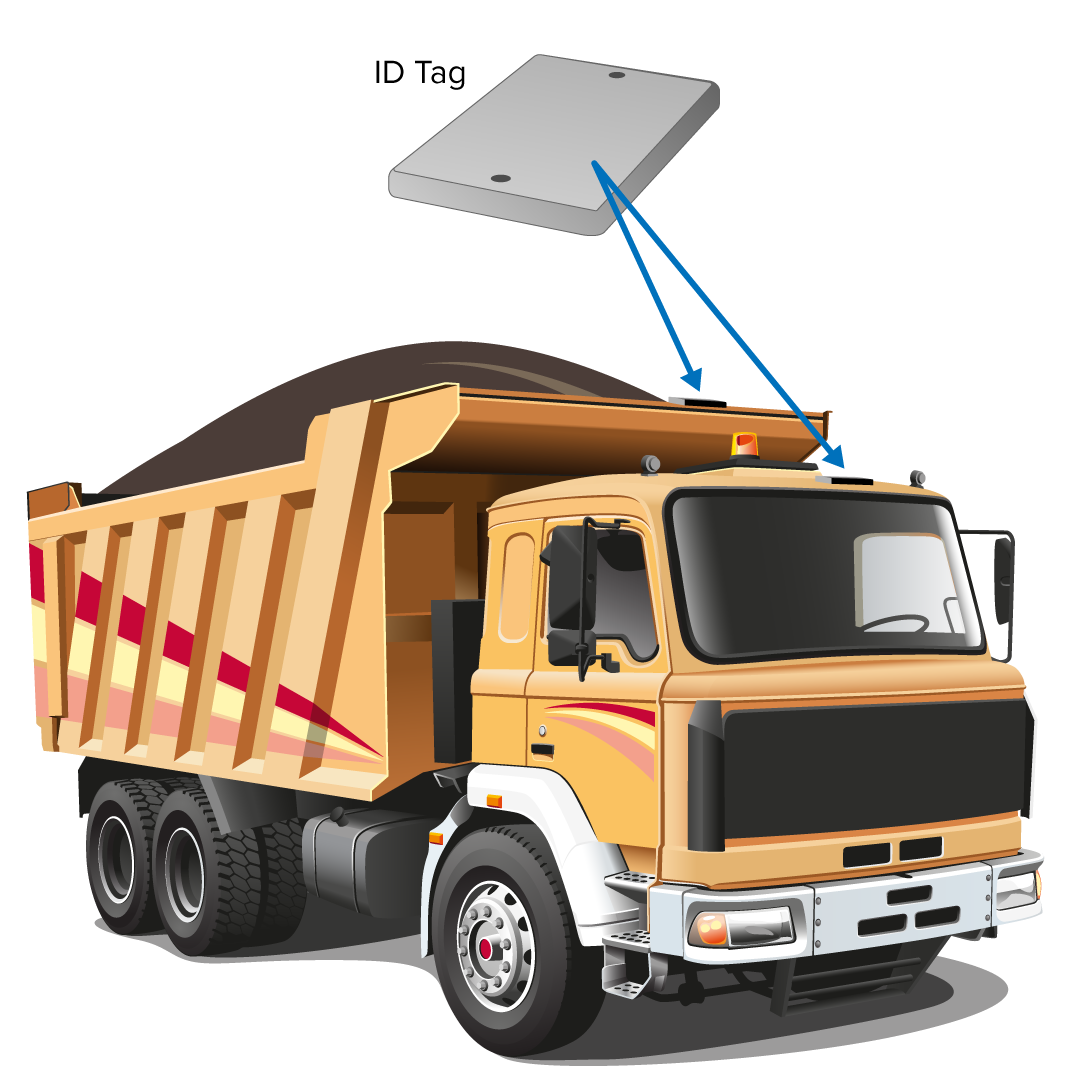

Figure 7 – typical mounting locations and required clearance zone for ID tags
In this Article
This section describes basic operation of the LVS after installation and commissioning.
Starting up and shutting down
Use the power isolator switch on the front of the power box to power on the LVS.
After initialisation sequence the operator console and message board will display ‘READY TO SCAN’ if no problems are detected.
To shut the system down, wait until the system is idle before turning off power with the power isolator switch.
If checks fail, a ‘SYSTEM SETUP REQUIRED’ message will be generated and the scan head alignment procedure must be carried out. (See Appendix 2 – Scan head installation and alignment.)
The main screen
The operator console Main screen (figure 2) displays:
- load details for the most recent measurement
- status messages
- buttons for accessing other screens.

Figure 2 – operator console Main screen
All other screens can be password protected. The default for all passwords is ‘TALLY’. See Password settings to change password options.
A ‘READY TO SCAN’ message indicates the system is operational and ready to start a scan.
Ensure this message is displayed and the scan area is clear of obstacles after power-up and initialisation.
If the message reads ‘SYSTEM SETUP REQUIRED’ and the scan area is clear, the system has detected that the scan head alignment is out and must be re-aligned. (See Appendix 2 – Scan head installation and alignment.)
Status messages change to show the current system status.
On-screen prompts request manual input of vehicle/bin IDs or other information as required.
Status messages are also reported on the message board. For a list of status messages, see Appendix 3 – Status messages and error codes.
General scan procedure
The general procedure for scanning any vehicle combination is:
- Wait for ‘READY TO SCAN’ message on message board.
- Approach scanner slowly and stop vehicle clear of scan head.
Covers must be fully stowed during scanning
- Wait for ‘PROCEED’ message on message board.
- Proceed at a SLOW, STEADY speed (walking pace) through the scan area.
- Stop clear of scan head when message changes to ‘WAIT FOR RESULT’.
- Enter details at operator console if prompted on message board/console screen.Scanning starts and stops automatically when the target vehicle crosses the scan area.
If the vehicle is empty and has not already been scanned into the vehicle database, the vehicle details need to be entered at the operator console before scanning. (See Scan a new vehicle into the database.)
If the vehicle is loaded, scan as above and then enter bin IDs and load details as requested to complete the measurement. (See Scan a load.)
Scan a new vehicle into the database
Normally a truck/trailer is scanned empty and recorded as a reference scan in the vehicle database before being scanned with a load.
On subsequent visits, the loaded vehicle is scanned and load volume computed by comparing the new scan with the reference scan.
To create a new reference scan:
- Ensure the vehicle is unloaded.
All truck and trailer bins must be completely empty and covers fully stowed.
- Push the NEW button on the Main screen or on the Database screen (not available if system is not ready to scan) to open the New Vehicle dialog (figure 3).
- Select the Type of vehicle to scan:
- 1 BIN – TRUCK/DUMPER/SEMI-TRAILER: scan target has only one load carrying bin (e.g., rigid body truck, semi-trailer or tractor-trailer).
- 2 BINS – TRUCK AND TRAILER (TANDEM/DOUBLE): scan target has two load carrying bins (e.g., truck and trailer/double/tandem combination).

Figure 3 – operator console New Vehicle dialog
- Enter the name of the vehicle operator (owner/company) in the Operator/Carrier
- For each bin, enter the vehicle license plate number or unique identifier corresponding to that bin.
- For semi-trailers where the trailer has a different identifier than the tractor unit and can be swapped with a different one, use the trailer identifier.
- Select the Swappable Bin option if a bin is removable from the truck/trailer body carrying it and can be swapped with other bins or swapped between first and second positions on a 2-bin combination vehicle. In this case, enter a unique ID that identifies the bin not the carrying vehicle. Swappable bins appear on both the truck (bin 1) and trailer (bin 2) selection lists in manual ID prompts after scanning.
- Select the Skip This Bin option if the corresponding bin does not need to be entered into the vehicle database – for example, when the bin is already in the database and does not need to be updated or is currently loaded or covered.
- If the 2-bin type has been selected, the Permanent Pair option is available. (See Link truck and trailer as a permanent pair for details.)
- If ID tags are being used, fit these before scanning the vehicle. (See Automatic vehicle identification)
- Push the OK button and follow the General scan procedure above.
When the scan completes successfully, the dialog closes and the message board briefly displays SCAN OK.
If the new vehicle scan was initiated from the Main screen, the system returns to the Main screen with READY TO SCAN status.
Vehicle records can be reviewed in the Database screen. (See Vehicle database management.)
Reference scans expire after 6-12 months (depending on regional/legal settings) and must be updated. (See Updating reference scans.)
If any structural changes are made, or a cover/tarpaulin is added/removed, the reference scan for the affected bin must be updated immediately.
Scan a load
Scan
- Scan the loaded vehicle (as per the General scan procedure above).
Identify vehicle
- When the scan is complete, identify the vehicle. Each bin (truck, trailer) is identified separately. If registered ID tags are fitted to the vehicle, identification is automatic. (See Automatic vehicle identification below.)If no tags are fitted or a tag cannot be read, enter manually. The operator console prompts for manual ID entry (figure 4).Vehicles (bins) in the database can be selected from the displayed list. Keying the first letter(s) of the ID auto-scrolls the list to the closest match for quick selection.
- Select the bin ID and press the Enter key [ ] to confirm. If a trailer (second bin) is present, its ID will be requested with a second prompt. The LVS searches for the identified vehicles(s) in the database. If found, the load volume is computed.

Figure 4 – operator console ID prompt
- If the vehicle is not found, the operator console prompts with 2-SCAN and RE-ENTER options:
— In the case of mis-keyed entry, select RE-ENTER.
— If the vehicle is not in the database, select 2-SCAN to complete the measurement in 2-Scan mode. This requires a second scan of the empty bin(s) after the vehicle has been unloaded. (See 2-Scan measurements below.)
Enter load details
- If additional prompts for load details have been configured, the operator console also prompts for information about the measured load (figure 5).
User-defined load details such as product type, customer or order number can be collected at this stage. (See Configuring load detail prompts.)
After a load has been scanned and all prompts completed, a load report displays on the operator console screen and on the message board.

Figure 5 – operator console load detail prompt
The load details are also logged to file and a ticket may be printed, depending on configuration. (See User configuration options.)
Scanning options for a 2-bin vehicle
For a loaded 2-bin combination vehicle where only one of the two bins is in the database or one of the bins is covered and should not be measured:
- If both bins must be measured, do a 2-Scan measurement. (See 2-Scan measurements below.)
- If one bin can be skipped (no measurement required) then do a ‘truck only’ or ‘trailer only’ measurement by cancelling the ID prompt for the bin to be skipped. In this case, load details (on the load report, printed ticket and so on) are blank for the cancelled bin.
2-Scan measurements
It is possible to measure a load on a vehicle that has not previously been scanned empty.
In this case, the truck or truck and trailer combination is scanned one time loaded and then again when empty. The load is computed as the difference between the two scans.
The advantage of 2-Scan measurement is that there is no need to first create a reference scan. The disadvantage is that two scans are required for every measurement.
This mode should normally only be used for the first load on a truck that is new to the site. The vehicle should be entered into the database as a reference scan immediately after completion of the 2-Scan measurement.
However, it may sometimes be desirable to perform 2-Scan measurements for all loads:
- Trucks arrive on site loaded and each truck visits the site a very limited number of times. In such case it may not be worthwhile performing controlled empty scans.
- It is desirable to measure the carry-back (load material stuck in bin after off-loading) for every load and report the net volume as the measured load volume (the difference between the carry-back volume and the fully loaded gross volume).
2-Scan first scan procedure
- For the first scan (1 of 2), scan of the vehicle as per General scan procedure above.
- Enter an ID to identify the vehicle when the ID Prompt displays.For a 2-bin truck and trailer combination, only one ID needs to be entered.The operator console will prompt with a message stating that the ID cannot be found in the database, with 2-SCAN and RE-ENTER options (figure 6).
- Select 2-SCAN to start a new 2-Scan measurement.

Figure 6 – operator console 2-Scan mode prompt
2-Scan second scan procedure
- For the second scan (2 of 2), scan the vehicle.
- Select the previously entered ID from the ID prompt list.
The load computation and processing will then proceed as normal.
Load details can be requested on either the first or the second scan in 2-Scan mode and 2-Scan measurements can be disabled. (See 2-Scan measurement settings.)
The first scan of a 2-Scan measurement is only valid for 6 hours. After this, it is not possible to complete the 2-Scan measurement.
Within 10 minutes after the second scan, it is possible to repeat the second scan if a re-measurement is desired. In this case the new measurement will be marked as a REPEAT SCAN.
Create a reference scan after a 2-Scan measurement
The second scan of a 2-Scan measurement can optionally be converted into a reference scan in the vehicle database to avoid performing a separate empty scan.
This is only possible within 10 minutes of completing the second scan and before any other scans are performed.
To record the second scan as a reference scan:
- Confirm all bins are completely empty.
- Follow the steps of Scan a new vehicle into the database above.
- When prompted whether to create the database record from the previous scan or a new scan, select PREVIOUS.
- After entering the required vehicle details, click the OK button – the reference scan will be recorded in the database.
Automatic vehicle identification
Vehicles can optionally be fitted with ID tags for automatic identification.
An RFID tag reader in the scan head detects the tags during scanning.
For 2-bin combinations, separate ID tags are required for truck (bin 1) and trailer (bin 2), unless the trailer has been linked to the truck as a permanent pair. (See Link truck and trailer as a permanent pair.)
To register an ID tag to a vehicle that has not yet been scanned into the database, mount the tag on the vehicle, as described below, before doing the empty reference scan.
Mount the tag:
- as close as possible to horizontal (flat, face up)
- as close as possible to the centre of the vehicle (width-ways)
- with a clear line of site to the scan head when the vehicle passes beneath it
- with the clearance zone as shown in figure 7 on all sides of the tag.
On top of the external sun-visor at front of cab is generally a good position for a truck.
For a trailer, fit the tag in a central position at front, away from possible damage area.
Tags have two mounting holes that suit M4 screws or similar mechanical fasteners. Heavy-duty industrial double-sided adhesive tape can also be used for mounting.
Do not store unused tags within reading range of the tag reader.
To manually register, replace or clear an ID tag for a vehicle already in the database, see Manual ID tag registration.


Figure 7 – typical mounting locations and required clearance zone for ID tags
