Introduction
When load status reporting is enabled, status values are reported for each measured load.
Load quantity status values indicate whether the bin is:
- loaded correctly (with the expected quantity of material)
- underloaded
- overloaded.
Load distribution status values indicate whether the load is:
- well distributed inside the bin
- loaded unevenly to the left or right
- loaded unevenly to the front or rear
These status values provide instant performance feedback to drivers, system operators and monitoring systems, and may be used to optimise payloads and increase productivity.
Load status reporting can be used:
- to trigger immediate corrective action
- as a training tool for loader operators
- for productivity reporting.
Load quantity status
Load quantity status is based on the size of the measured load.
By default, load quantity is the measured volume. If weight estimation is enabled, the estimated weight can be used to determine load quantity status instead of volume.
For each measured load, user-defined thresholds can be applied to the load quantity and one of the following load quantity status values reported (with associated status colour).
| Status Value | Description |
|---|---|
| EMPTY (blue) |
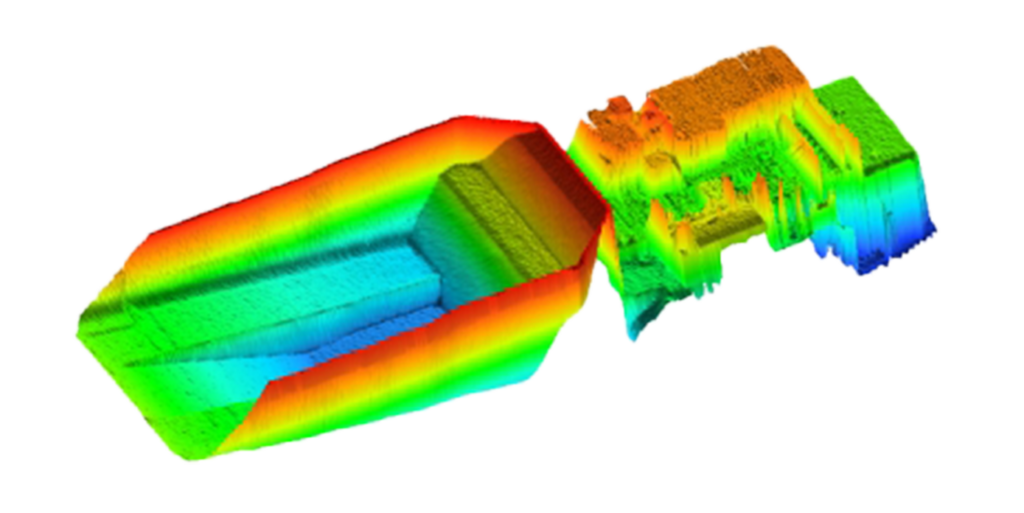
Indicates that the bin is empty.
|
| CARRYBACK (orange) |
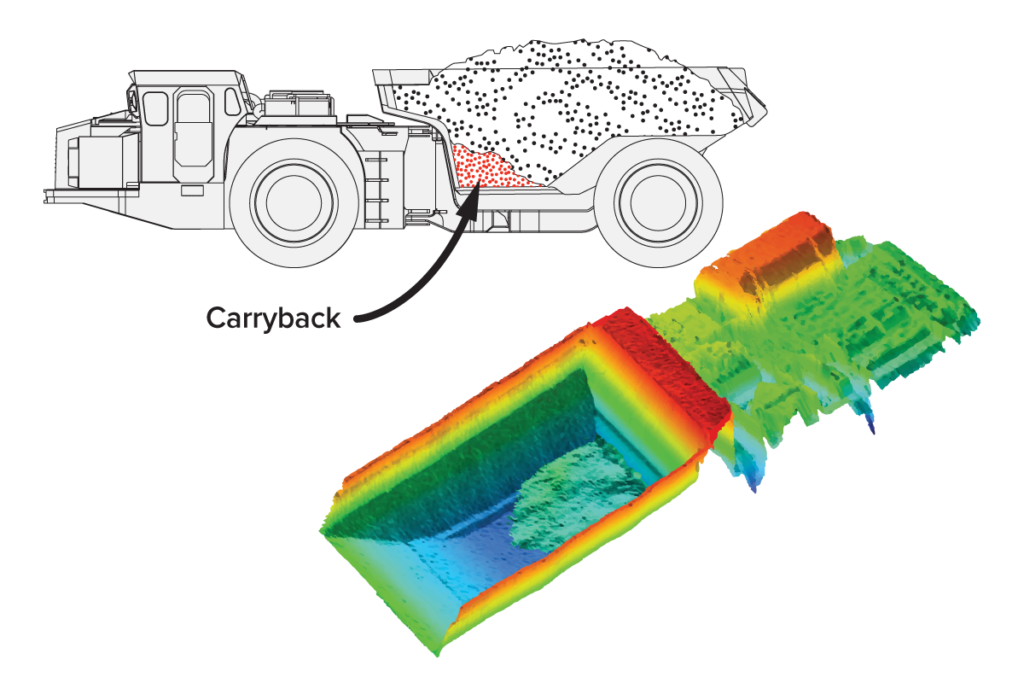
Indicates that residual material is stuck in the bin after dumping the load.
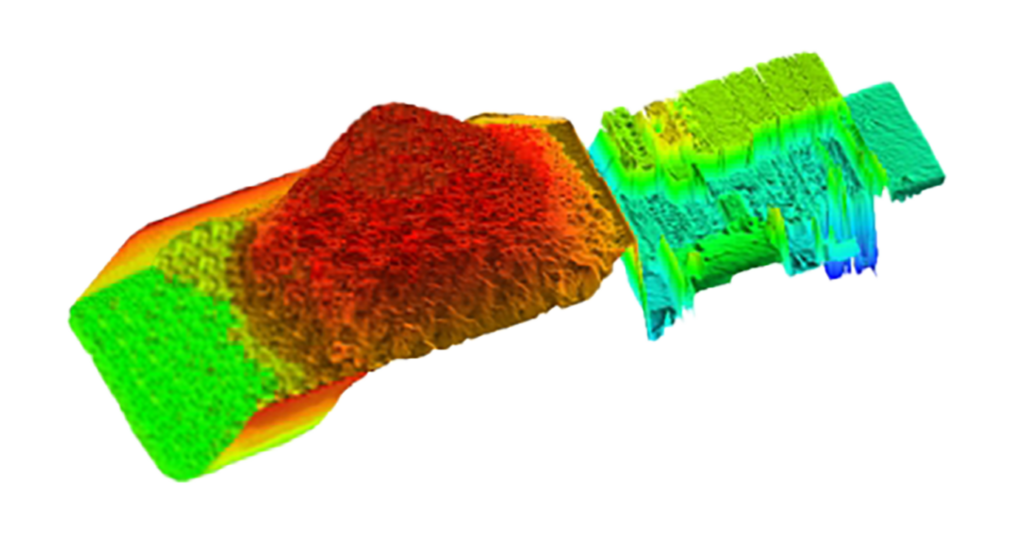
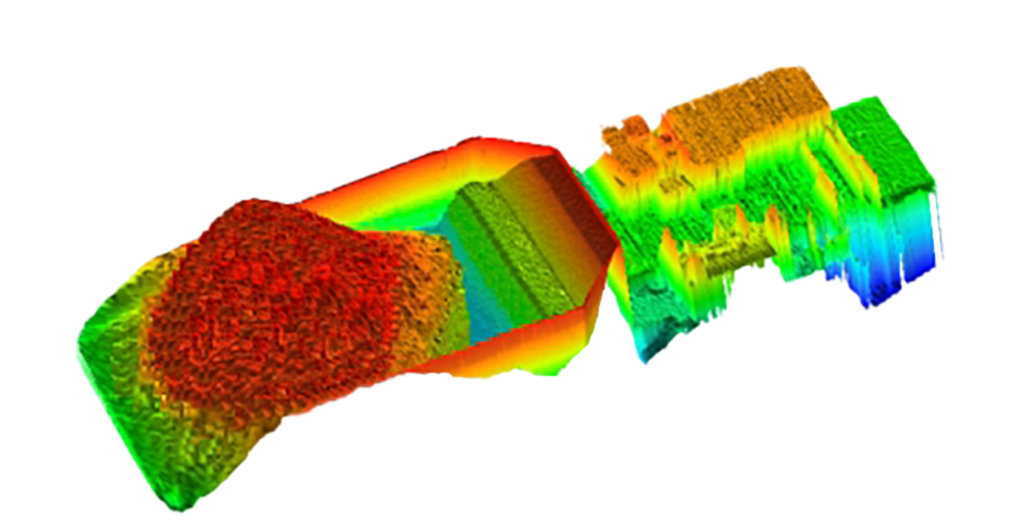
This reduces the capacity of the bin, as illustrated below, and increases haulage costs. If not cleaned out, carryback can circulate for multiple truck cycles and result in lost productivity.
|
| UNDERLOADED (red) |
Indicates that the bin is underloaded.
Underloading results in unnecessary additional truck movements to shift the same amount of material, with corresponding loss of productivity.
|
| LOADED-OK (green) |
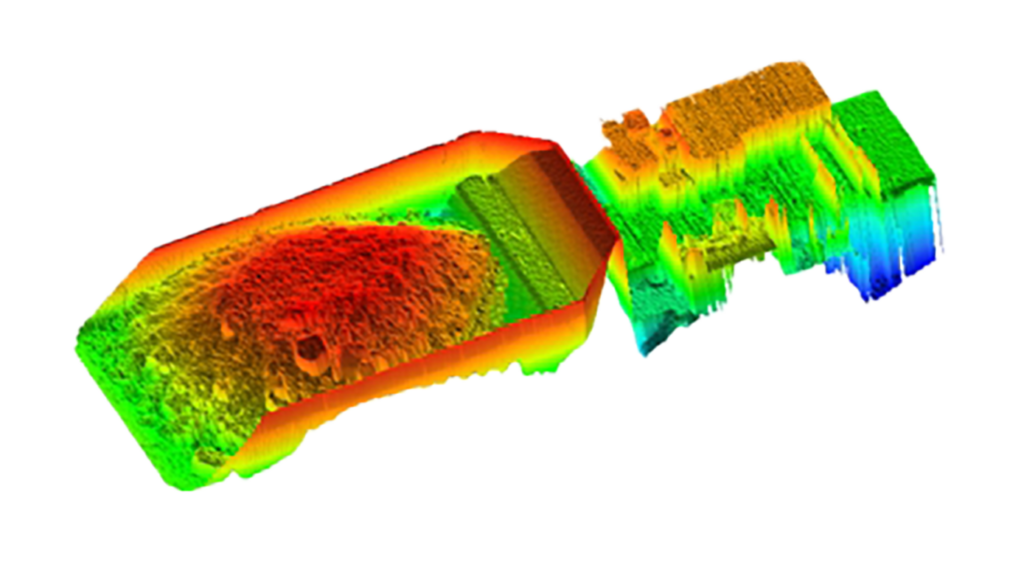
Indicates that the load quantity is in the target range for maximum productivity.
|
| OVERLOADED (red) |
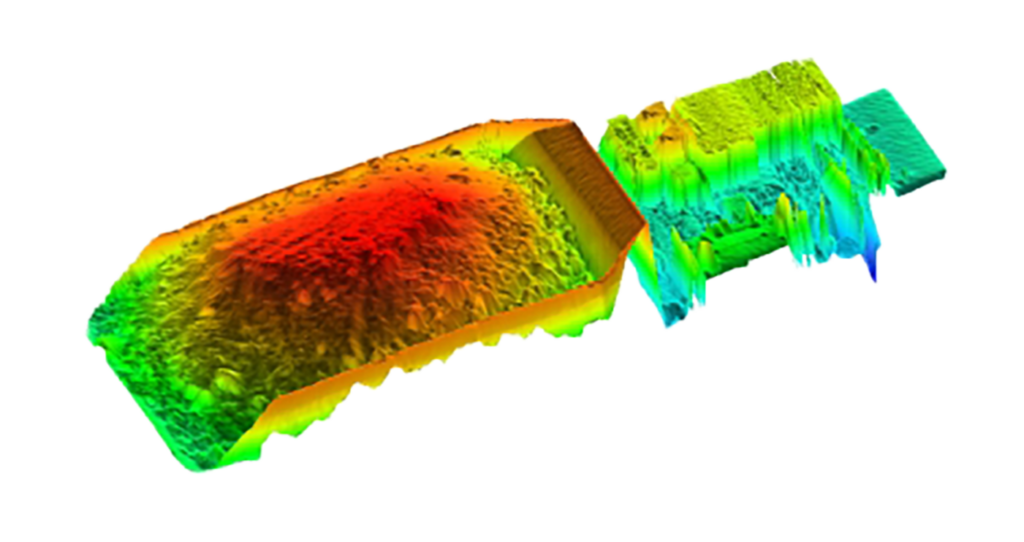
Indicates that the bin is overloaded. Overloading results in increased cycle times, fuel consumption, wear on trucks and tyres and reduced productivity. 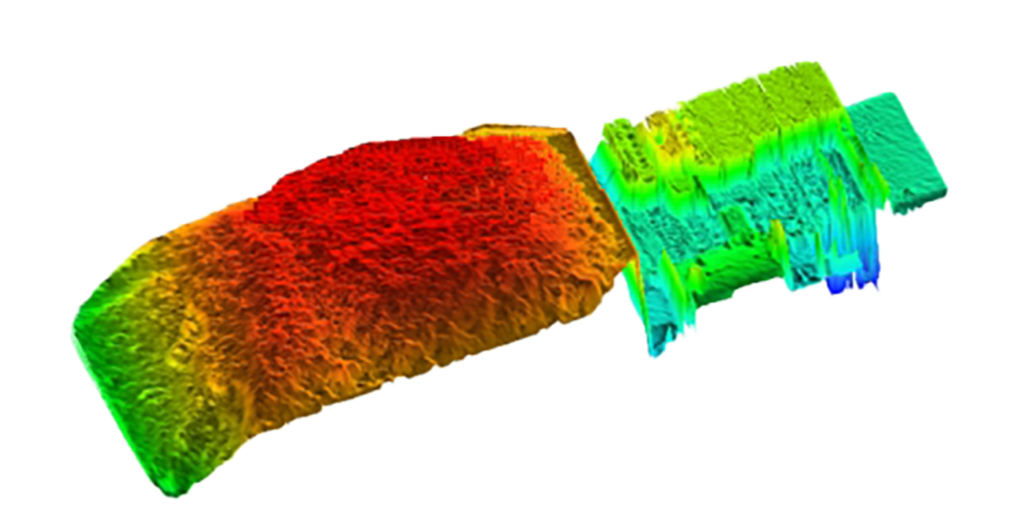 |
Load distribution status
Load distribution status is based on the distribution of the load within the bin.
The bin is divided into four quadrants and the percentage of the overall load in each quadrant is computed.
Left/right and front/rear load distribution ratios are computed, as illustrated in figure 8.
These ratios can optionally be included in load reports as ‘Left/Right (%)’ and ‘Front/Rear (%)’ load details in the format ‘(50/50)’ where each side of the ratio indicates the percentage of the total load in the corresponding half of the bin.
User-defined thresholds can be applied to the load distribution ratios and up to two of the following load distribution status values reported.
No load distribution status is reported if distribution is within thresholds. In this case, only load quantity status is reported.
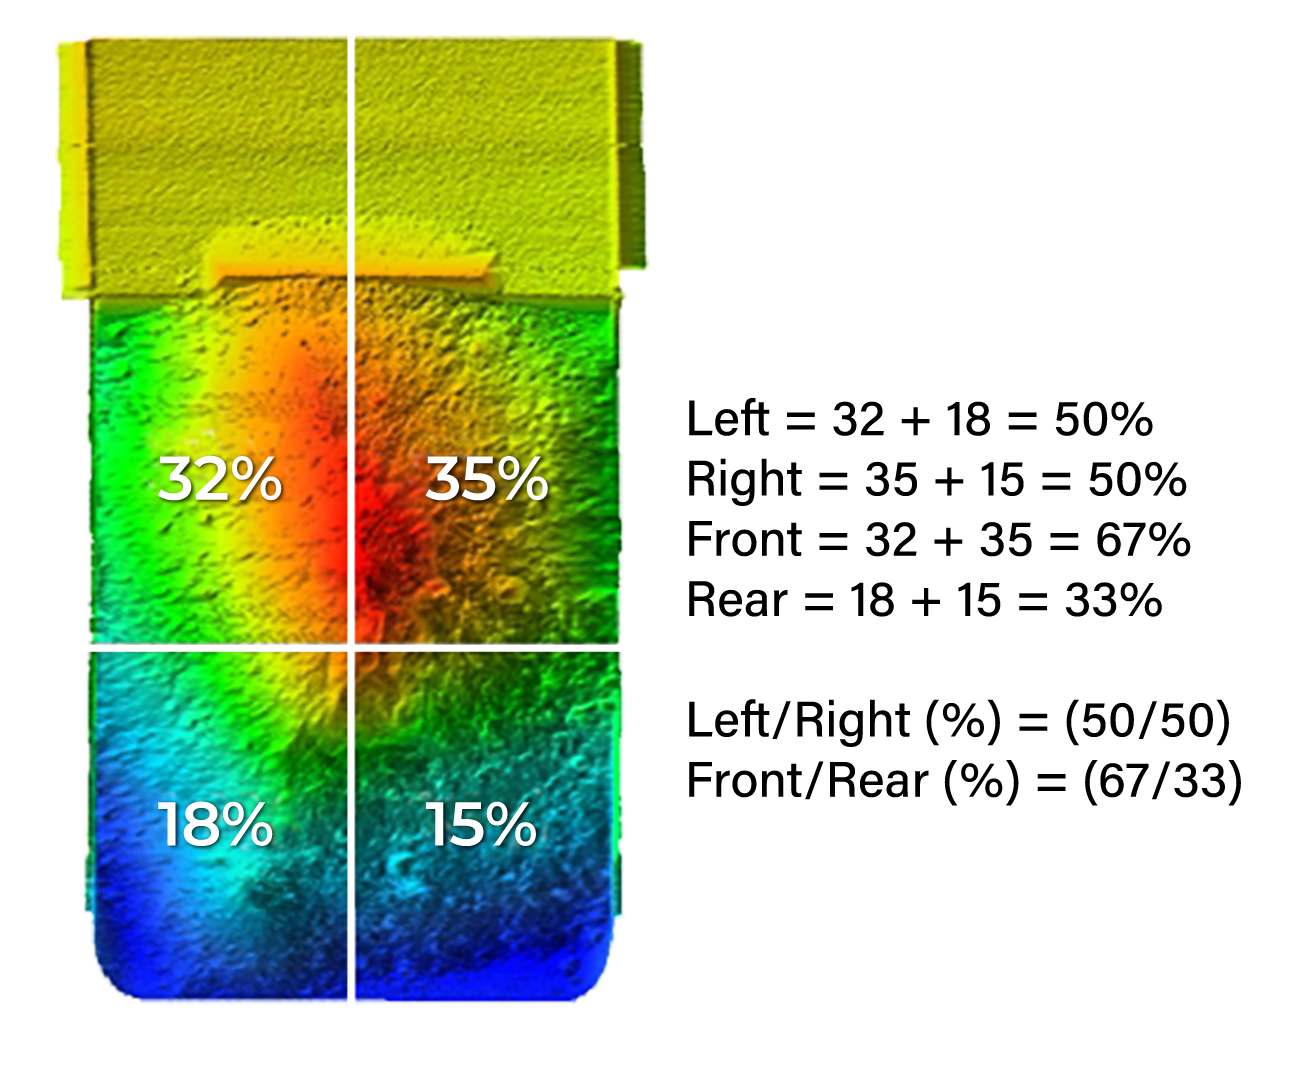
Figure 8 – Load distribution status computation
The mid-point of the bin for the computation of front/rear load distribution is the half-way point between the front and rear walls of the bin.
This does not have a direct relationship to the ideal centre-of-mass of the load or the weight on the front and rear axles.
For non-cuboid bins, such as off-highway dump trucks, the ideal front/rear load distribution ratio may not be 50/50.
| Status value | Description |
|---|---|
| LEFT-HEAVY, RIGHT-HEAVY (red) |
Indicates that too much of the load is on the specified side of the bin. This may overload the tyres on one side or create risk of the truck tipping over. 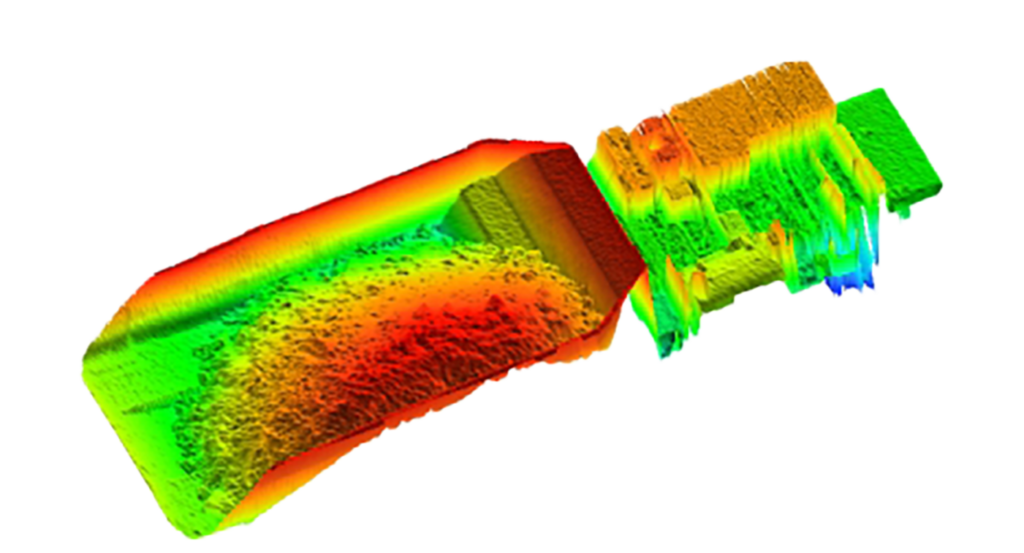 |
| FRONT-HEAVY (red) |
Indicates that too much of the load is in the front of the bin.
This may:
|
| BACK-HEAVY (red) |
Indicates that too much of the load is in the rear of the bin.
This may overload the rear tyres and interfere with traction.
|
3D load profiles like those shown on previous pages can be viewed online for any recorded scan when the MPS is connected to the MyScanner™ web service.
The interactive ‘3D Profile’ tool built into the MyScanner web portal is an invaluable tool for manual load auditing.
In addition to reviewing load size and distribution, 3D scan profiles also allow blast fragmentation to be visually estimated.
Please contact your Loadscan representative for more information about the MyScanner web service.
Load reports
Load status values are included in load reports:
One load quantity status value and up to two load distribution status values may be reported for each measured bin load.
Load distribution ratios may optionally be reported as additional load detail fields.
Operator console
Figure 9 shows examples of load reports on the MPS operator console main screen when load status reporting is enabled.
Load distribution ratio reporting is enabled in the second example (extra load details).
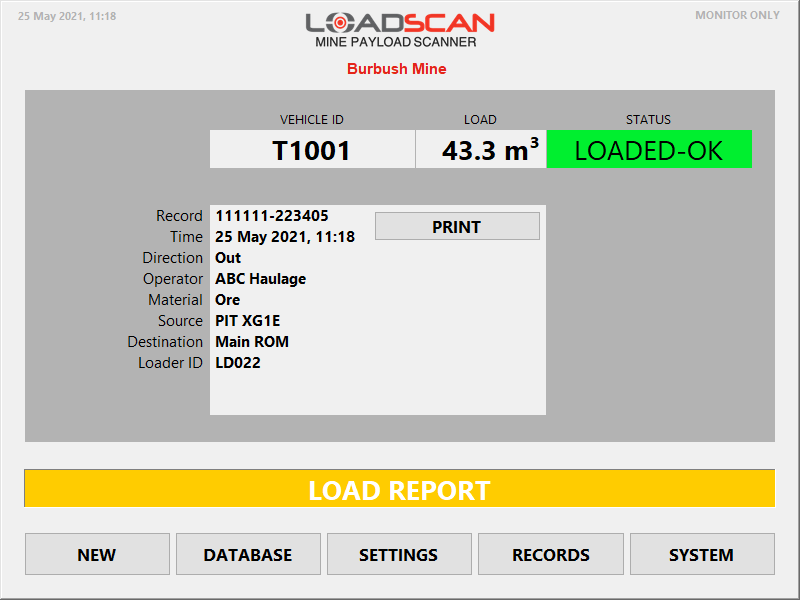
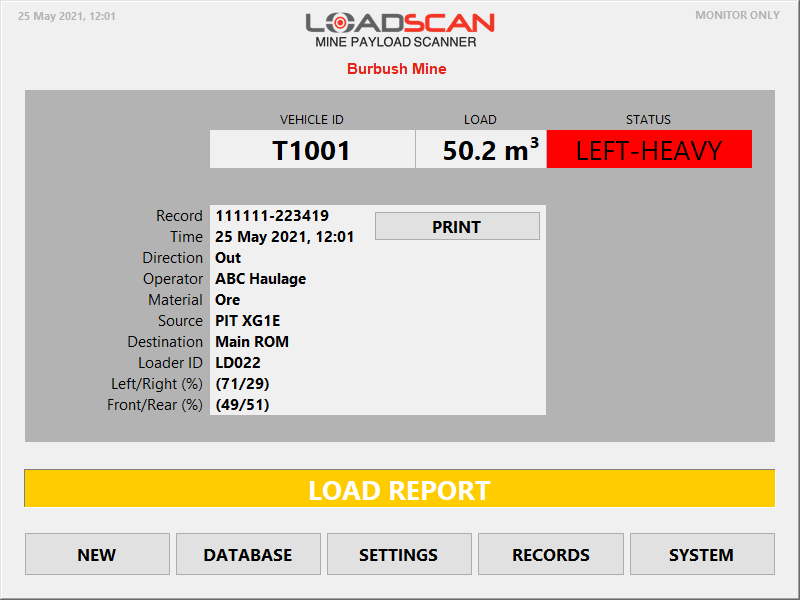
Figure 9 – operator console load report examples with load status reporting enabled
The status indicator on the operator console Main screen displays a single status value only.
If multiple status values are set for a single load, only the highest priority status value will show.
Message board
Figure 10 shows an example of a load report that drivers see on the message board after scanning a load when load status reporting is enabled.
One or more status values are reported.
Load status reporting can be disabled for message board load reports where this is not required for truck drivers. Refer to Enabling Load Status Reporting for details.
On MB4 model message boards the load status values are colour-coded. Older MB3 message boards do not support colour-coding.
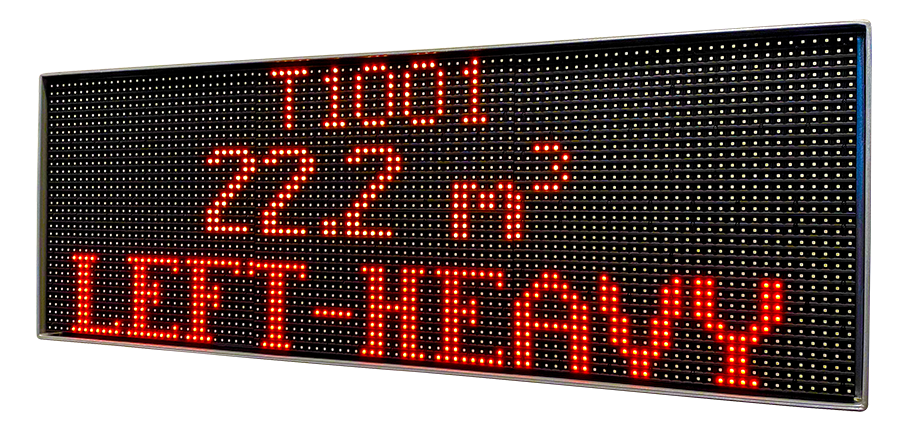
Figure 10 – message board load report example with load status reporting enabled
The record number is not displayed on message board load reports when load status reporting is enabled.
Measurement records
MPS measurement records may be viewed on the MPS, uploaded to the MyScanner web service or exported to external systems for processing.
Load status values are reported in the ‘Truck Status’ record field when load status reporting is enabled. This field contains a numeric status code followed by one or more status values in text format. This is illustrated in the sample screenshot from the MyScanner web portal shown in figure 11.
The status code provides the same information as the text, in numeric form. Refer to the support document Loadscan LVS – Log File Formats for an explanation of status codes used in measurement records.
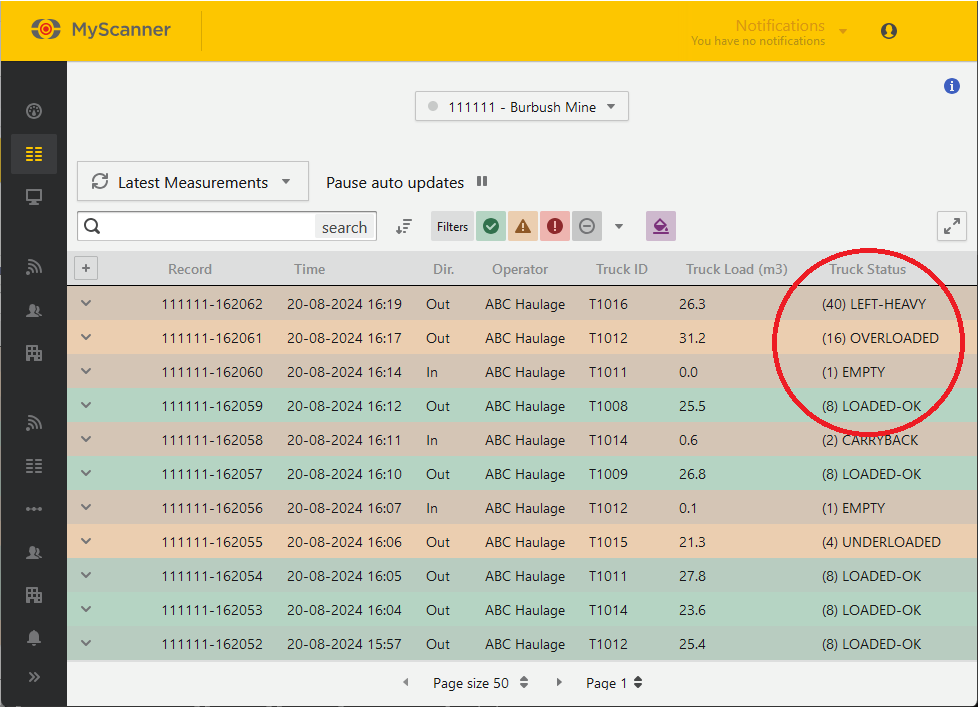
Figure 11 – Loadscan MyScanner sample screenshot
Configuration
Enabling Load Status Reporting
Load status reporting must be enabled through custom settings.
The following custom settings are available to enable/disable load status reporting features:
| Setting | Description |
|---|---|
| LoadStatusReportingEnable | Set to TRUE to enable load status reporting. If set to FALSE, no load status values will be reported. |
| LoadStatusReportLeftRightRatio | Set to TRUE to activate a Left/Right (%) load detail field for reporting the left/right load distribution ratio. |
| LoadStatusReportFrontRearRatio | Set to TRUE to activate a Front/Rear (%) load detail field for reporting the front/rear load distribution ratio. |
| LoadStatusReportOnMessageBoard | Set to FALSE to remove load status values from message board load reports. If TRUE or not set, load status values will display on message board load reports. |
Thresholds
Load status values are determined by applying user-defined thresholds to the measured load quantity and load distribution ratios.
To set thresholds, open the Load Thresholds dialog as shown in figure 12, by one of the following methods (only possible when load status reporting enabled):
| Method | Description |
|---|---|
| Set thresholds for a specific vehicle |
|
| Set default thresholds |
|
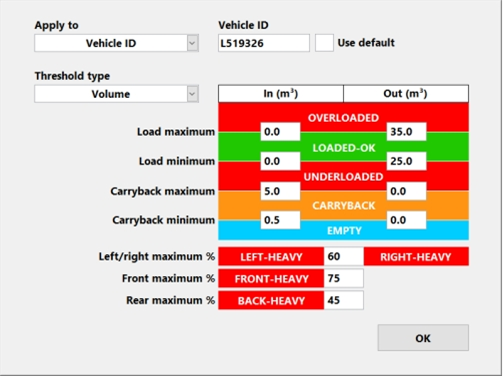
Figure 12 – operator console Load Thresholds dialog
The following apply to thresholds:
- thresholds with a value of 0 (zero) are not set
- load quantity thresholds must be set separately for each scan direction (In, Out)
- load distribution thresholds apply to both scan directions
- when set, Load minimum acts as a minimum threshold for reporting load distribution status values.
Direction specific load quantity thresholds allow for different load types in each direction. For example, ore in one direction and carryback only, in the other.
If the vehicle database is synchronized across multiple MPS systems (see MyScanner web service settings) then load thresholds will also be synchronized.
Set default thresholds
Default thresholds are applied to all vehicles which do not have custom thresholds.
To edit the default thresholds:
- Set the Apply to selector to ‘Default’.
- Enter the desired values according to Load status logic, below.
Set thresholds for a specific vehicle
- Set the Apply to selector to ‘Vehicle ID’.
- Select vehicle when prompted or click in the Vehicle ID field to change the selection.
To apply the default thresholds to the selected vehicle, enable Use default. In this case, the default thresholds are displayed but cannot be edited.
To apply custom thresholds:
- Disable Use default.
- Enter desired values according to Load status logic, below.
- Note that when Use default is disabled, any custom thresholds previously applied to the selected vehicle will be restored.
Set thresholds by weight
If the Weight Estimate function is enabled, the estimated weight can be used to determine load quantity status instead of volume.
To set thresholds by weight:
- Change the Threshold type selector to ‘Weight’.
- Enter the desired thresholds in tons/tonnes.
Estimated weights are based on user-defined material density values which must be defined for thresholding by weight to work correctly.
If a density value has not been defined for the current load material, the reported load quantity status is NO STATUS and has no associated colour.
Load status logic
Load status values are determined according to the following rules.
| Status value | Rule |
|---|---|
| EMPTY (blue) |
|
| CARRYBACK (orange) |
|
| UNDERLOADED (red) |
|
| LOADED-OK (green) |
If the load quantity status is LOADED-OK but a load distribution status is also set, then LOADED-OK is not reported. For example, if LOADED-OK (green) and RIGHT-HEAVY (red) are both set then only RIGHT-HEAVY (red) will appear on load reports and measurement records. |
| OVERLOADED (red) |
|
| LEFT-HEAVY (red) |
|
| RIGHT-HEAVY (red) |
|
| FRONT-HEAVY (red) |
|
| BACK-HEAVY (red) |
|
| NO STATUS (no colour) |
|
If no thresholds are set:
- all non-zero loads are reported as LOADED-OK
- zero-value loads are reported as EMPTY.
In this Article
Introduction
When load status reporting is enabled, status values are reported for each measured load.
Load quantity status values indicate whether the bin is:
- loaded correctly (with the expected quantity of material)
- underloaded
- overloaded.
Load distribution status values indicate whether the load is:
- well distributed inside the bin
- loaded unevenly to the left or right
- loaded unevenly to the front or rear
These status values provide instant performance feedback to drivers, system operators and monitoring systems, and may be used to optimise payloads and increase productivity.
Load status reporting can be used:
- to trigger immediate corrective action
- as a training tool for loader operators
- for productivity reporting.
Load quantity status
Load quantity status is based on the size of the measured load.
By default, load quantity is the measured volume. If weight estimation is enabled, the estimated weight can be used to determine load quantity status instead of volume.
For each measured load, user-defined thresholds can be applied to the load quantity and one of the following load quantity status values reported (with associated status colour).
| Status Value | Description |
|---|---|
| EMPTY (blue) |
Indicates that the bin is empty.
|
| CARRYBACK (orange) |
Indicates that residual material is stuck in the bin after dumping the load.
This reduces the capacity of the bin, as illustrated below, and increases haulage costs. If not cleaned out, carryback can circulate for multiple truck cycles and result in lost productivity.
|
| UNDERLOADED (red) |
Indicates that the bin is underloaded.
Underloading results in unnecessary additional truck movements to shift the same amount of material, with corresponding loss of productivity.
|
| LOADED-OK (green) |
Indicates that the load quantity is in the target range for maximum productivity.
|
| OVERLOADED (red) |
Indicates that the bin is overloaded. Overloading results in increased cycle times, fuel consumption, wear on trucks and tyres and reduced productivity.  |
Load distribution status
Load distribution status is based on the distribution of the load within the bin.
The bin is divided into four quadrants and the percentage of the overall load in each quadrant is computed.
Left/right and front/rear load distribution ratios are computed, as illustrated in figure 8.
These ratios can optionally be included in load reports as ‘Left/Right (%)’ and ‘Front/Rear (%)’ load details in the format ‘(50/50)’ where each side of the ratio indicates the percentage of the total load in the corresponding half of the bin.
User-defined thresholds can be applied to the load distribution ratios and up to two of the following load distribution status values reported.
No load distribution status is reported if distribution is within thresholds. In this case, only load quantity status is reported.

Figure 8 – Load distribution status computation
The mid-point of the bin for the computation of front/rear load distribution is the half-way point between the front and rear walls of the bin.
This does not have a direct relationship to the ideal centre-of-mass of the load or the weight on the front and rear axles.
For non-cuboid bins, such as off-highway dump trucks, the ideal front/rear load distribution ratio may not be 50/50.
| Status value | Description |
|---|---|
| LEFT-HEAVY, RIGHT-HEAVY (red) |
Indicates that too much of the load is on the specified side of the bin. This may overload the tyres on one side or create risk of the truck tipping over.  |
| FRONT-HEAVY (red) |
Indicates that too much of the load is in the front of the bin.
This may:
|
| BACK-HEAVY (red) |
Indicates that too much of the load is in the rear of the bin.
This may overload the rear tyres and interfere with traction.
|
3D load profiles like those shown on previous pages can be viewed online for any recorded scan when the MPS is connected to the MyScanner™ web service.
The interactive ‘3D Profile’ tool built into the MyScanner web portal is an invaluable tool for manual load auditing.
In addition to reviewing load size and distribution, 3D scan profiles also allow blast fragmentation to be visually estimated.
Please contact your Loadscan representative for more information about the MyScanner web service.
Load reports
Load status values are included in load reports:
One load quantity status value and up to two load distribution status values may be reported for each measured bin load.
Load distribution ratios may optionally be reported as additional load detail fields.
Operator console
Figure 9 shows examples of load reports on the MPS operator console main screen when load status reporting is enabled.
Load distribution ratio reporting is enabled in the second example (extra load details).


Figure 9 – operator console load report examples with load status reporting enabled
The status indicator on the operator console Main screen displays a single status value only.
If multiple status values are set for a single load, only the highest priority status value will show.
Message board
Figure 10 shows an example of a load report that drivers see on the message board after scanning a load when load status reporting is enabled.
One or more status values are reported.
Load status reporting can be disabled for message board load reports where this is not required for truck drivers. Refer to Enabling Load Status Reporting for details.
On MB4 model message boards the load status values are colour-coded. Older MB3 message boards do not support colour-coding.

Figure 10 – message board load report example with load status reporting enabled
The record number is not displayed on message board load reports when load status reporting is enabled.
Measurement records
MPS measurement records may be viewed on the MPS, uploaded to the MyScanner web service or exported to external systems for processing.
Load status values are reported in the ‘Truck Status’ record field when load status reporting is enabled. This field contains a numeric status code followed by one or more status values in text format. This is illustrated in the sample screenshot from the MyScanner web portal shown in figure 11.
The status code provides the same information as the text, in numeric form. Refer to the support document Loadscan LVS – Log File Formats for an explanation of status codes used in measurement records.

Figure 11 – Loadscan MyScanner sample screenshot
Configuration
Enabling Load Status Reporting
Load status reporting must be enabled through custom settings.
The following custom settings are available to enable/disable load status reporting features:
| Setting | Description |
|---|---|
| LoadStatusReportingEnable | Set to TRUE to enable load status reporting. If set to FALSE, no load status values will be reported. |
| LoadStatusReportLeftRightRatio | Set to TRUE to activate a Left/Right (%) load detail field for reporting the left/right load distribution ratio. |
| LoadStatusReportFrontRearRatio | Set to TRUE to activate a Front/Rear (%) load detail field for reporting the front/rear load distribution ratio. |
| LoadStatusReportOnMessageBoard | Set to FALSE to remove load status values from message board load reports. If TRUE or not set, load status values will display on message board load reports. |
Thresholds
Load status values are determined by applying user-defined thresholds to the measured load quantity and load distribution ratios.
To set thresholds, open the Load Thresholds dialog as shown in figure 12, by one of the following methods (only possible when load status reporting enabled):
| Method | Description |
|---|---|
| Set thresholds for a specific vehicle |
|
| Set default thresholds |
|

Figure 12 – operator console Load Thresholds dialog
The following apply to thresholds:
- thresholds with a value of 0 (zero) are not set
- load quantity thresholds must be set separately for each scan direction (In, Out)
- load distribution thresholds apply to both scan directions
- when set, Load minimum acts as a minimum threshold for reporting load distribution status values.
Direction specific load quantity thresholds allow for different load types in each direction. For example, ore in one direction and carryback only, in the other.
If the vehicle database is synchronized across multiple MPS systems (see MyScanner web service settings) then load thresholds will also be synchronized.
Set default thresholds
Default thresholds are applied to all vehicles which do not have custom thresholds.
To edit the default thresholds:
- Set the Apply to selector to ‘Default’.
- Enter the desired values according to Load status logic, below.
Set thresholds for a specific vehicle
- Set the Apply to selector to ‘Vehicle ID’.
- Select vehicle when prompted or click in the Vehicle ID field to change the selection.
To apply the default thresholds to the selected vehicle, enable Use default. In this case, the default thresholds are displayed but cannot be edited.
To apply custom thresholds:
- Disable Use default.
- Enter desired values according to Load status logic, below.
- Note that when Use default is disabled, any custom thresholds previously applied to the selected vehicle will be restored.
Set thresholds by weight
If the Weight Estimate function is enabled, the estimated weight can be used to determine load quantity status instead of volume.
To set thresholds by weight:
- Change the Threshold type selector to ‘Weight’.
- Enter the desired thresholds in tons/tonnes.
Estimated weights are based on user-defined material density values which must be defined for thresholding by weight to work correctly.
If a density value has not been defined for the current load material, the reported load quantity status is NO STATUS and has no associated colour.
Load status logic
Load status values are determined according to the following rules.
| Status value | Rule |
|---|---|
| EMPTY (blue) |
|
| CARRYBACK (orange) |
|
| UNDERLOADED (red) |
|
| LOADED-OK (green) |
If the load quantity status is LOADED-OK but a load distribution status is also set, then LOADED-OK is not reported. For example, if LOADED-OK (green) and RIGHT-HEAVY (red) are both set then only RIGHT-HEAVY (red) will appear on load reports and measurement records. |
| OVERLOADED (red) |
|
| LEFT-HEAVY (red) |
|
| RIGHT-HEAVY (red) |
|
| FRONT-HEAVY (red) |
|
| BACK-HEAVY (red) |
|
| NO STATUS (no colour) |
|
If no thresholds are set:
- all non-zero loads are reported as LOADED-OK
- zero-value loads are reported as EMPTY.
