Introduction
This document is supplementary to the Load Volume Scanner (LVS) Operator Manual and provides information on configuring advanced functionality for load detail data collection and reporting.
This document has been updated for LVS software version 3.0-581. Differences may be present in older versions.
Variable auto responses
The value of any user-defined load detail can be set using an auto-response.
Auto-responses insert predefined text into load detail fields without the need for manual prompting.
For basic auto-response configuration and usage, refer to Automatic responses to load detail prompts in the Advanced functions section of the LVS Operator Manual.
It is possible to insert variables into auto-response text. Each variable is replaced with text corresponding to the actual value that the variable refers to after a scan completes.
A variable can refer to:
- additional information about a selected load detail value
- data stored on an ID tag used to identify the vehicle
- data stored in a barcode or QR code scanned instead of manual load detail entry.
Available variables are detailed below.
Report additional information about a selected load detail
An auto-response variable can refer to any field from a selection list item that corresponds to a selected load detail value.
This allows additional information about the selected value to be recorded as a separate load detail.
This may be used for example, to report:
- A product code corresponding to the selected product
- A density or compaction factor corresponding to the selected product
- A customer code corresponding to selected customer.
Each list item in a load detail selection list has three fields:
| Field number | Field name | Description |
|---|---|---|
| 1 | Name | Item name as it appears in the selection list. This field is required. |
| 2 | Value | Value that is output when name is selected. This is the text value shown on load reports and saved in measurement records. If not set, value will be the same as name. |
| 3 | Custom | Optional custom information associated with the list item. |
Refer to Load detail selection lists in the User configuration options section of the LVS Operator Manual for general list editing and usage instructions.
Once a list item has been selected on a load detail prompt, an auto-response variable for a subsequent load detail can extract the value from any of the fields of the selected list item.
The required auto-response variable is:
| Variable | Description |
|---|---|
| LoadDetail(n) | “LoadDetail” is the name of the load detail as set in LVS configuration and “n” is the field number to be reported (see table above). |
The following must be true for the auto-response to evaluate correctly:
- The load detail has an associated selection list
- The load detail value has already been set (either manually or by an auto response) and matches a list item.
Example – reporting a product code corresponding to the selected product
A mulch company uses an LVS and has load details configured as shown in the operator console Load Details dialog:
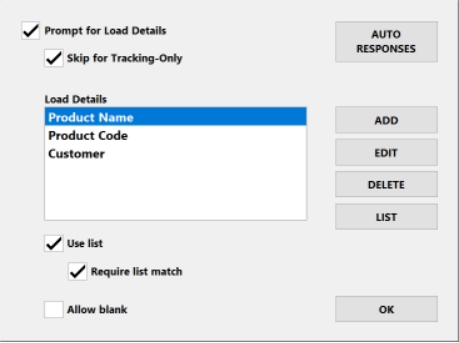
The ‘Product Name’ load detail records the name of the measured product. It has a selection list as shown in the operator console List dialog:
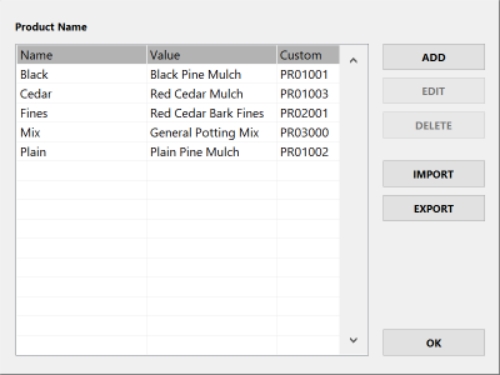
In this example:
- ‘Name’ entries are short nicknames that appear on the selection list. These are what the LVS operators generally use to refer to the products
- ‘Value’ entries are the full product names used to populate the ‘Product Name’ load detail
- ‘Custom’ entries are product codes as used by the company’s accounting software.
This ‘Product Code’ load detail has an auto-response set to ‘Product Name(3)’ as shown in the operator console Auto-Responses dialog:
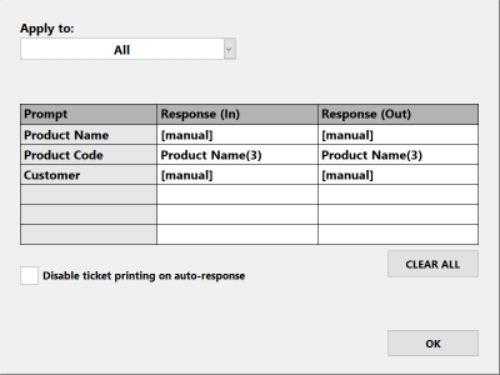
This populates the ‘Product Code’ load detail with the value from field number 3 (custom) for the list item matching the ‘Product Name’ value.
The resulting output is the product code associated with the selected product. This is used to match the product to records in the company’s accounting system database.
Report ID tag data
The following auto-response variables refer to data stored on an RFID tag used to identify the vehicle. These can be used to report the data as additional load details:
| Variable | Description |
|---|---|
| TAGID | The unique identifier code for the ID tag.
This is the value that shows in the ‘ID tag’ field for vehicle database records. |
| TAGDATA | Data stored in ‘user’ memory on the ID tag.
This can only be used with EPC tags on an LVS system fitted with an EPC Gen2 Global compliant UHF tag reader. User memory on EPC tags can be programmed by the user to store supplementary information related to vehicle loads.
If the vehicle is not identified by an ID tag or user memory is empty or inaccessible, then the TAGDATA variable is replaced with ‘no data’. |
Refer to the support document Load Volume Scanner – License Plate Recognition (LPR) user guide for general information about RFID reader and tag options for LVS systems.
Answer load detail prompts with a barcode or QR code
A scanned barcode or QR code can be used to automatically answer multiple load detail prompts.
This requires:
- a USB bar code reader fitted to the LVS system
- user-generated barcodes/QR codes.
The barcode/QR code output must be multi-field text with semi-colon separators between fields:
Field 1;Field 2;Field 3…
The required auto-response variable is:
| Variable | Description |
|---|---|
| BARCODE(i) | Field number “i” from a multi-field barcode or QR code output. |
The barcode/QR code should be scanned when the first load detail prompt appears. All load details with BARCODE auto-responses set are then answered automatically.
Any subsequent load details are prompted manually if:
- they do not have an auto-response set
- the referenced barcode/QR code field does not exist or is blank.
The load detail prompt will close automatically if the barcode or QR code output is terminated with a carriage-return character.
Otherwise, the prompt must be closed manually after scanning the code.
Example – Rock aggregate supply to a construction site
A construction company operates an LVS on a construction site and is supplied with construction aggregates from a quarry.
The quarry supplies a docket with each load that includes a custom QR code.
The LVS has load details configured as shown in the operator console Load Details dialog:
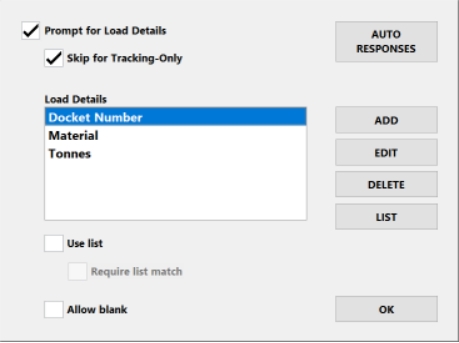
All load details have auto-responses set for the incoming scan direction as shown in the operator console Auto-Responses dialog:
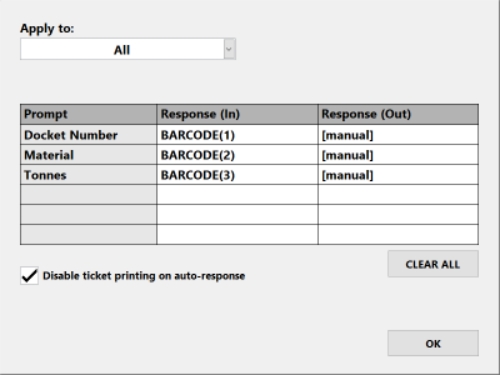
The custom QR code printed on the quarry supply docket has a matching output format as illustrated by the following sample:
QRY02-00340164;Drainage Gravel;15.7
Selection dependent list filters
Filter codes can be inserted into load detail selection lists to vary the list items that are shown based on what values were selected for one or more preceding load details.
Here are some usage examples:
- Filter a supplier list based on product selection so that only suppliers that can supply the selected product are shown on the supplier selection list
- Filter a job list based on customer selection so that only the selected customer’s jobs are shown on the job list
Filter a destination list based on both product and source selection so that only compatible processing destinations are shown on the destination list.
Using filter codes requires editing load detail selection lists.
Refer to Load detail selection lists in the User configuration options section of the LVS Operator Manual for general list editing instructions.
Filter codes
Here are basic requirements for entering filter codes into load detail selection lists:
- To add filter codes from the LVS user interface, enter each one as a new list item and use the ‘Name’ field only.
- To add filter codes into selection list text files externally to the LVS user interface, enter each filter code on a new line.
- A filter code acts only on list items placed after the code and before any subsequent filter code.
- List items do not need to be entered in alphabetical order as they are automatically ordered after filtering and before they are displayed.
- Any list items before the first filter code will always be displayed.
- A USB keyboard is required to enter filter code characters that are not available on the on-screen keypad when adding filter codes from the LVS user interface.
| Format | Description |
|---|---|
| LoadDetail=A | LoadDetail is the name of a preceding load detail and A is the filter value.
List items that follow the filter code (and before any subsequent filter code) will display only if the selected value for the specified load detail matches filter value A. |
| LoadDetail=A,B,C… | As above, but with multiple filter values. List items that follow the filter code (and before any subsequent filter code) will display only if the selected value for the specified load detail matches one of the filter values. |
| LoadDetail1=A&LoadDetail2=B | Filter codes can be combined with the ‘&’ character.
In this case, list items that follow the filter code (and before any subsequent filter code) will display only if the selected value for LoadDetail1 matches A and the selected value for LoadDetail2 matches B. |
| *Load_Detail=A | Adding “*” at the beginning of a filter code makes it negative.
In this case, list items that follow the filter code (and before any subsequent filter code) will show unless the selected value for LoadDetail matches A. |
| Load_Detail1=A Load_Detail2=B |
Multiple positive filter codes can precede a set of list items.
In this case, list items that follow the filter code (and before any subsequent filter code) will show if the selected value for Load_Detail1 matches A or the selected value for Load_Detail2 matches B. |
| *Load_Detail1=A *Load_Detail2=B |
Multiple negative filter codes can precede a set of list items.
In this case, list items that follow the filter code (and before any subsequent filter code) will display unless the selected value for Load_Detail1 matches A or the selected value for Load_Detail2 matches B. |
Example – filtering product list based on supplier selection
A company has two suppliers who supply similar landscaping products:
| Supplier | Products |
|---|---|
| Smith & Co | Black Mulch, Red Mulch, Dark Mulch, Potting Mix, High Grade Topsoil |
| Jones Soils | Black Topsoil, Red Bark, Dark Topsoil, High Grade Sand, Washed Stones |
Due to the similarity of product names, there is a high chance of mistakes when selecting product type. To reduce the chance of mistakes the company filters the product list to show only the products available from the selected supplier.
‘Supplier’ and ‘Product’ load details are configured so that supplier selection occurs before product selection, as shown in the operator console Load Details dialog:
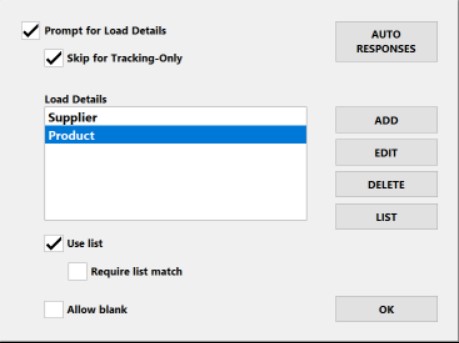
Both load details have selection lists associated with them.
The ‘Product’ list as shown in the operator console List dialog results in only the selected supplier’s product range appearing on the product selection list:
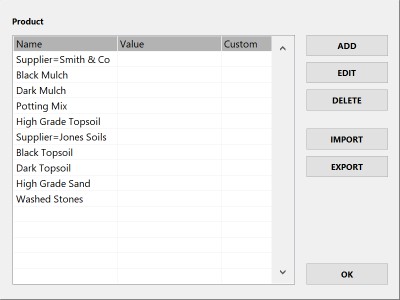
In this Article
Introduction
This document is supplementary to the Load Volume Scanner (LVS) Operator Manual and provides information on configuring advanced functionality for load detail data collection and reporting.
This document has been updated for LVS software version 3.0-581. Differences may be present in older versions.
Variable auto responses
The value of any user-defined load detail can be set using an auto-response.
Auto-responses insert predefined text into load detail fields without the need for manual prompting.
For basic auto-response configuration and usage, refer to Automatic responses to load detail prompts in the Advanced functions section of the LVS Operator Manual.
It is possible to insert variables into auto-response text. Each variable is replaced with text corresponding to the actual value that the variable refers to after a scan completes.
A variable can refer to:
- additional information about a selected load detail value
- data stored on an ID tag used to identify the vehicle
- data stored in a barcode or QR code scanned instead of manual load detail entry.
Available variables are detailed below.
Report additional information about a selected load detail
An auto-response variable can refer to any field from a selection list item that corresponds to a selected load detail value.
This allows additional information about the selected value to be recorded as a separate load detail.
This may be used for example, to report:
- A product code corresponding to the selected product
- A density or compaction factor corresponding to the selected product
- A customer code corresponding to selected customer.
Each list item in a load detail selection list has three fields:
| Field number | Field name | Description |
|---|---|---|
| 1 | Name | Item name as it appears in the selection list. This field is required. |
| 2 | Value | Value that is output when name is selected. This is the text value shown on load reports and saved in measurement records. If not set, value will be the same as name. |
| 3 | Custom | Optional custom information associated with the list item. |
Refer to Load detail selection lists in the User configuration options section of the LVS Operator Manual for general list editing and usage instructions.
Once a list item has been selected on a load detail prompt, an auto-response variable for a subsequent load detail can extract the value from any of the fields of the selected list item.
The required auto-response variable is:
| Variable | Description |
|---|---|
| LoadDetail(n) | “LoadDetail” is the name of the load detail as set in LVS configuration and “n” is the field number to be reported (see table above). |
The following must be true for the auto-response to evaluate correctly:
- The load detail has an associated selection list
- The load detail value has already been set (either manually or by an auto response) and matches a list item.
Example – reporting a product code corresponding to the selected product
A mulch company uses an LVS and has load details configured as shown in the operator console Load Details dialog:

The ‘Product Name’ load detail records the name of the measured product. It has a selection list as shown in the operator console List dialog:

In this example:
- ‘Name’ entries are short nicknames that appear on the selection list. These are what the LVS operators generally use to refer to the products
- ‘Value’ entries are the full product names used to populate the ‘Product Name’ load detail
- ‘Custom’ entries are product codes as used by the company’s accounting software.
This ‘Product Code’ load detail has an auto-response set to ‘Product Name(3)’ as shown in the operator console Auto-Responses dialog:

This populates the ‘Product Code’ load detail with the value from field number 3 (custom) for the list item matching the ‘Product Name’ value.
The resulting output is the product code associated with the selected product. This is used to match the product to records in the company’s accounting system database.
Report ID tag data
The following auto-response variables refer to data stored on an RFID tag used to identify the vehicle. These can be used to report the data as additional load details:
| Variable | Description |
|---|---|
| TAGID | The unique identifier code for the ID tag.
This is the value that shows in the ‘ID tag’ field for vehicle database records. |
| TAGDATA | Data stored in ‘user’ memory on the ID tag.
This can only be used with EPC tags on an LVS system fitted with an EPC Gen2 Global compliant UHF tag reader. User memory on EPC tags can be programmed by the user to store supplementary information related to vehicle loads.
If the vehicle is not identified by an ID tag or user memory is empty or inaccessible, then the TAGDATA variable is replaced with ‘no data’. |
Refer to the support document Load Volume Scanner – License Plate Recognition (LPR) user guide for general information about RFID reader and tag options for LVS systems.
Answer load detail prompts with a barcode or QR code
A scanned barcode or QR code can be used to automatically answer multiple load detail prompts.
This requires:
- a USB bar code reader fitted to the LVS system
- user-generated barcodes/QR codes.
The barcode/QR code output must be multi-field text with semi-colon separators between fields:
Field 1;Field 2;Field 3…
The required auto-response variable is:
| Variable | Description |
|---|---|
| BARCODE(i) | Field number “i” from a multi-field barcode or QR code output. |
The barcode/QR code should be scanned when the first load detail prompt appears. All load details with BARCODE auto-responses set are then answered automatically.
Any subsequent load details are prompted manually if:
- they do not have an auto-response set
- the referenced barcode/QR code field does not exist or is blank.
The load detail prompt will close automatically if the barcode or QR code output is terminated with a carriage-return character.
Otherwise, the prompt must be closed manually after scanning the code.
Example – Rock aggregate supply to a construction site
A construction company operates an LVS on a construction site and is supplied with construction aggregates from a quarry.
The quarry supplies a docket with each load that includes a custom QR code.
The LVS has load details configured as shown in the operator console Load Details dialog:

All load details have auto-responses set for the incoming scan direction as shown in the operator console Auto-Responses dialog:

The custom QR code printed on the quarry supply docket has a matching output format as illustrated by the following sample:
QRY02-00340164;Drainage Gravel;15.7
Selection dependent list filters
Filter codes can be inserted into load detail selection lists to vary the list items that are shown based on what values were selected for one or more preceding load details.
Here are some usage examples:
- Filter a supplier list based on product selection so that only suppliers that can supply the selected product are shown on the supplier selection list
- Filter a job list based on customer selection so that only the selected customer’s jobs are shown on the job list
Filter a destination list based on both product and source selection so that only compatible processing destinations are shown on the destination list.
Using filter codes requires editing load detail selection lists.
Refer to Load detail selection lists in the User configuration options section of the LVS Operator Manual for general list editing instructions.
Filter codes
Here are basic requirements for entering filter codes into load detail selection lists:
- To add filter codes from the LVS user interface, enter each one as a new list item and use the ‘Name’ field only.
- To add filter codes into selection list text files externally to the LVS user interface, enter each filter code on a new line.
- A filter code acts only on list items placed after the code and before any subsequent filter code.
- List items do not need to be entered in alphabetical order as they are automatically ordered after filtering and before they are displayed.
- Any list items before the first filter code will always be displayed.
- A USB keyboard is required to enter filter code characters that are not available on the on-screen keypad when adding filter codes from the LVS user interface.
| Format | Description |
|---|---|
| LoadDetail=A | LoadDetail is the name of a preceding load detail and A is the filter value.
List items that follow the filter code (and before any subsequent filter code) will display only if the selected value for the specified load detail matches filter value A. |
| LoadDetail=A,B,C… | As above, but with multiple filter values. List items that follow the filter code (and before any subsequent filter code) will display only if the selected value for the specified load detail matches one of the filter values. |
| LoadDetail1=A&LoadDetail2=B | Filter codes can be combined with the ‘&’ character.
In this case, list items that follow the filter code (and before any subsequent filter code) will display only if the selected value for LoadDetail1 matches A and the selected value for LoadDetail2 matches B. |
| *Load_Detail=A | Adding “*” at the beginning of a filter code makes it negative.
In this case, list items that follow the filter code (and before any subsequent filter code) will show unless the selected value for LoadDetail matches A. |
| Load_Detail1=A Load_Detail2=B |
Multiple positive filter codes can precede a set of list items.
In this case, list items that follow the filter code (and before any subsequent filter code) will show if the selected value for Load_Detail1 matches A or the selected value for Load_Detail2 matches B. |
| *Load_Detail1=A *Load_Detail2=B |
Multiple negative filter codes can precede a set of list items.
In this case, list items that follow the filter code (and before any subsequent filter code) will display unless the selected value for Load_Detail1 matches A or the selected value for Load_Detail2 matches B. |
Example – filtering product list based on supplier selection
A company has two suppliers who supply similar landscaping products:
| Supplier | Products |
|---|---|
| Smith & Co | Black Mulch, Red Mulch, Dark Mulch, Potting Mix, High Grade Topsoil |
| Jones Soils | Black Topsoil, Red Bark, Dark Topsoil, High Grade Sand, Washed Stones |
Due to the similarity of product names, there is a high chance of mistakes when selecting product type. To reduce the chance of mistakes the company filters the product list to show only the products available from the selected supplier.
‘Supplier’ and ‘Product’ load details are configured so that supplier selection occurs before product selection, as shown in the operator console Load Details dialog:

Both load details have selection lists associated with them.
The ‘Product’ list as shown in the operator console List dialog results in only the selected supplier’s product range appearing on the product selection list:

