Introduction
This document is supplementary to the Load Volume Scanner (LVS) operator manual and provides information on features and usage of the License Plate Recognition (LPR) camera add-on option for automatic vehicle identification.
The standard LVS solution for automatic vehicle identification is to use vehicle-mounted RFID tags and the LVS system includes a built-in RFID tag reader for this.
LPR uses cameras to read vehicle license plates. This provides an alternative to RFID tags that does not require purchasing and mounting tags on vehicles.
LPR is an add-on option for the standard LVS system and has the following features:
- one or two cameras for automatic vehicle identification in one or both scan directions
- 3 – 8 m (10 – 26 ft) detection range (plate style dependent)
- multiple country/state license plate formats supported
- built-in illumination for day/night operation
- similar functionality to RFID tags
- front and/or rear license plate detection, depending on application and configuration
- ‘Auto 2-Scan’ option to initiate a 2-Scan measurement without user input when an unidentified license plate is detected
- view and download license plate images captured during a scan
- support for ‘tracking-only’ for specific vehicles (no measurement)
can be used together with RFID tags.
Installation
LPR hardware installation and software configuration must be performed by Loadscan or its representative, or with remote support from Loadscan technicians and is not fully documented here. Notes below provide an overview.
Hardware installation
The LPR add-on may be pre-installed on a new LVS system or retrofitted on site.
One-camera system
- Suitable for scanning vehicles in one direction only.
- Configured to detect front license plates only or rear license plates only.
Two-camera system
- Suitable for scanning vehicles in both directions.
- Configured to detect front, rear or both license plates.
The LPR camera assembly attaches to the LVS mounting pole.
The diagram below shows LPR cameras mounted on an LVS-3BMF:
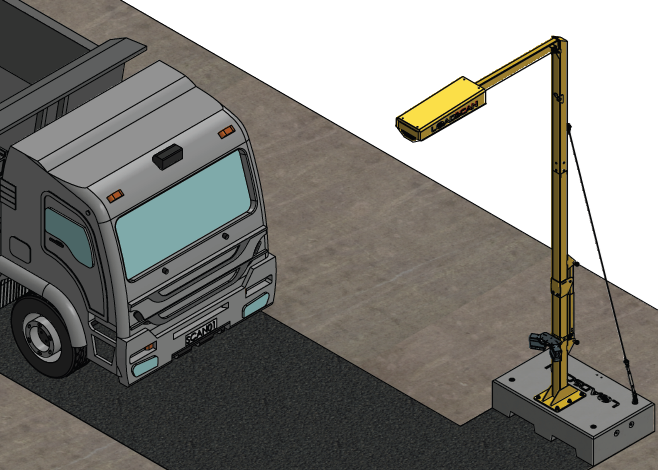
The LPR camera assembly is attached to the LVS mounting pole with a removable bracket that clamps to the pole. The bracket can easily be loosened for height adjustment or disassembled for removal.
The cameras are connected to the LVS system by detachable cables with waterproof power and data connectors.
The cameras can be mounted at a range of heights above or below the lower jack bracket on the bottom section of the LVS mounting pole. The lateral angle and down-tilt angle of the camera can be adjusted in 5° increments with locking screws.
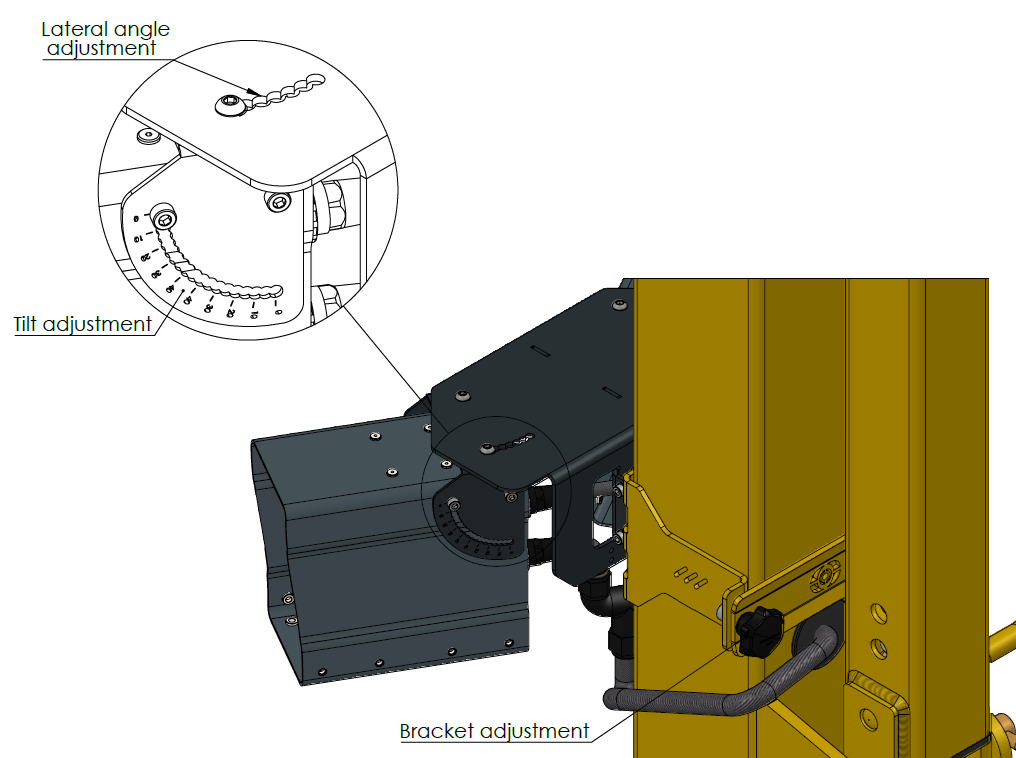
Optimal mounting for a standard LVS is typically:
- just above the lower jack bracket
- 30° lateral angle towards the scan area (maximum setting)
- 10° down-tilt (two notches down from level).
This is adjusted during the Commissioning process if required.
A single-camera system can only be used for a single scan direction and must be configured to read front plates only or rear plates only. It must be mounted on the appropriate side of the camera assembly.
LVS Software configuration
After LPR hardware is installed, LVS software settings for LPR must be configured:
- on site by Loadscan staff or approved representative
- by Loadscan technical support via remote-control (internet connectivity to LVS operator console required)
- via a software update file supplied by Loadscan technical support.
If software is being configured remotely, please specify the following:
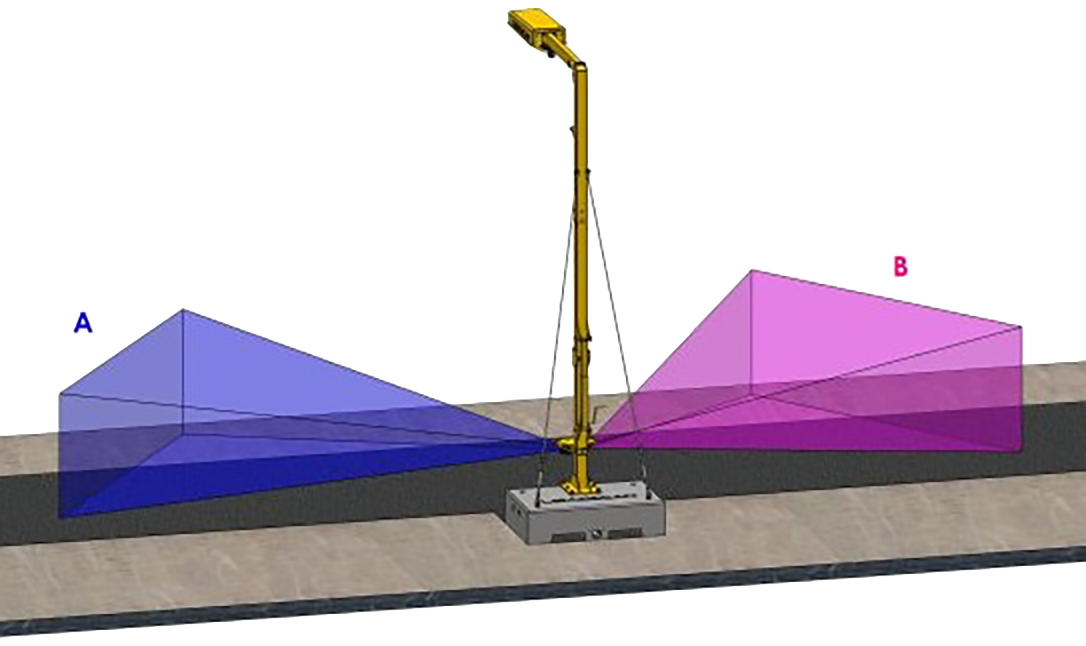
- [Single camera system only] the direction of the camera relative to the LVS system (A or B) according to the image below.
- Whether to enable combined RFID and LPR vehicle identification.
- The required ‘IDReadingOption’ and associated timeout, as described below.
The ‘IDReadingOption’ setting controls camera selection and timing of license plate detections during a scan to suit the truck types, camera locations and scan direction.
This setting has the following standard options and must be set to suit the application:
| Option | Description |
|---|---|
| before | Front license plate detection only.
Suitable for:
The camera facing the oncoming vehicle is selected and plate detection occurs only as the vehicle approaches the scan head (before the scan starts). Auto 2-Scan mode enabled: an unregistered plate initiates a 2-Scan measurement only if no registered plates were detected. (See Auto 2-Scan mode.) |
| after | Rear license plate detection only.
Suitable for single bin trucks and semi-trailers with clearly visible rear plates. The camera facing the same direction as the vehicle is selected and plate detection starts when the back of the vehicle clears the scan head (when the scan stops) and continues until the vehicle is identified or timeout occurs (adjustable, 30 seconds by default). Auto 2-Scan mode enabled: detection stops immediately when an unregistered plate is detected and a 2-Scan measurement is initiated. (See Auto 2-Scan mode.) The LED message board displays a ‘DETECTING VEHICLE ID’ message while waiting for a plate detection after a scan. |
| before-after | Front and rear license plate detection.
Suitable for:
A dual camera system is required for this option.
If all bins have not been identified before the scan, plate detection resumes after the scan, and continues until all bins have been identified or timeout occurs (adjustable, 30 seconds by default). Auto 2-Scan mode enabled: detection after the scan does not stop when an unregistered plate is detected. If timeout occurs, an unregistered plate initiates a 2-Scan measurement only if no registered plates were detected. (See Auto 2-Scan mode.) The LED message board displays a ‘DETECTING VEHICLE ID’ message while waiting for plate detections after a scan. |
Additional non-standard options for custom applications are not described here.
Commissioning
Perform the following commissioning procedure for each camera after initial installation.
A suitable test vehicle with a clearly readable license plate is required for this procedure. The plate should be mounted centrally and at the standard height.
This is normally a one-time process carried out by the installer or with remote support from Loadscan. It may need to be repeated when:
- license plate detection quality is low
- the scan head mounting is changed between standard outrigger and extended outrigger
- the LVS is installed in a different region, with different license plate format.
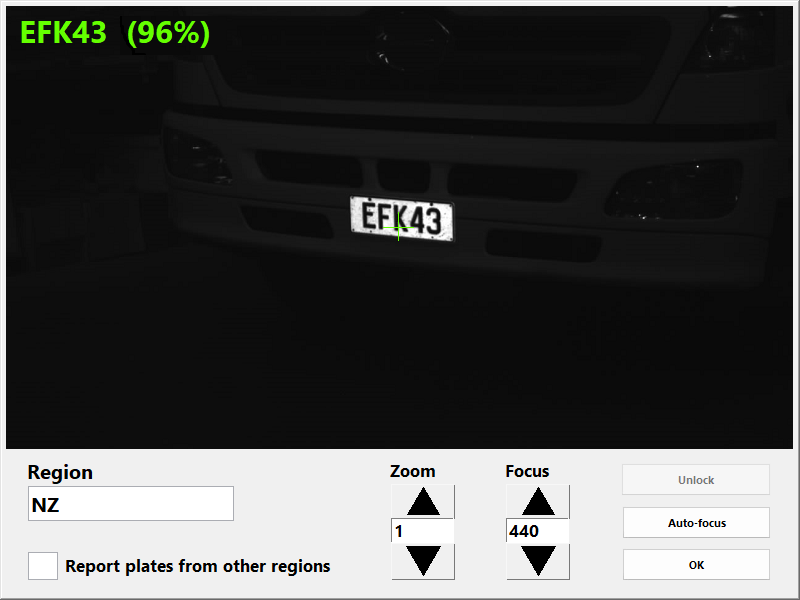
Open the LPR Live Viewer screen
- Open the System screen and push the camera icon button.
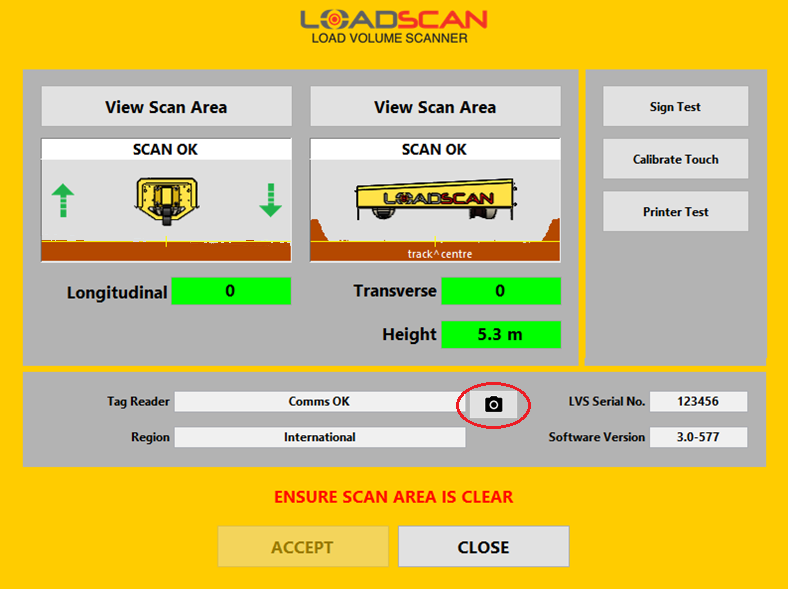
- If two LPR cameras are fitted, then select the A or B direction camera when prompted.

The LPR Live Viewer screen will open and show the live view from the camera as well as current region, zoom and focus settings.
When the camera detects a license plate, the plate ID is reported at the top left of the screen, along with a confidence score for the detection (0-100%).
Set the region
- Unlock the camera settings with the Unlock button (password ‘LPRLOCK’).
- Set Region to the required country/state. This sets the expected license plate format.
- If license plates from other countries/states should also be reported, enable Report plates from other regions.
Set zoom and focus
- Set the camera mounting to expected optimal position:
- just above the lower jack bracket
- 30° lateral angle towards the scan area (maximum setting)
- Set the camera down-tilt and adjust the zoom level setting to expected optimal values according to the following table:
| Scan head mounting | Down-tilt | Zoom |
|---|---|---|
| Standard outrigger | 10° (two notches down from level) | 2 |
| Extended outrigger | 5° (one notches down from level) | 10 |
- Position the test vehicle so that the license plate is:
- above the centreline of the scan area
- at the horizontal centre of the camera live view image.
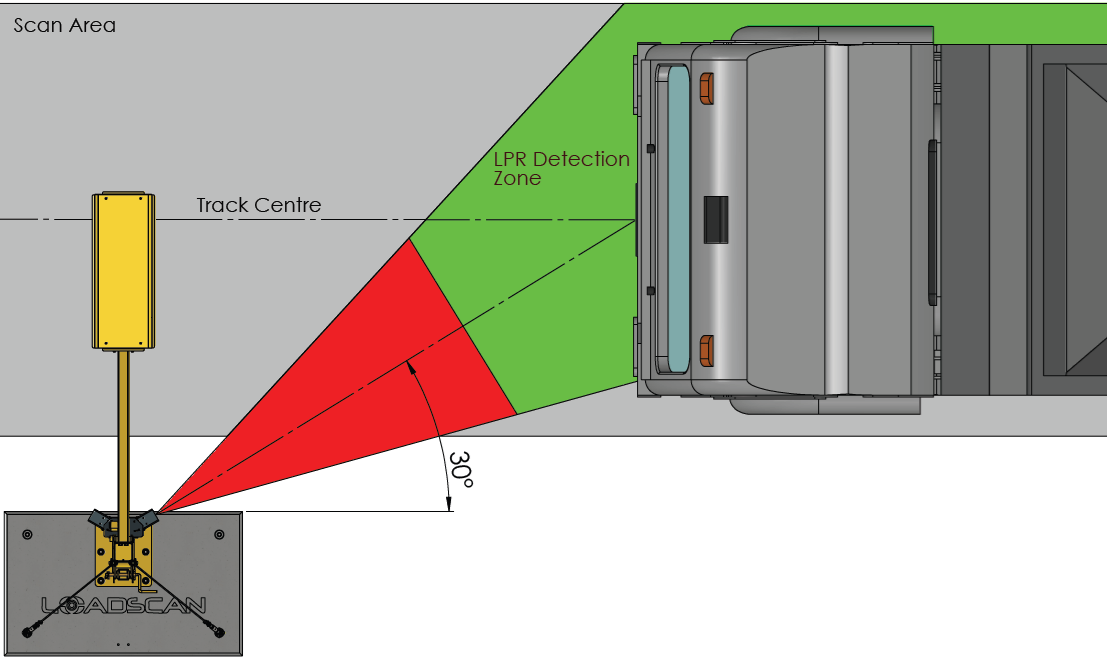
- Adjust the camera height and down-tilt (if necessary) to get the plate as close as possible to the vertical centre of the camera live view image.
- Adjust zoom (if necessary) so that the camera can see close to the full width of the scan track at the target distance.
For best results, the zoom should be set as high as possible while ensuring that the camera view includes all possible license plate positions at the target distance. This must allow for:
- vehicles driving to the left or right of the scan area
- license plates mounted non-centrally on vehicles.
- Check the LPR performance by driving the test vehicle (and other vehicles if available) through the scan area at different speeds and left/right positions. For each pass, confirm that the plate ID reported on the LPR Live Viewer screen matches the actual plate ID.
- Repeats steps 8-11 if necessary to improve LPR performance.
- When satisfied with the LPR performance, close the LPR View Viewer screen.
A dialog will appear asking whether to keep new settings or restore the camera settings before the LPR Live Viewer screen was opened.
Push the Keep button to save the new settings. Push the Restore button if you do not want to save the new settings.
General LVS operation with LPR
License plate detections associated with a scan are handled basically the same way as RFID tag detections.
- The LPR camera(s) detect truck or trailer licence plates that pass within the detection range.
- The LVS software matches license plate numbers to records in the vehicle database.
- If the vehicle is found in the database (all bins identified) then load measurement and reporting proceeds immediately for the corresponding scan.
- If the vehicle is not found in the LVS database (one or more bins not identified) then depending on LVS configuration, the system may:
- prompt for manual ID input
- discard the scan
- start an ‘Auto 2-Scan’ measurement (see Auto 2-Scan mode).
Plates must be clearly visible. Mis-reads (incorrect plate number) or failed reads (no plate number) may occur where plates are obstructed, dirty, worn or damaged.
Using license plate numbers as ID tags
License plate numbers are a form of ID tag used to identify a vehicle. Every record in the LVS vehicle database has an ‘ID tag’ field that is used to register an ID tag code that will automatically identify the corresponding vehicle bin.
For an RFID tag, the ‘ID tag’ field stores the unique identifier of the tag.
For LPR, the license plate number does not normally need to be registered and the ‘ID tag’ field can be left blank.
- If the license plate number matches the vehicle ID assigned to the bin, then the plate number does not need to be registered.
- If the assigned vehicle ID for a bin is different from the corresponding license plate, then the plate number must be manually registered as an ID tag.
For regions where there is no distinction between the letter “O” and the number “0” on license plates the LPR camera will consistently report one of these characters.
Where this results in a mismatch between a registered vehicle ID and the license plate number reported by the LPR camera, the plate number exactly as reported by the LPR camera must be registered as an ID tag.
To manually register a license plate number as an ID tag for a vehicle in the database:
- Open the Vehicle Database screen.
- Select the vehicle ID on the Identifier list.
- Press the ID Tag button.
- If the vehicle is a trailer (second bin), a prompt will display with two options. Select the ID TAG option to open the ID Tag Registration dialog.
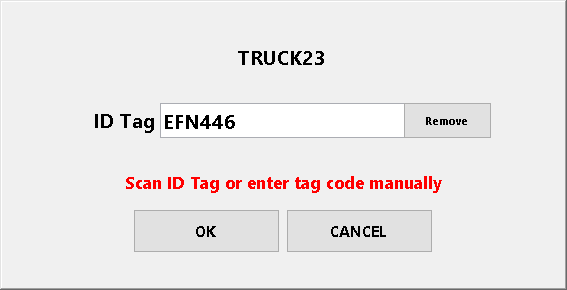
- If the vehicle is present, then drive it to a position where the license plate can be detected. The ‘ID Tag’ field will populate when the license plate is detected.
If the vehicle is not present or it is more convenient to enter the plate number manually, click in the ID Tag field to open the on-screen keypad for editing. - Select OK to register the license plate number as an ID tag.
Auto 2-Scan mode
Auto 2-Scan mode is an advanced feature only available for LVS systems with LPR.
- Auto 2-Scan measurement is the same as normal 2-Scan measurement but automatically registers the detected license plate number as the vehicle ID and can be fully automated.
- If Auto 2-Scan mode is enabled, an unregistered license plate number initiates a 2-Scan measurement if no registered plates are detected for the same scan. Where more than one unregistered plate number is detected, the first one is used.
- When a 2-Scan measurement is initiated, the associated scan is recorded as the first scan of two. The measurement completes when the same vehicle is detected on a subsequent scan.
- The reported load volume is the difference between the two scans.
To enable Auto 2-Scan mode:
- Open the Settings screen.
- Press the 2-Scan button to open the 2-Scan Measurement Settings dialog.
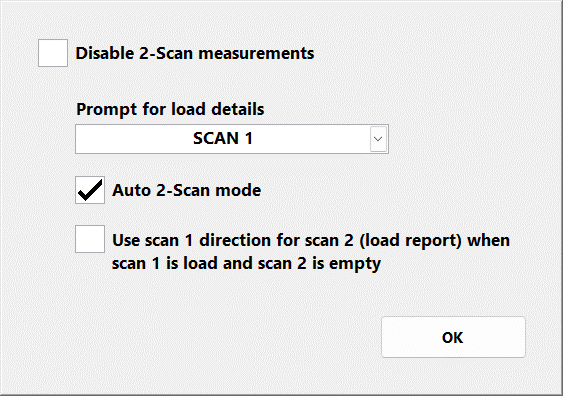
- Enable Auto 2-Scan mode.
- Close the dialog with the OK button to apply setting.
Refer to 2-Scan measurements in the Advanced functions section of the LVS operator manual for a general description of 2-Scan measurement and 2-Scan measurement settings in the User configuration options section for details of other related settings.
Semi-trailers and dual bin combination vehicles
Truck-trailers and semi-trailers are identified by rear plates and cannot be directly identified by the front plate of the towing vehicle (the truck or tractor unit).
However, front plates are generally easy to read and rear plates can be difficult or impossible to read. In particular, it is not feasible to reliably identify rear plates on trucks or semi-trailers towing another trailer.
This problem can be avoided where no trailer swapping occurs, and truck-trailers or semi-trailers are always paired with the same towing vehicle:
- for a truck-trailer we can use the ‘permanent pair’ functionality of the LVS to link the trailer permanently with a particular truck so that the trailer is identified automatically when the truck is identified. Refer to Link truck and trailer as a permanent pair in the Advanced functions section of the LVS operator manual.
- for a single semi-trailer towed by a tractor unit we can achieve the same result by registering the truck license plate number as an ‘ID tag’ for the semi-trailer. Refer to Using license plate numbers as ID tags.
Tracking Only
For some trucks it may be desirable to record vehicle movements without measuring the load.
The LVS has functionality to do this using RFID tags by creating special ‘Tracking Only’ records in the vehicle database. These record the vehicle ID and associated ID tag number but have no associated reference scan data.
Tracking Only vehicle records can be used with LPR without the requirement for RFID tags.
Refer to Tracking Only (no measurement) in the Advanced functions section of the LVS operator manual for instructions on creating and using Tracking Only vehicle records.
Instead of scanning an ID tag when creating a Tracking Only vehicle record, manually register the license plate number as described in Using license plate numbers as ID tags.
Viewing and downloading LPR license plate images.
A black and white image of the license plate is recorded for every LPR detection associated with a scan. These images are useful for auditing scan records and troubleshooting LPR performance.
LPR images can be viewed and downloaded to USB flash drive from the LVS operator console.
If any LPR images are available for a scan, then a camera icon button displays on the Main screen while the load report for that scan is active, as illustrated below:
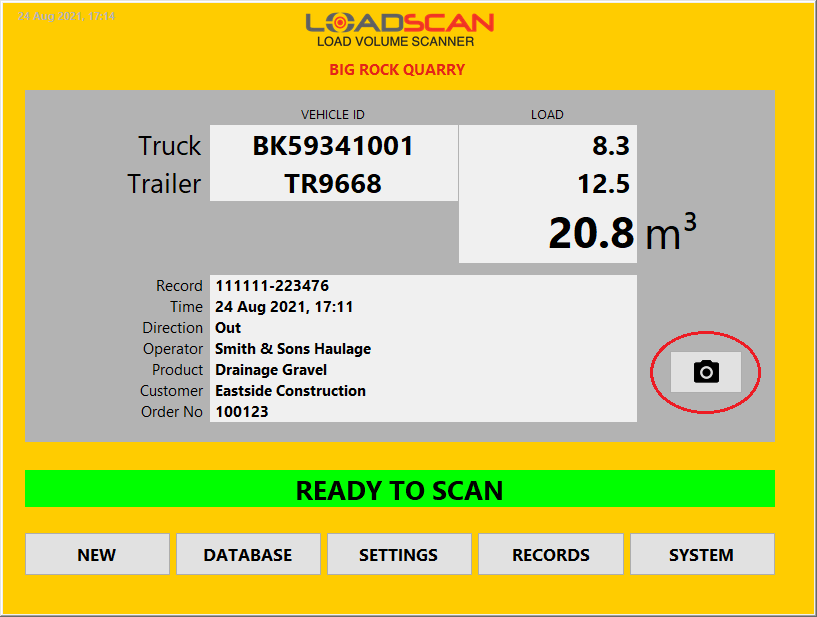
Press the camera icon button to open the Image Viewer screen:
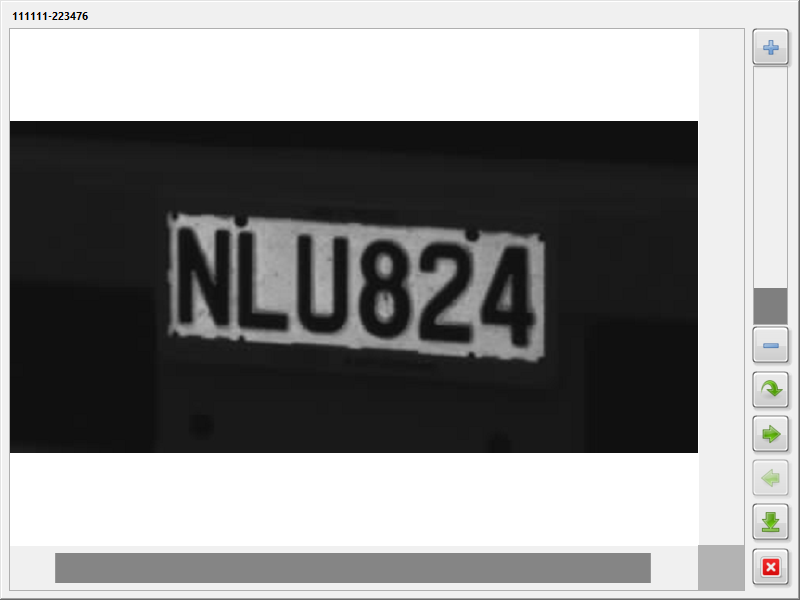
The following icon buttons are available:
| Button | Function |
|---|---|
| Zoom+ Increase zoom level. The zoom slider can also be used. |
|
| Zoom- Decrease zoom level. The zoom slider can also be used. |
|
| Reset Reset image pan and zoom to best fit. |
|
| Next Show next image (greyed-out if no more images) |
|
| Previous Show previous image (greyed-out if no previous image) |
|
| Download All images for the scan are downloaded to a zip file on USB flash drive. A USB flash drive with enough free space must be plugged into the LVS USB port. |
|
| Close Close the Image Viewer screen. |
Images can be panned with scrollbars or by clicking-and-dragging.
Note that if an external USB mouse is attached to the LVS operator console then mouse-wheel zooming is also supported.
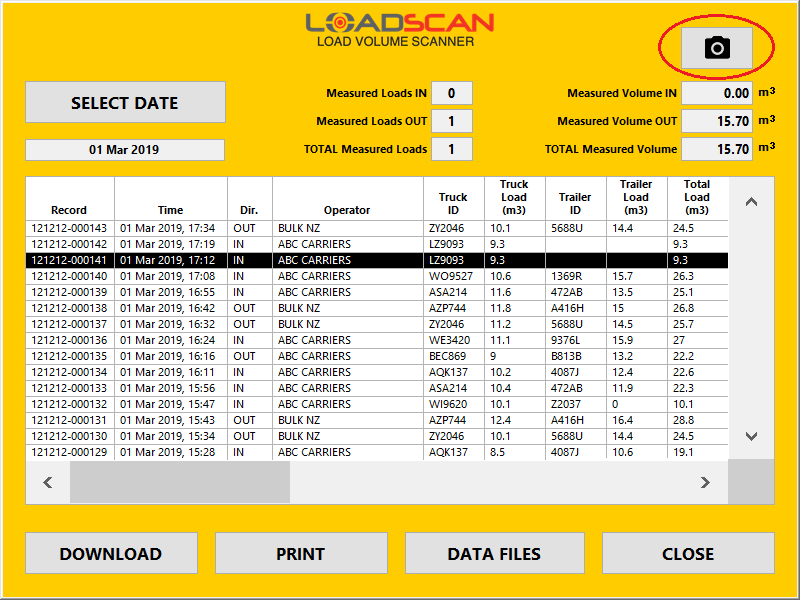
The camera icon button also displays to open the Image Viewer screen:
- on the Records screen when a measurement record with associated LPR image(s) is selected.
- on the Scan Data dialog when a scan data file for a scan with associated LPR image(s) is selected.
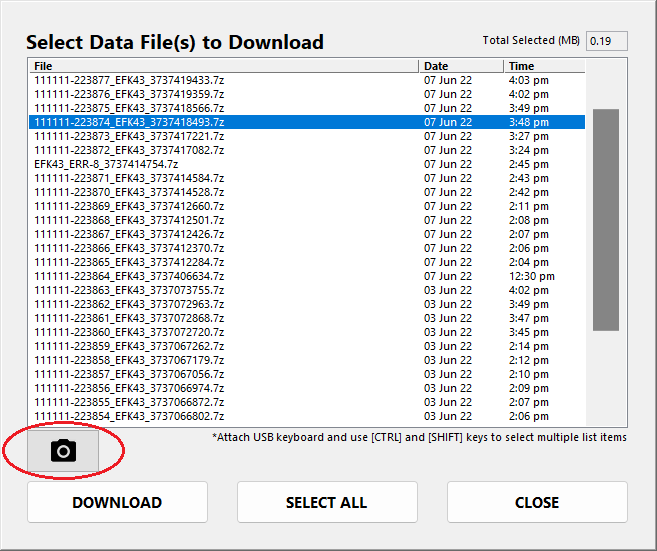
LPR images are saved with corresponding ‘scan data files’ that record raw scan data for each scan. They are auto deleted at the same time as corresponding scan data files. Refer to Scan data files in the Reviewing measurement records section of the LVS operator manual for details.
Checking LPR camera operation
LPR camera operation can be checked from the operator console System screen.
Communication status
The Tag Reader field on this screen reports communication status for enabled RFID and LPR devices and displays detected RFID tag or license plate identifiers.
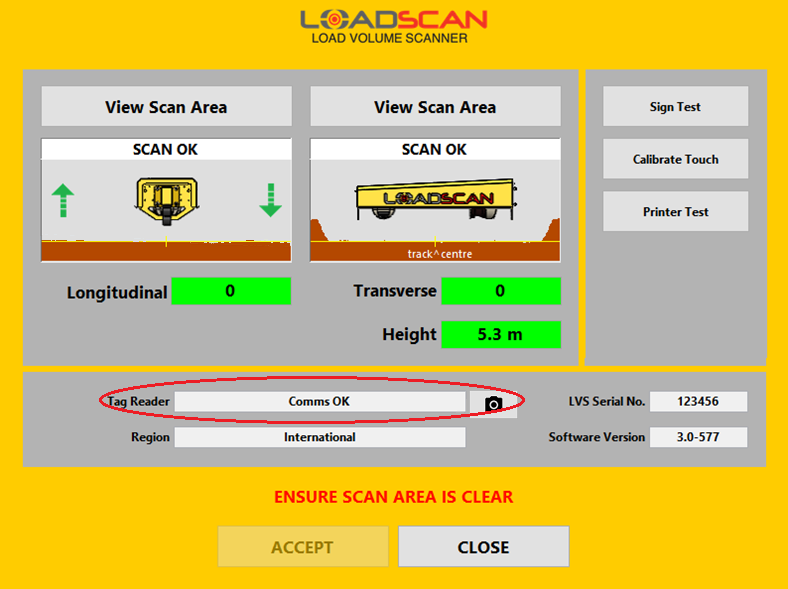
- ‘COMMS OK’ indicates all ID reader devices are communicating with the LVS.
- ‘NO COMMS’ indicates that there is no communication with any ID reader devices.
- ‘NO COMMS’ with a model name in brackets indicates that there is no communication with the specific device. For LPR the model is ‘MICROPAK3’.
When an RFID tag or a license plate is detected, the identifier displays for about 5 seconds in the Tag Reader field and on the LED message board.
LPR Live Viewer
Use the camera icon button to the right of the Tag Reader field to open the LPR Live Viewer screen.
If two LPR cameras are fitted, then select the A or B direction camera when prompted.

The LPR Live Viewer screen shows the live view from the camera.
If the camera detects a license plate, the plate number is reported at the top left of the screen, along with a confidence score for the detection (0 – 100%).
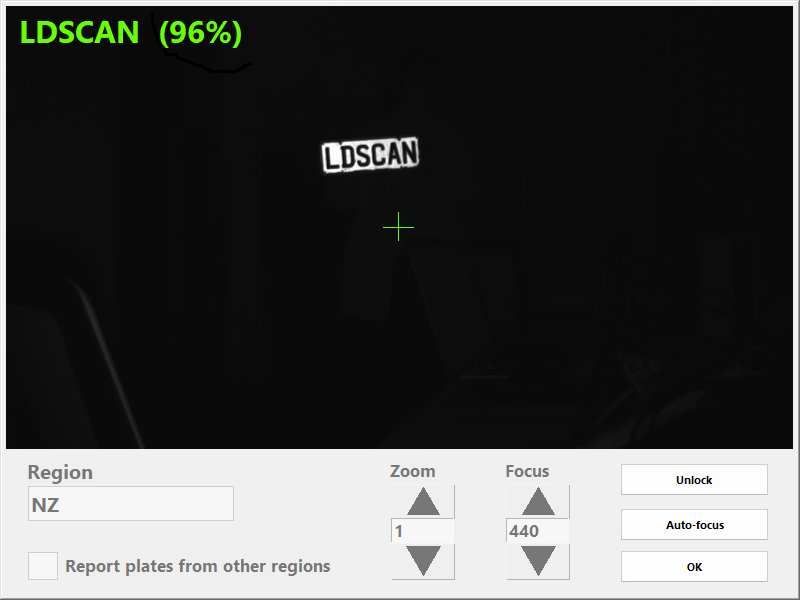
Use of this screen is described in more detail in Commissioning.
When testing LPR operation please check that:
- camera lenses are clean
- license plates are clearly visible (not obstructed, dirty, worn or damaged) and mounted in standard locations on test vehicles
- licence plate format is appropriate for the LPR region specified during commissioning
- only one vehicle is in the scan area at a time
- license plates on vehicles in adjacent lanes are not in the camera field of view
- the scan area is correctly defined and aligned with the LVS
- trucks are well centred on the scan area and not turning immediately before a scan starts or immediately after a scan completes.
Please contact Loadscan technical support if LPR detection issues cannot be resolved.
In this Article
Introduction
This document is supplementary to the Load Volume Scanner (LVS) operator manual and provides information on features and usage of the License Plate Recognition (LPR) camera add-on option for automatic vehicle identification.
The standard LVS solution for automatic vehicle identification is to use vehicle-mounted RFID tags and the LVS system includes a built-in RFID tag reader for this.
LPR uses cameras to read vehicle license plates. This provides an alternative to RFID tags that does not require purchasing and mounting tags on vehicles.
LPR is an add-on option for the standard LVS system and has the following features:
- one or two cameras for automatic vehicle identification in one or both scan directions
- 3 – 8 m (10 – 26 ft) detection range (plate style dependent)
- multiple country/state license plate formats supported
- built-in illumination for day/night operation
- similar functionality to RFID tags
- front and/or rear license plate detection, depending on application and configuration
- ‘Auto 2-Scan’ option to initiate a 2-Scan measurement without user input when an unidentified license plate is detected
- view and download license plate images captured during a scan
- support for ‘tracking-only’ for specific vehicles (no measurement)
can be used together with RFID tags.
Installation
LPR hardware installation and software configuration must be performed by Loadscan or its representative, or with remote support from Loadscan technicians and is not fully documented here. Notes below provide an overview.
Hardware installation
The LPR add-on may be pre-installed on a new LVS system or retrofitted on site.
One-camera system
- Suitable for scanning vehicles in one direction only.
- Configured to detect front license plates only or rear license plates only.
Two-camera system
- Suitable for scanning vehicles in both directions.
- Configured to detect front, rear or both license plates.
The LPR camera assembly attaches to the LVS mounting pole.
The diagram below shows LPR cameras mounted on an LVS-3BMF:

The LPR camera assembly is attached to the LVS mounting pole with a removable bracket that clamps to the pole. The bracket can easily be loosened for height adjustment or disassembled for removal.
The cameras are connected to the LVS system by detachable cables with waterproof power and data connectors.
The cameras can be mounted at a range of heights above or below the lower jack bracket on the bottom section of the LVS mounting pole. The lateral angle and down-tilt angle of the camera can be adjusted in 5° increments with locking screws.

Optimal mounting for a standard LVS is typically:
- just above the lower jack bracket
- 30° lateral angle towards the scan area (maximum setting)
- 10° down-tilt (two notches down from level).
This is adjusted during the Commissioning process if required.
A single-camera system can only be used for a single scan direction and must be configured to read front plates only or rear plates only. It must be mounted on the appropriate side of the camera assembly.
LVS Software configuration
After LPR hardware is installed, LVS software settings for LPR must be configured:
- on site by Loadscan staff or approved representative
- by Loadscan technical support via remote-control (internet connectivity to LVS operator console required)
- via a software update file supplied by Loadscan technical support.
If software is being configured remotely, please specify the following:
- [Single camera system only] the direction of the camera relative to the LVS system (A or B) according to the image below.

- Whether to enable combined RFID and LPR vehicle identification.
- The required ‘IDReadingOption’ and associated timeout, as described below.
The ‘IDReadingOption’ setting controls camera selection and timing of license plate detections during a scan to suit the truck types, camera locations and scan direction.
This setting has the following standard options and must be set to suit the application:
| Option | Description |
|---|---|
| before | Front license plate detection only.
Suitable for:
The camera facing the oncoming vehicle is selected and plate detection occurs only as the vehicle approaches the scan head (before the scan starts). Auto 2-Scan mode enabled: an unregistered plate initiates a 2-Scan measurement only if no registered plates were detected. (See Auto 2-Scan mode.) |
| after | Rear license plate detection only.
Suitable for single bin trucks and semi-trailers with clearly visible rear plates. The camera facing the same direction as the vehicle is selected and plate detection starts when the back of the vehicle clears the scan head (when the scan stops) and continues until the vehicle is identified or timeout occurs (adjustable, 30 seconds by default). Auto 2-Scan mode enabled: detection stops immediately when an unregistered plate is detected and a 2-Scan measurement is initiated. (See Auto 2-Scan mode.) The LED message board displays a ‘DETECTING VEHICLE ID’ message while waiting for a plate detection after a scan. |
| before-after | Front and rear license plate detection.
Suitable for:
A dual camera system is required for this option.
If all bins have not been identified before the scan, plate detection resumes after the scan, and continues until all bins have been identified or timeout occurs (adjustable, 30 seconds by default). Auto 2-Scan mode enabled: detection after the scan does not stop when an unregistered plate is detected. If timeout occurs, an unregistered plate initiates a 2-Scan measurement only if no registered plates were detected. (See Auto 2-Scan mode.) The LED message board displays a ‘DETECTING VEHICLE ID’ message while waiting for plate detections after a scan. |
Additional non-standard options for custom applications are not described here.
Commissioning
Perform the following commissioning procedure for each camera after initial installation.
A suitable test vehicle with a clearly readable license plate is required for this procedure. The plate should be mounted centrally and at the standard height.
This is normally a one-time process carried out by the installer or with remote support from Loadscan. It may need to be repeated when:
- license plate detection quality is low
- the scan head mounting is changed between standard outrigger and extended outrigger
- the LVS is installed in a different region, with different license plate format.
Open the LPR Live Viewer screen
- Open the System screen and push the camera icon button.

- If two LPR cameras are fitted, then select the A or B direction camera when prompted.

The LPR Live Viewer screen will open and show the live view from the camera as well as current region, zoom and focus settings.
When the camera detects a license plate, the plate ID is reported at the top left of the screen, along with a confidence score for the detection (0-100%).

Set the region
- Unlock the camera settings with the Unlock button (password ‘LPRLOCK’).
- Set Region to the required country/state. This sets the expected license plate format.
- If license plates from other countries/states should also be reported, enable Report plates from other regions.
Set zoom and focus
- Set the camera mounting to expected optimal position:
- just above the lower jack bracket
- 30° lateral angle towards the scan area (maximum setting)
- Set the camera down-tilt and adjust the zoom level setting to expected optimal values according to the following table:
| Scan head mounting | Down-tilt | Zoom |
|---|---|---|
| Standard outrigger | 10° (two notches down from level) | 2 |
| Extended outrigger | 5° (one notches down from level) | 10 |
- Position the test vehicle so that the license plate is:
- above the centreline of the scan area
- at the horizontal centre of the camera live view image.

- Adjust the camera height and down-tilt (if necessary) to get the plate as close as possible to the vertical centre of the camera live view image.
- Adjust zoom (if necessary) so that the camera can see close to the full width of the scan track at the target distance.
For best results, the zoom should be set as high as possible while ensuring that the camera view includes all possible license plate positions at the target distance. This must allow for:
- vehicles driving to the left or right of the scan area
- license plates mounted non-centrally on vehicles.
- Check the LPR performance by driving the test vehicle (and other vehicles if available) through the scan area at different speeds and left/right positions. For each pass, confirm that the plate ID reported on the LPR Live Viewer screen matches the actual plate ID.
- Repeats steps 8-11 if necessary to improve LPR performance.
- When satisfied with the LPR performance, close the LPR View Viewer screen.
A dialog will appear asking whether to keep new settings or restore the camera settings before the LPR Live Viewer screen was opened.
Push the Keep button to save the new settings. Push the Restore button if you do not want to save the new settings.
General LVS operation with LPR
License plate detections associated with a scan are handled basically the same way as RFID tag detections.
- The LPR camera(s) detect truck or trailer licence plates that pass within the detection range.
- The LVS software matches license plate numbers to records in the vehicle database.
- If the vehicle is found in the database (all bins identified) then load measurement and reporting proceeds immediately for the corresponding scan.
- If the vehicle is not found in the LVS database (one or more bins not identified) then depending on LVS configuration, the system may:
- prompt for manual ID input
- discard the scan
- start an ‘Auto 2-Scan’ measurement (see Auto 2-Scan mode).
Plates must be clearly visible. Mis-reads (incorrect plate number) or failed reads (no plate number) may occur where plates are obstructed, dirty, worn or damaged.
Using license plate numbers as ID tags
License plate numbers are a form of ID tag used to identify a vehicle. Every record in the LVS vehicle database has an ‘ID tag’ field that is used to register an ID tag code that will automatically identify the corresponding vehicle bin.
For an RFID tag, the ‘ID tag’ field stores the unique identifier of the tag.
For LPR, the license plate number does not normally need to be registered and the ‘ID tag’ field can be left blank.
- If the license plate number matches the vehicle ID assigned to the bin, then the plate number does not need to be registered.
- If the assigned vehicle ID for a bin is different from the corresponding license plate, then the plate number must be manually registered as an ID tag.
For regions where there is no distinction between the letter “O” and the number “0” on license plates the LPR camera will consistently report one of these characters.
Where this results in a mismatch between a registered vehicle ID and the license plate number reported by the LPR camera, the plate number exactly as reported by the LPR camera must be registered as an ID tag.
To manually register a license plate number as an ID tag for a vehicle in the database:
- Open the Vehicle Database screen.
- Select the vehicle ID on the Identifier list.
- Press the ID Tag button.
- If the vehicle is a trailer (second bin), a prompt will display with two options. Select the ID TAG option to open the ID Tag Registration dialog.

- If the vehicle is present, then drive it to a position where the license plate can be detected. The ‘ID Tag’ field will populate when the license plate is detected.
If the vehicle is not present or it is more convenient to enter the plate number manually, click in the ID Tag field to open the on-screen keypad for editing. - Select OK to register the license plate number as an ID tag.
Auto 2-Scan mode
Auto 2-Scan mode is an advanced feature only available for LVS systems with LPR.
- Auto 2-Scan measurement is the same as normal 2-Scan measurement but automatically registers the detected license plate number as the vehicle ID and can be fully automated.
- If Auto 2-Scan mode is enabled, an unregistered license plate number initiates a 2-Scan measurement if no registered plates are detected for the same scan. Where more than one unregistered plate number is detected, the first one is used.
- When a 2-Scan measurement is initiated, the associated scan is recorded as the first scan of two. The measurement completes when the same vehicle is detected on a subsequent scan.
- The reported load volume is the difference between the two scans.
To enable Auto 2-Scan mode:
- Open the Settings screen.
- Press the 2-Scan button to open the 2-Scan Measurement Settings dialog.

- Enable Auto 2-Scan mode.
- Close the dialog with the OK button to apply setting.
Refer to 2-Scan measurements in the Advanced functions section of the LVS operator manual for a general description of 2-Scan measurement and 2-Scan measurement settings in the User configuration options section for details of other related settings.
Semi-trailers and dual bin combination vehicles
Truck-trailers and semi-trailers are identified by rear plates and cannot be directly identified by the front plate of the towing vehicle (the truck or tractor unit).
However, front plates are generally easy to read and rear plates can be difficult or impossible to read. In particular, it is not feasible to reliably identify rear plates on trucks or semi-trailers towing another trailer.
This problem can be avoided where no trailer swapping occurs, and truck-trailers or semi-trailers are always paired with the same towing vehicle:
- for a truck-trailer we can use the ‘permanent pair’ functionality of the LVS to link the trailer permanently with a particular truck so that the trailer is identified automatically when the truck is identified. Refer to Link truck and trailer as a permanent pair in the Advanced functions section of the LVS operator manual.
- for a single semi-trailer towed by a tractor unit we can achieve the same result by registering the truck license plate number as an ‘ID tag’ for the semi-trailer. Refer to Using license plate numbers as ID tags.
Tracking Only
For some trucks it may be desirable to record vehicle movements without measuring the load.
The LVS has functionality to do this using RFID tags by creating special ‘Tracking Only’ records in the vehicle database. These record the vehicle ID and associated ID tag number but have no associated reference scan data.
Tracking Only vehicle records can be used with LPR without the requirement for RFID tags.
Refer to Tracking Only (no measurement) in the Advanced functions section of the LVS operator manual for instructions on creating and using Tracking Only vehicle records.
Instead of scanning an ID tag when creating a Tracking Only vehicle record, manually register the license plate number as described in Using license plate numbers as ID tags.
Viewing and downloading LPR license plate images.
A black and white image of the license plate is recorded for every LPR detection associated with a scan. These images are useful for auditing scan records and troubleshooting LPR performance.
LPR images can be viewed and downloaded to USB flash drive from the LVS operator console.
If any LPR images are available for a scan, then a camera icon button displays on the Main screen while the load report for that scan is active, as illustrated below:

Press the camera icon button to open the Image Viewer screen:

The following icon buttons are available:
| Button | Function |
|---|---|
| Zoom+ Increase zoom level. The zoom slider can also be used. |
|
| Zoom- Decrease zoom level. The zoom slider can also be used. |
|
| Reset Reset image pan and zoom to best fit. |
|
| Next Show next image (greyed-out if no more images) |
|
| Previous Show previous image (greyed-out if no previous image) |
|
| Download All images for the scan are downloaded to a zip file on USB flash drive. A USB flash drive with enough free space must be plugged into the LVS USB port. |
|
| Close Close the Image Viewer screen. |
Images can be panned with scrollbars or by clicking-and-dragging.
Note that if an external USB mouse is attached to the LVS operator console then mouse-wheel zooming is also supported.
The camera icon button also displays to open the Image Viewer screen:
- on the Records screen when a measurement record with associated LPR image(s) is selected.

- on the Scan Data dialog when a scan data file for a scan with associated LPR image(s) is selected.

LPR images are saved with corresponding ‘scan data files’ that record raw scan data for each scan. They are auto deleted at the same time as corresponding scan data files. Refer to Scan data files in the Reviewing measurement records section of the LVS operator manual for details.
Checking LPR camera operation
LPR camera operation can be checked from the operator console System screen.
Communication status
The Tag Reader field on this screen reports communication status for enabled RFID and LPR devices and displays detected RFID tag or license plate identifiers.

- ‘COMMS OK’ indicates all ID reader devices are communicating with the LVS.
- ‘NO COMMS’ indicates that there is no communication with any ID reader devices.
- ‘NO COMMS’ with a model name in brackets indicates that there is no communication with the specific device. For LPR the model is ‘MICROPAK3’.
When an RFID tag or a license plate is detected, the identifier displays for about 5 seconds in the Tag Reader field and on the LED message board.
LPR Live Viewer
Use the camera icon button to the right of the Tag Reader field to open the LPR Live Viewer screen.
If two LPR cameras are fitted, then select the A or B direction camera when prompted.

The LPR Live Viewer screen shows the live view from the camera.
If the camera detects a license plate, the plate number is reported at the top left of the screen, along with a confidence score for the detection (0 – 100%).

Use of this screen is described in more detail in Commissioning.
When testing LPR operation please check that:
- camera lenses are clean
- license plates are clearly visible (not obstructed, dirty, worn or damaged) and mounted in standard locations on test vehicles
- licence plate format is appropriate for the LPR region specified during commissioning
- only one vehicle is in the scan area at a time
- license plates on vehicles in adjacent lanes are not in the camera field of view
- the scan area is correctly defined and aligned with the LVS
- trucks are well centred on the scan area and not turning immediately before a scan starts or immediately after a scan completes.
Please contact Loadscan technical support if LPR detection issues cannot be resolved.
