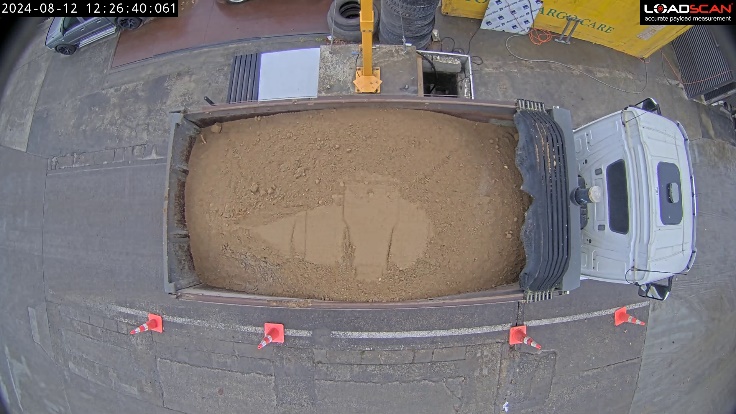
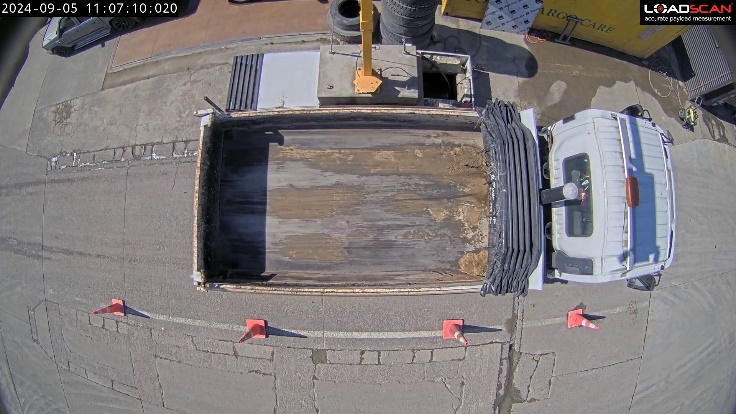
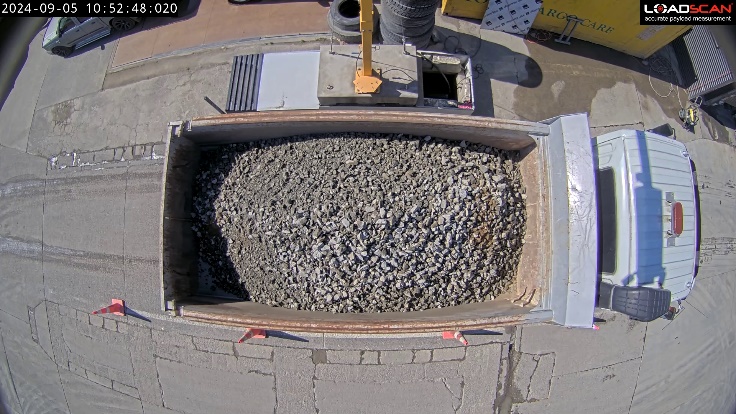
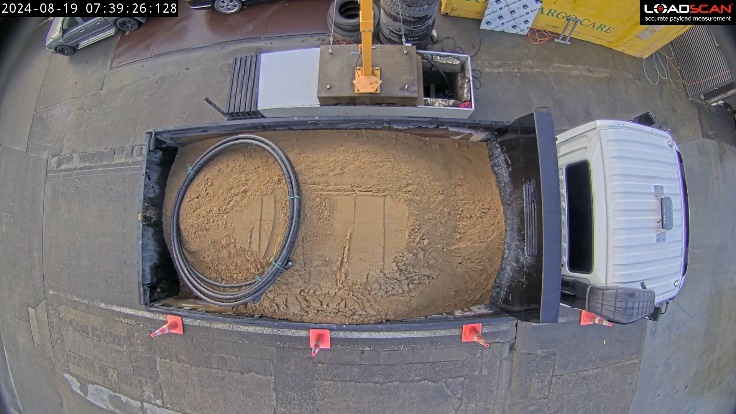
This document is supplementary to the Load Volume Scanner (LVS) operator manual and describes the features and usage of the LoadVision™ camera add-on option.
Instructions in this document assume familiarity with the LVS operator interface. Refer to the LVS operator manual for detailed LVS configuration and operation instructions.
Product Overview
The LoadVision camera is a fully integrated add-on option for LVS system. The camera is fitted to the LVS scan head and works with the MyScanner™ web service to enable users to view and download recorded video clips and snapshot images of scanned truck loads.
Features
The LoadVision camera and MyScanner web service together provide the following key features:
- view and download video clips or individual snapshot images for any scan available on the MyScanner web portal ‘Measurements’ page
- Full HD (1920 x 1080) resolution video and images
- video recording at 10 frames per second (fps)
- colour video recording in daylight
- black and white video recording at night (with built-in IR illumination)
- 130° horizontal field of view (along the scan track)
- 72° vertical field of view (across the scan track)
- 2 – 4 weeks of continuous video recording stored on-board the camera
- all uploaded scan videos and images available in MyScanner for a 3-month period
- web browser access to live view and recorded video (on local network only).
Uses
Uses for LoadVision include:
- load audits for quality control or dispute/discrepancy resolution
- identification/confirmation of load material/product type
- confirmation of vehicle ID
- cleanfill monitoring for unwanted contaminants/regulatory requirements
- error scan investigation
- security monitoring (live view and recorded video).
How it works
LoadVision uses an Axis M31 series wide-angle network camera that is configured with LoadVision specific settings and is fully integrated into the LVS software.
- The camera records continuously to an internal memory card.
- After every scan the LVS retrieves a video clip of the scan from the camera and uploads this to MyScanner.
- MyScanner extracts snapshot images from the uploaded video and links the video and images to the measurement record for the scan.
- MyScanner users can view and download videos and images in the MyScanner web portal user interface.
By default, uploaded scan videos:
- start 5 seconds before the target vehicle reaches the scan head (scan start)
- end 3 seconds after the vehicle clears the scan head (scan stop)
- are limited to a maximum duration of 150 seconds.
If necessary, Loadscan technical support can tune these settings.
The front view of a truck approaching the scan head before the scan starts can make manual confirmation of truck ID possible from company logos and licence plate numbers.
Installation and configuration
Hardware Installation
The LoadVision camera is fitted to the end of the LVS scan head to provide the best wide-angle overhead view.
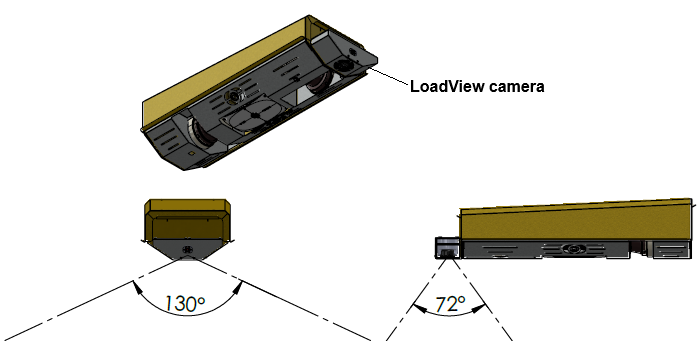
The camera assembly can be fitted to your LVS at the Loadscan factory or retrofitted in the field if the system meets minimum requirements.
Hardware installation is outside the scope of this document. If the camera is supplied as a retrofit kit, then assembly and configuration instructions will be provided with the kit.
Configuration
The LoadVision camera is enabled in the LVS software as part of the camera installation process.
The following are required for the LVS to upload video to MyScanner:
- a high-speed internet connection to the LVS
- an active MyScanner account.
Contact your Loadscan representative if you do not yet have a MyScanner account for your organization.
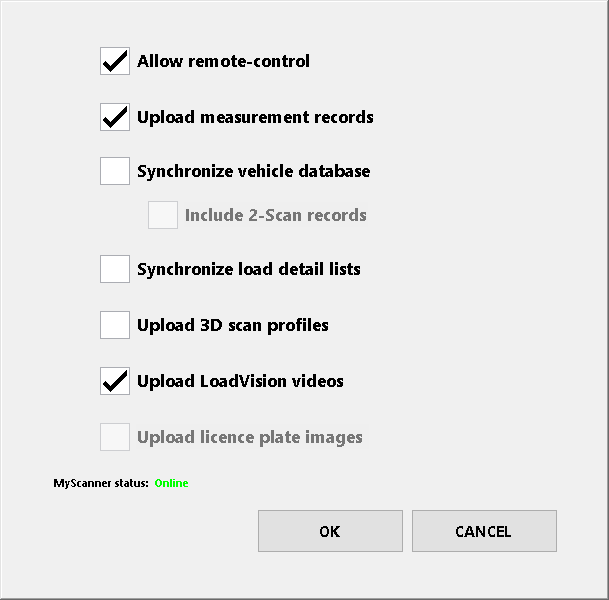
To enable or disable video uploads to MyScanner:
- Open the Settings screen by pushing the SETTINGS button on the LVS operator console main screen (user password required).
- Open the MyScanner Settings dialog by pushing the MyScanner button in the System section of the Settings screen
- Enable or disable the Upload LoadVision videos option as required.
- Ensure that Upload measurement records is also enabled and that MyScanner status is ‘online’ when Upload LoadVision videos is enabled.
Adjusting the camera angle (optional)
The camera is preset to look straight down on the scan area. This should suit most applications. A tilted view towards one end of the scan area may be preferred where:
- the 130° field of view is not enough to capture large trailer bins in a single image unless the camera is tilted
- the LVS is set to scan in one direction only and tilting the camera towards oncoming trucks allows for better visibility of company logos and license plates for manual confirmation of truck ID
- it is desirable to include a nearby office, gate or such like in the recorded video.
The camera can be tilted to approximately 45° either way with an unobstructed view.
The camera must be operated with the bottom cover removed (as in diagram below) if a tilt is required. This increases the camera exposure to the weather which may result in the lens cover requiring cleaning occasionally.
To adjust the camera tilt angle:
- Remove the camera mounting bracket bottom cover (6 screws).
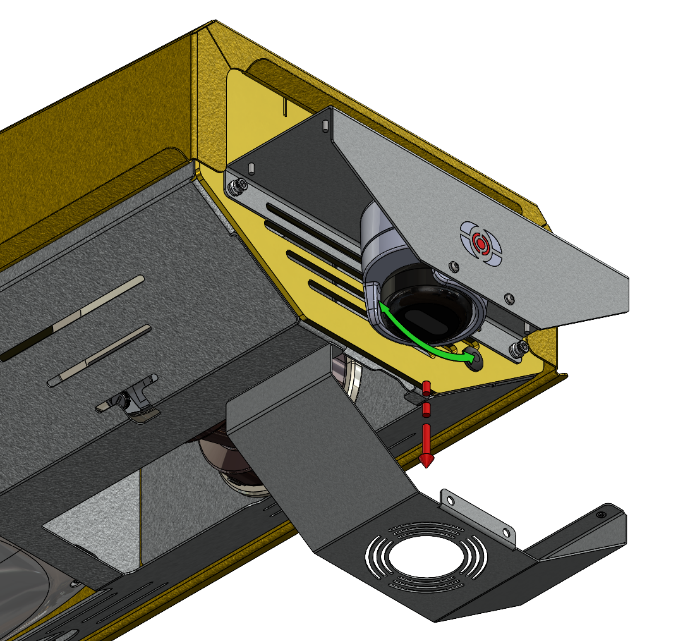
To adjust the camera tilt angle:
- Unclip the removeable white camera housing that surrounds the lens assembly by pulling firmly on it.
- Adjust the lens angle as desired with the gimbal arrangement provided. Refer to the Axis M31 series network camera installation guide if necessary:
https://www.axis.com/dam/public/43/fc/ea/axis-m311-lve-series–installation-guide-en-US-114644.pdf - Re-assemble the camera but leave the mounting bracket bottom cover off.
- Confirm the camera view with the live viewer built into the LVS operator interface as described in Checking/setting the camera view.
Lighting
The camera records in colour during daylight. In low light/night conditions the built-in IR illumination is automatically enabled and the image changes to black and white.
External lighting can be installed for colour recording in low natural light conditions.
Note that external lighting should be installed overhead (for example, mounted on the LVS mounting pole) to avoid casting shadows on the truck load, resulting in dark images.
Checking/setting the camera view
The LVS has a built-in viewer that can be used to:
- confirm that the camera is operational
- check the live view
- rotate the camera image by 180°.
To open the LoadVision live viewer:
- Open the System screen by pushing the SYSTEM button on the LVS operator console main screen (system password required).
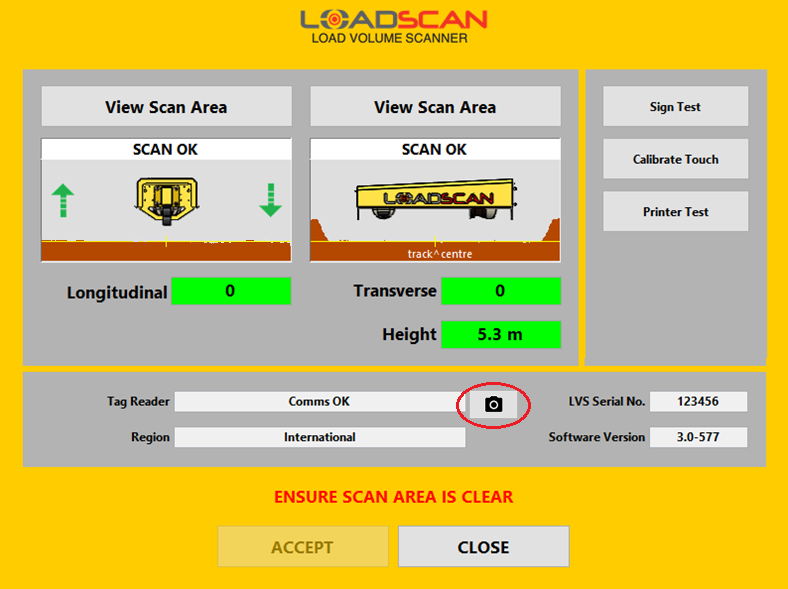
- Push the camera icon button (highlighted in image above) to open the LoadVision viewer.
- If LPR camera(s) are also installed, then select ‘LoadVision Camera’ when prompted to select a camera.
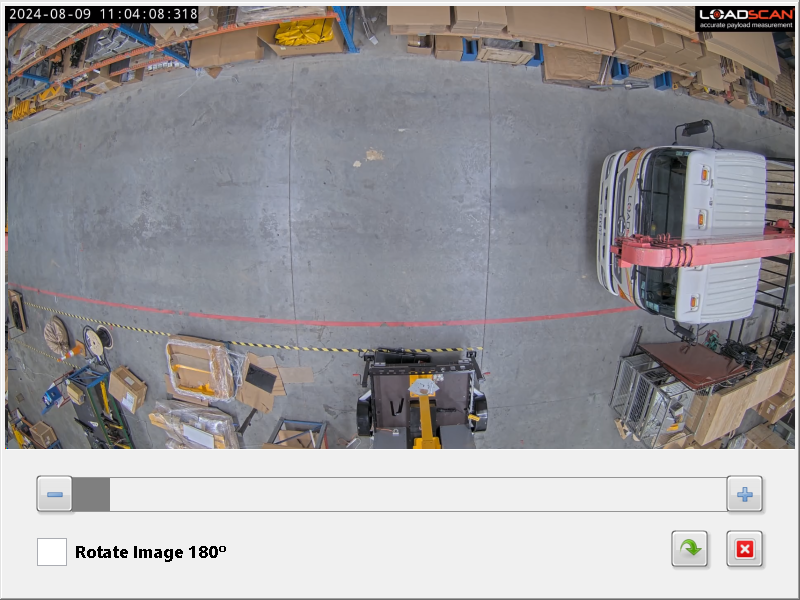
The live viewer opens with the camera image fitted to the display area. The image can be:
- zoomed in and out with the slider bar or [+] and [-] buttons below the image
- panned with scrollbars that appear when zoomed or by dragging the image
- reset to default view with the arrow button.
Optionally use the Rotate Image 180° button to rotate the image to match the scan direction with the left-to-right or right-to left travel direction in the image. This setting is applied to recorded and uploaded video.
Close the live viewer with the [X] button.
Viewing video clips and snapshot images in MyScanner
Video clips for each scan are automatically uploaded to MyScanner on completion of the scan. Snapshot images are then extracted from the video at half second intervals.
Measurement records generally appear in MyScanner a few seconds after the scan completes. It may take longer for video clips to upload and process. This depends on the speed of the internet connection to the LVS and the duration of the scan.
All scans with video and images available will show an image icon to the left of the corresponding measurement record in the MyScanner ‘Measurements’ page.
To open the LoadVision viewer in MyScanner:
- Open the Measurements page.
- Click on the image icon to the left of the measurement record for the scan of interest.
- On desktop/tablet the LoadVision viewer will open in split screen as in the screenshot below. On mobile, the viewer will open in a new page.
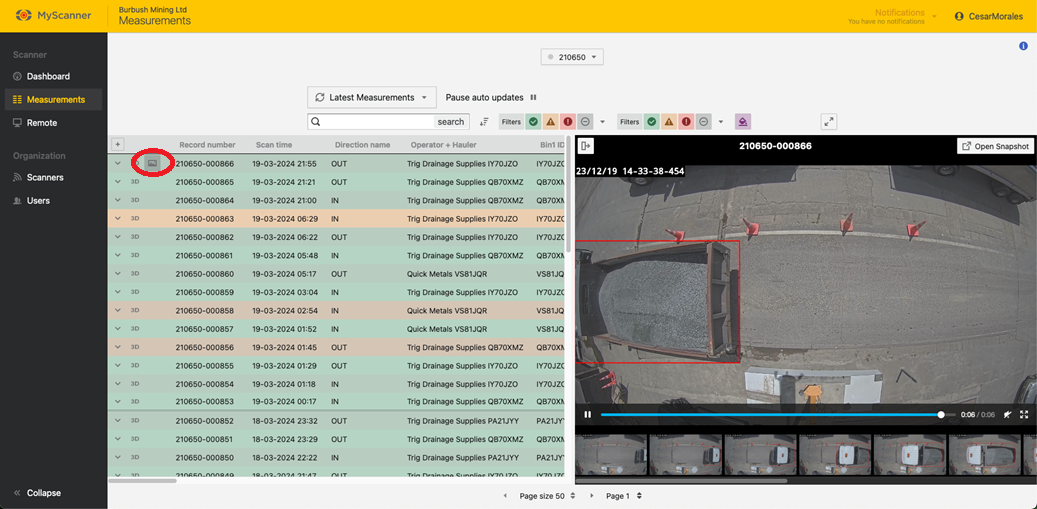
The viewer shows snapshot images below the video. Click on an image to open it.
Video clips start 5 seconds before the start of the scan and stop 3 seconds after the end of the scan, with a maximum duration of 150 seconds.
Once the viewer is open it is possible to jump to different scans by clicking on different image icons.
Refer to the MyScanner user guide for detailed instructions on using the LoadVision viewer to view and download video clips and snapshot images.
To access the MyScanner user guide:
- Click on the user icon/name at the top-right of the MyScanner page.
- Select the ‘Support’ option.
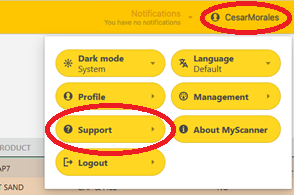
- Select MyScanner User Guide in the ‘Support Documents’ section of the support page.
Connecting to the camera from a web browser
A web browser on a device on the same local area network as the LVS can connect to the LoadVision camera web console for access to:
- live camera view
- recorded video.
This allows real-time monitoring and review of recorded events that were not measurement scans.
The camera web console is routed through the LVS operator interface console computer using port forwarding and is locked for viewing only.
To open the camera web console:
- Open a web browser on a device that is connected to the same wired or wireless local network as the LVS
- Type the following URL in the address bar:
http://X.X.X.X:8080
where X.X.X.X is the IP address of the LVS operator console.
To get the LVS operator console IP address:
- Open the Settings screen by pushing the SETTINGS button on the LVS operator console main screen (user password required).
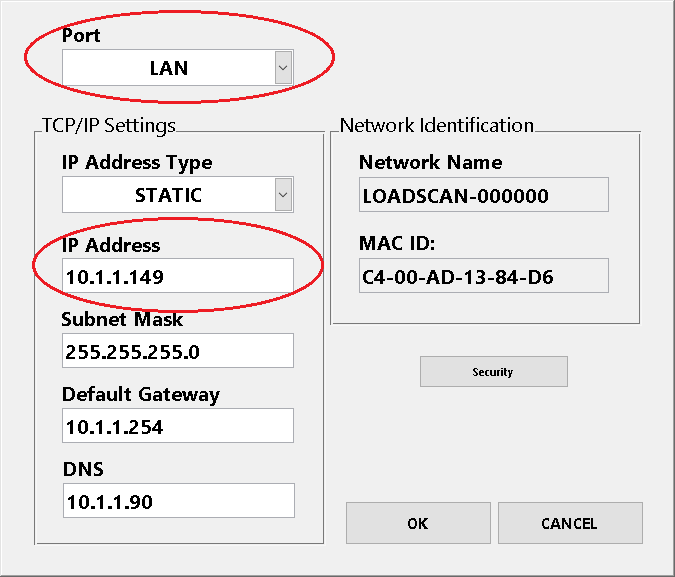
- Push the Network (LAN) button to open the Network Settings dialog.
- Record the value in IP Address (ensure Port is set to ‘LAN’).
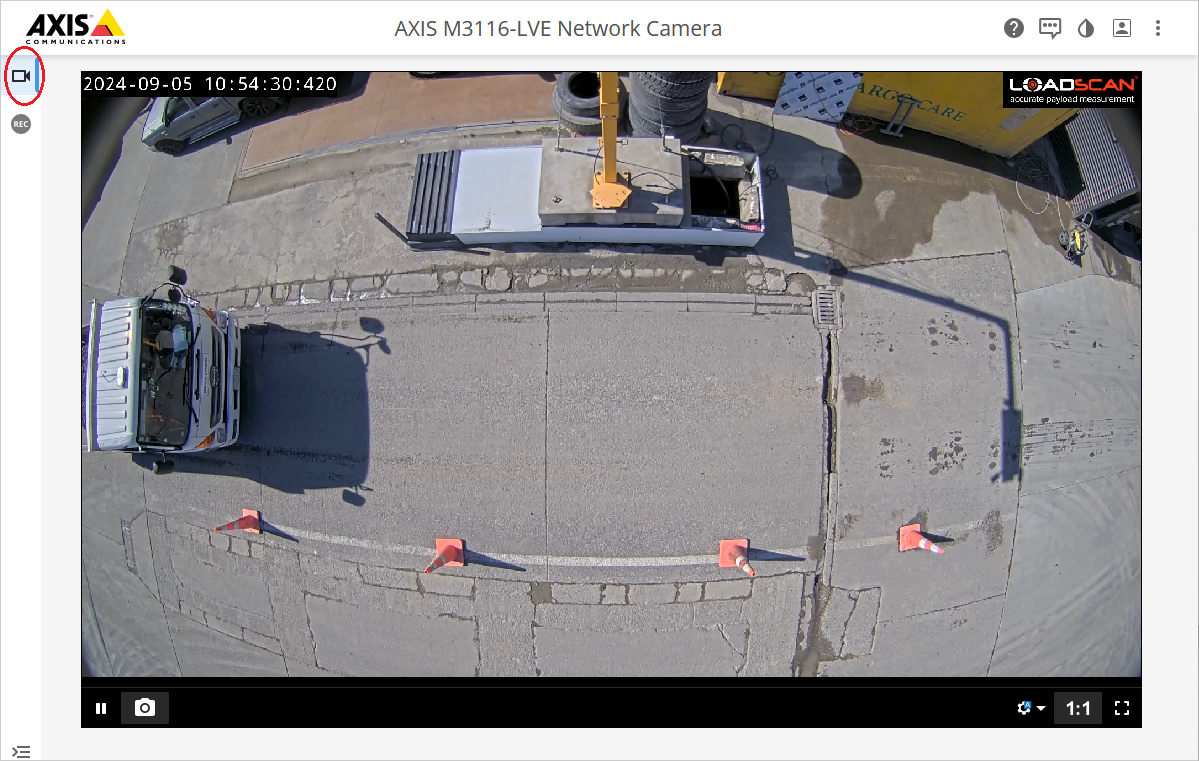
The camera web console has a very simple user interface.
Live view page:
Recordings page:
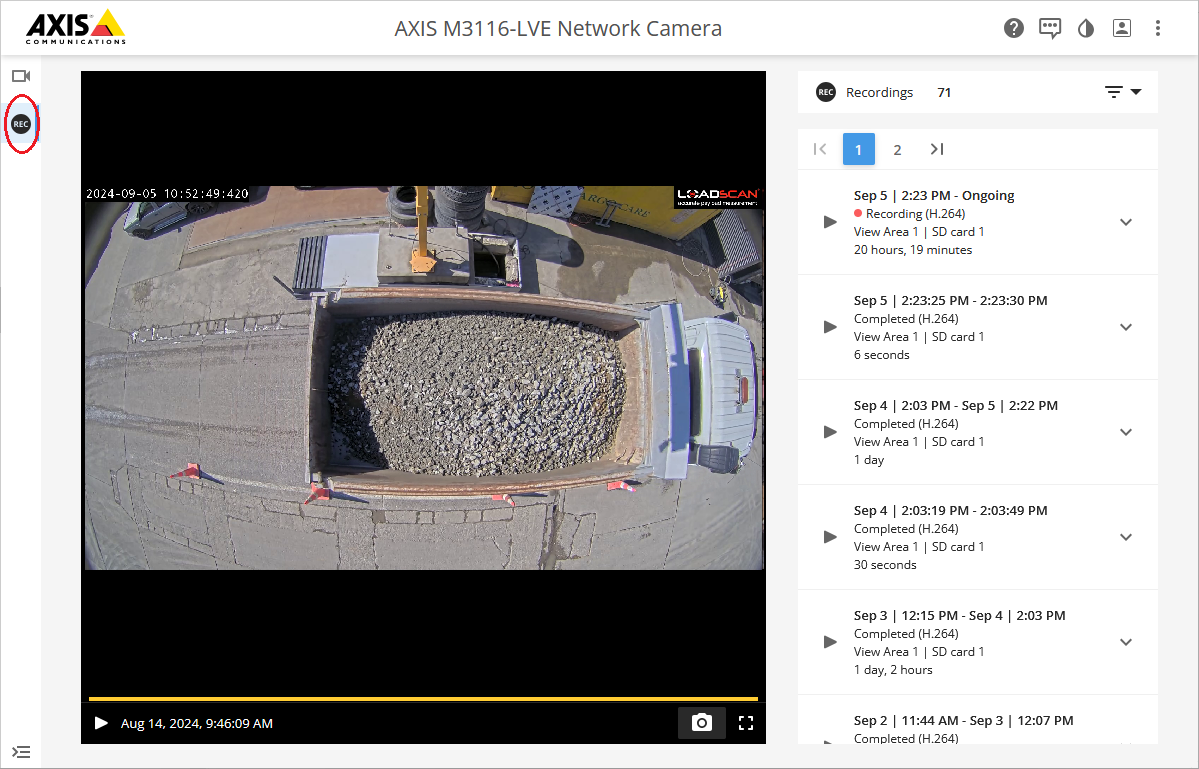
Both the live view and recordings pages allow snapshot images to be captured and saved.
Web browser access to live view and video recording is available even if video uploads to MyScanner are paused by disabling the Upload LoadVision videos option in the LVS MyScanner settings as described in Configuration.
In this Article
This document is supplementary to the Load Volume Scanner (LVS) operator manual and describes the features and usage of the LoadVision™ camera add-on option.
Instructions in this document assume familiarity with the LVS operator interface. Refer to the LVS operator manual for detailed LVS configuration and operation instructions.
Product Overview
The LoadVision camera is a fully integrated add-on option for LVS system. The camera is fitted to the LVS scan head and works with the MyScanner™ web service to enable users to view and download recorded video clips and snapshot images of scanned truck loads.
Features
The LoadVision camera and MyScanner web service together provide the following key features:
- view and download video clips or individual snapshot images for any scan available on the MyScanner web portal ‘Measurements’ page
- Full HD (1920 x 1080) resolution video and images
- video recording at 10 frames per second (fps)
- colour video recording in daylight
- black and white video recording at night (with built-in IR illumination)
- 130° horizontal field of view (along the scan track)
- 72° vertical field of view (across the scan track)
- 2 – 4 weeks of continuous video recording stored on-board the camera
- all uploaded scan videos and images available in MyScanner for a 3-month period
- web browser access to live view and recorded video (on local network only).
Uses
Uses for LoadVision include:
- load audits for quality control or dispute/discrepancy resolution
- identification/confirmation of load material/product type
- confirmation of vehicle ID
- cleanfill monitoring for unwanted contaminants/regulatory requirements
- error scan investigation
- security monitoring (live view and recorded video).
How it works
LoadVision uses an Axis M31 series wide-angle network camera that is configured with LoadVision specific settings and is fully integrated into the LVS software.
- The camera records continuously to an internal memory card.
- After every scan the LVS retrieves a video clip of the scan from the camera and uploads this to MyScanner.
- MyScanner extracts snapshot images from the uploaded video and links the video and images to the measurement record for the scan.
- MyScanner users can view and download videos and images in the MyScanner web portal user interface.
By default, uploaded scan videos:
- start 5 seconds before the target vehicle reaches the scan head (scan start)
- end 3 seconds after the vehicle clears the scan head (scan stop)
- are limited to a maximum duration of 150 seconds.
If necessary, Loadscan technical support can tune these settings.
The front view of a truck approaching the scan head before the scan starts can make manual confirmation of truck ID possible from company logos and licence plate numbers.
Installation and configuration
Hardware Installation
The LoadVision camera is fitted to the end of the LVS scan head to provide the best wide-angle overhead view.

The camera assembly can be fitted to your LVS at the Loadscan factory or retrofitted in the field if the system meets minimum requirements.
Hardware installation is outside the scope of this document. If the camera is supplied as a retrofit kit, then assembly and configuration instructions will be provided with the kit.
Configuration
The LoadVision camera is enabled in the LVS software as part of the camera installation process.
The following are required for the LVS to upload video to MyScanner:
- a high-speed internet connection to the LVS
- an active MyScanner account.
Contact your Loadscan representative if you do not yet have a MyScanner account for your organization.
To enable or disable video uploads to MyScanner:
- Open the Settings screen by pushing the SETTINGS button on the LVS operator console main screen (user password required).
- Open the MyScanner Settings dialog by pushing the MyScanner button in the System section of the Settings screen
- Enable or disable the Upload LoadVision videos option as required.
- Ensure that Upload measurement records is also enabled and that MyScanner status is ‘online’ when Upload LoadVision videos is enabled.

Adjusting the camera angle (optional)
The camera is preset to look straight down on the scan area. This should suit most applications. A tilted view towards one end of the scan area may be preferred where:
- the 130° field of view is not enough to capture large trailer bins in a single image unless the camera is tilted
- the LVS is set to scan in one direction only and tilting the camera towards oncoming trucks allows for better visibility of company logos and license plates for manual confirmation of truck ID
- it is desirable to include a nearby office, gate or such like in the recorded video.
The camera can be tilted to approximately 45° either way with an unobstructed view.
The camera must be operated with the bottom cover removed (as in diagram below) if a tilt is required. This increases the camera exposure to the weather which may result in the lens cover requiring cleaning occasionally.
To adjust the camera tilt angle:
- Remove the camera mounting bracket bottom cover (6 screws).

To adjust the camera tilt angle:
- Unclip the removeable white camera housing that surrounds the lens assembly by pulling firmly on it.
- Adjust the lens angle as desired with the gimbal arrangement provided. Refer to the Axis M31 series network camera installation guide if necessary:
https://www.axis.com/dam/public/43/fc/ea/axis-m311-lve-series–installation-guide-en-US-114644.pdf - Re-assemble the camera but leave the mounting bracket bottom cover off.
- Confirm the camera view with the live viewer built into the LVS operator interface as described in Checking/setting the camera view.
Lighting
The camera records in colour during daylight. In low light/night conditions the built-in IR illumination is automatically enabled and the image changes to black and white.
External lighting can be installed for colour recording in low natural light conditions.
Note that external lighting should be installed overhead (for example, mounted on the LVS mounting pole) to avoid casting shadows on the truck load, resulting in dark images.
Checking/setting the camera view
The LVS has a built-in viewer that can be used to:
- confirm that the camera is operational
- check the live view
- rotate the camera image by 180°.
To open the LoadVision live viewer:
- Open the System screen by pushing the SYSTEM button on the LVS operator console main screen (system password required).

- Push the camera icon button (highlighted in image above) to open the LoadVision viewer.
- If LPR camera(s) are also installed, then select ‘LoadVision Camera’ when prompted to select a camera.
The live viewer opens with the camera image fitted to the display area. The image can be:
- zoomed in and out with the slider bar or [+] and [-] buttons below the image
- panned with scrollbars that appear when zoomed or by dragging the image
- reset to default view with the arrow button.
Optionally use the Rotate Image 180° button to rotate the image to match the scan direction with the left-to-right or right-to left travel direction in the image. This setting is applied to recorded and uploaded video.
Close the live viewer with the [X] button.

Viewing video clips and snapshot images in MyScanner
Video clips for each scan are automatically uploaded to MyScanner on completion of the scan. Snapshot images are then extracted from the video at half second intervals.
Measurement records generally appear in MyScanner a few seconds after the scan completes. It may take longer for video clips to upload and process. This depends on the speed of the internet connection to the LVS and the duration of the scan.
All scans with video and images available will show an image icon to the left of the corresponding measurement record in the MyScanner ‘Measurements’ page.
To open the LoadVision viewer in MyScanner:
- Open the Measurements page.
- Click on the image icon to the left of the measurement record for the scan of interest.
- On desktop/tablet the LoadVision viewer will open in split screen as in the screenshot below. On mobile, the viewer will open in a new page.

The viewer shows snapshot images below the video. Click on an image to open it.
Video clips start 5 seconds before the start of the scan and stop 3 seconds after the end of the scan, with a maximum duration of 150 seconds.
Once the viewer is open it is possible to jump to different scans by clicking on different image icons.
Refer to the MyScanner user guide for detailed instructions on using the LoadVision viewer to view and download video clips and snapshot images.
To access the MyScanner user guide:
- Click on the user icon/name at the top-right of the MyScanner page.
- Select the ‘Support’ option.

- Select MyScanner User Guide in the ‘Support Documents’ section of the support page.
Connecting to the camera from a web browser
A web browser on a device on the same local area network as the LVS can connect to the LoadVision camera web console for access to:
- live camera view
- recorded video.
This allows real-time monitoring and review of recorded events that were not measurement scans.
The camera web console is routed through the LVS operator interface console computer using port forwarding and is locked for viewing only.
To open the camera web console:
- Open a web browser on a device that is connected to the same wired or wireless local network as the LVS
- Type the following URL in the address bar:
http://X.X.X.X:8080
where X.X.X.X is the IP address of the LVS operator console.
To get the LVS operator console IP address:
- Open the Settings screen by pushing the SETTINGS button on the LVS operator console main screen (user password required).
- Push the Network (LAN) button to open the Network Settings dialog.
- Record the value in IP Address (ensure Port is set to ‘LAN’).

The camera web console has a very simple user interface.
Live view page:

Recordings page:

Both the live view and recordings pages allow snapshot images to be captured and saved.
Web browser access to live view and video recording is available even if video uploads to MyScanner are paused by disabling the Upload LoadVision videos option in the LVS MyScanner settings as described in Configuration.
