Introduction
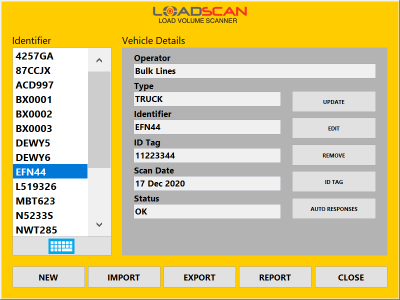
The Vehicle Database screen displays details of any vehicle recorded in the database. (Select the vehicle ID from the Identifier list.)
The screen (figure 10) is accessed from the DATABASE button on the Main screen.
It is password protected by default. The password requirement can be disabled. (See Password settings.)

Figure 10 – operator console Vehicle Database screen
| Button | Function |
|---|---|
| Open the standard ID prompt for faster ID selection. | |
| NEW | Scan a new vehicle into the database. (See Scan a new vehicle into the database.) |
| CLOSE | Return to the Main screen. |
Updating reference scans
Reference scans expire after 6-12 months (depending on regional/legal settings).
An ‘EXPIRED’ status for a reference scan indicates it is due for update.
Load records computed from expired reference scans will be marked with ‘REFERENCE SCAN EXPIRED’.
If any structural changes affecting a bin are made, or a cover/tarpaulin is added or removed, the reference scan for the affected bin must be updated immediately.
How to update a reference scan
- Select a vehicle record on the Vehicle Database screen.
- Press the Update button. (This is not available if the system is not ready to scan.)The New Vehicle dialog will appear showing the vehicle details. If a truck was selected and was originally scanned with a trailer as a 2-bin combination, the trailer details will also display. If a trailer is selected and was originally scanned with a truck, truck details will display.
- Check the details are correct and scan as for a new vehicle. (See Scan a new vehicle into the database.)Any ID tags detected during the update scan will be registered to the updated reference scan record(s), replacing any previous ID tag registration.
Manual ID tag registration
Manually register or replace an ID tag for a vehicle in the database
- Select the vehicle ID on the Identifier list.
- Press the ID Tag button.
- If the vehicle is a trailer (second bin), a prompt will display with options to:
- read an ID tag; or
- select a permanent partner truck. (See Link truck and trailer as a permanent pair.)
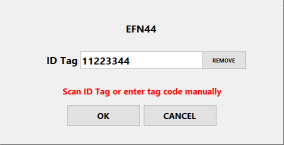
- Select the ID Tag option to open the ID Tag Registration dialog (figure 11).
- If the tag is already fitted to the vehicle, drive the vehicle below the scan head until the tag code appears on the screen and the message board. If the tag is not fitted, hold the tag as high as possible under the centre of the scan head (flat face up) until the code displays.
- Select OK to register the tag.
- Fit the tag to the vehicle/bin as described in Automatic vehicle identification.

Figure 11 – operator console ID Tag Registration dialog
Remove a tag code
To remove a tag code for a vehicle that no longer requires automatic identification, use the Remove button on the ID Tag Registration dialog.
Enter a tag code manually
To enter a tag code manually, if this is known, but the tag is not physically present, click in the ID Tag field on the ID Tag Registration dialog to open the on-screen keypad.
Editing vehicle details
Use this function to change the Operator or ID recorded for a vehicle.
- Select the vehicle ID on the Database screen.
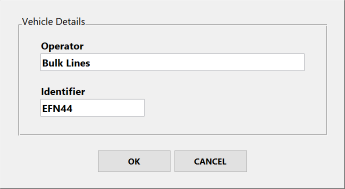
- Click the Edit button to open the Edit Vehicle Record dialog (figure 12).
- Click in the text boxes to open the on-screen keypad for text editing.

Figure 12 – operator console Edit Vehicle Record dialog
Setting auto responses for a selected vehicle
Pre-set load details can be defined as auto responses for the currently selected vehicle in the Auto-Responses dialog. (See Automatic responses to load detail prompts.)
Vehicle database reports
A summary report of all vehicles in the database is available for printing to the ticket printer or export to USB Flash drive in spreadsheet-compatible CSV text file format. It is also possible to print full details of the currently selected vehicle to the ticket printer.
- Press the REPORT button.
- A prompt will display with options for a summary list or details of the selected vehicle.
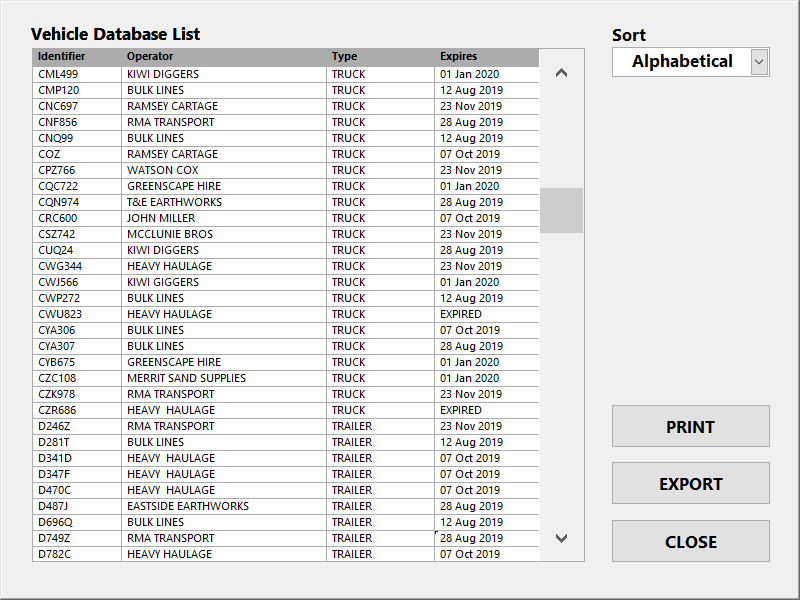
Option Result SELECTED Print a report for the currently selected database record. SUMMARY Open the Vehicle Database Report dialog (figure 13) for printing or exporting a full summary list of all database records. Figure 13 – operator console Vehicle Database Report dialog
Use the Sort selector to sort the list alphabetically by vehicle ID or by date of expiry, with the closest to expiry at the top of the list.
Push the Print button to print the list.
Due to the limited printer paper width:
- Identifier, Operator and Type fields are printed when the list is sorted alphabetically
- Identifier, Operator and Expires fields are printed when the list is sorted by expiry date.
Insert a USB Flash drive into the operator console USB port and push Export to export to CSV file.
Exporting the vehicle database
The entire vehicle database can be exported to a USB Flash drive as a single archive file:
- for backup purposes
- to transfer to another LVS.
How to export the database
- Insert a blank Flash drive into the operator console USB port.
- Press the EXPORT button.
- Enter the ‘system’ password when prompted.
- Follow the on-screen instructions.
- Do not remove the USB drive before the ‘Please Wait’ message disappears.
- Copy the file to computer or other storage media, as required.
The vehicle database can also be backed-up via the MyScanner™ web service. (See MyScanner web service settings.)
Back-up the vehicle database regularly so it can be restored if lost (for example, due to hardware failure, theft or damage) without needing to re-scan all vehicles.
Importing a vehicle database
A previously backed-up vehicle database archive file can be imported to:
- restore a database
- transfer a database from another LVS.
How to import a database
- Insert a USB Flash drive containing a previously created database archive file.
- Click the IMPORT button.
- Enter the ‘system’ password when prompted.
- Follow the on-screen instructions.
When import is complete, imported vehicles will appear on the Identifier list.
Vehicle records from the archive file will be imported if they are:
- not already in the vehicle database
- newer than existing records.
The vehicle database can also be restored:
- via the MyScanner™ web service. (See MyScanner web service settings.)
Removing a vehicle from the database
- Select the vehicle on the Database screen.
- Push the Remove button.
- Select YES when the confirmation dialog appears.
Trucks and trailers originally scanned together as a 2-bin combination need to be removed separately.
In this Article
Introduction
The Vehicle Database screen displays details of any vehicle recorded in the database. (Select the vehicle ID from the Identifier list.)
The screen (figure 10) is accessed from the DATABASE button on the Main screen.
It is password protected by default. The password requirement can be disabled. (See Password settings.)

Figure 10 – operator console Vehicle Database screen
| Button | Function |
|---|---|
| Open the standard ID prompt for faster ID selection. | |
| NEW | Scan a new vehicle into the database. (See Scan a new vehicle into the database.) |
| CLOSE | Return to the Main screen. |
Updating reference scans
Reference scans expire after 6-12 months (depending on regional/legal settings).
An ‘EXPIRED’ status for a reference scan indicates it is due for update.
Load records computed from expired reference scans will be marked with ‘REFERENCE SCAN EXPIRED’.
If any structural changes affecting a bin are made, or a cover/tarpaulin is added or removed, the reference scan for the affected bin must be updated immediately.
How to update a reference scan
- Select a vehicle record on the Vehicle Database screen.
- Press the Update button. (This is not available if the system is not ready to scan.)The New Vehicle dialog will appear showing the vehicle details. If a truck was selected and was originally scanned with a trailer as a 2-bin combination, the trailer details will also display. If a trailer is selected and was originally scanned with a truck, truck details will display.
- Check the details are correct and scan as for a new vehicle. (See Scan a new vehicle into the database.)Any ID tags detected during the update scan will be registered to the updated reference scan record(s), replacing any previous ID tag registration.
Manual ID tag registration
Manually register or replace an ID tag for a vehicle in the database
- Select the vehicle ID on the Identifier list.
- Press the ID Tag button.
- If the vehicle is a trailer (second bin), a prompt will display with options to:
- read an ID tag; or
- select a permanent partner truck. (See Link truck and trailer as a permanent pair.)
- Select the ID Tag option to open the ID Tag Registration dialog (figure 11).
- If the tag is already fitted to the vehicle, drive the vehicle below the scan head until the tag code appears on the screen and the message board. If the tag is not fitted, hold the tag as high as possible under the centre of the scan head (flat face up) until the code displays.
- Select OK to register the tag.
- Fit the tag to the vehicle/bin as described in Automatic vehicle identification.

Figure 11 – operator console ID Tag Registration dialog
Remove a tag code
To remove a tag code for a vehicle that no longer requires automatic identification, use the Remove button on the ID Tag Registration dialog.
Enter a tag code manually
To enter a tag code manually, if this is known, but the tag is not physically present, click in the ID Tag field on the ID Tag Registration dialog to open the on-screen keypad.
Editing vehicle details
Use this function to change the Operator or ID recorded for a vehicle.
- Select the vehicle ID on the Database screen.
- Click the Edit button to open the Edit Vehicle Record dialog (figure 12).
- Click in the text boxes to open the on-screen keypad for text editing.

Figure 12 – operator console Edit Vehicle Record dialog
Setting auto responses for a selected vehicle
Pre-set load details can be defined as auto responses for the currently selected vehicle in the Auto-Responses dialog. (See Automatic responses to load detail prompts.)
Vehicle database reports
A summary report of all vehicles in the database is available for printing to the ticket printer or export to USB Flash drive in spreadsheet-compatible CSV text file format. It is also possible to print full details of the currently selected vehicle to the ticket printer.
- Press the REPORT button.
- A prompt will display with options for a summary list or details of the selected vehicle.
Option Result SELECTED Print a report for the currently selected database record. SUMMARY Open the Vehicle Database Report dialog (figure 13) for printing or exporting a full summary list of all database records. Figure 13 – operator console Vehicle Database Report dialog
Use the Sort selector to sort the list alphabetically by vehicle ID or by date of expiry, with the closest to expiry at the top of the list.
Push the Print button to print the list.
Due to the limited printer paper width:
- Identifier, Operator and Type fields are printed when the list is sorted alphabetically
- Identifier, Operator and Expires fields are printed when the list is sorted by expiry date.
Insert a USB Flash drive into the operator console USB port and push Export to export to CSV file.
Exporting the vehicle database
The entire vehicle database can be exported to a USB Flash drive as a single archive file:
- for backup purposes
- to transfer to another LVS.
How to export the database
- Insert a blank Flash drive into the operator console USB port.
- Press the EXPORT button.
- Enter the ‘system’ password when prompted.
- Follow the on-screen instructions.
- Do not remove the USB drive before the ‘Please Wait’ message disappears.
- Copy the file to computer or other storage media, as required.
The vehicle database can also be backed-up via the MyScanner™ web service. (See MyScanner web service settings.)
Back-up the vehicle database regularly so it can be restored if lost (for example, due to hardware failure, theft or damage) without needing to re-scan all vehicles.
Importing a vehicle database
A previously backed-up vehicle database archive file can be imported to:
- restore a database
- transfer a database from another LVS.
How to import a database
- Insert a USB Flash drive containing a previously created database archive file.
- Click the IMPORT button.
- Enter the ‘system’ password when prompted.
- Follow the on-screen instructions.
When import is complete, imported vehicles will appear on the Identifier list.
Vehicle records from the archive file will be imported if they are:
- not already in the vehicle database
- newer than existing records.
The vehicle database can also be restored:
- via the MyScanner™ web service. (See MyScanner web service settings.)
Removing a vehicle from the database
- Select the vehicle on the Database screen.
- Push the Remove button.
- Select YES when the confirmation dialog appears.
Trucks and trailers originally scanned together as a 2-bin combination need to be removed separately.
